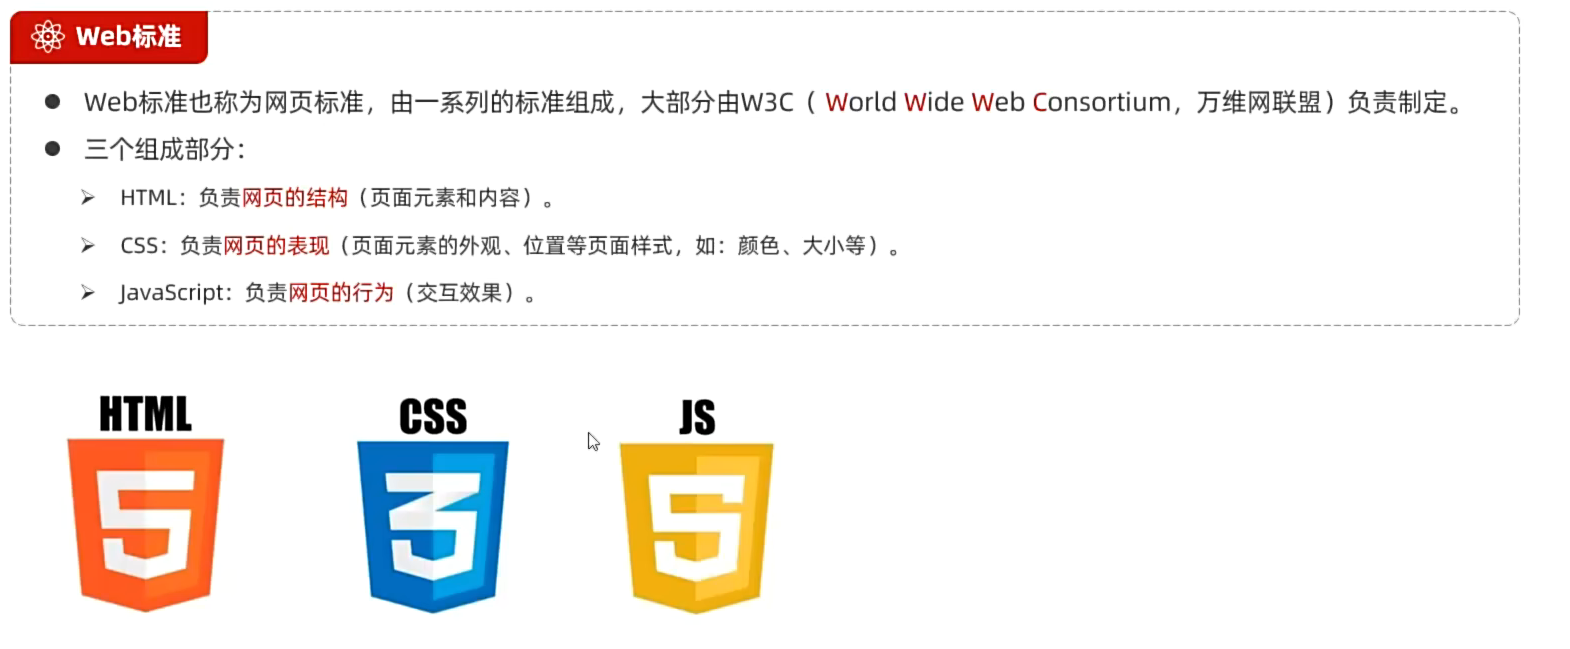
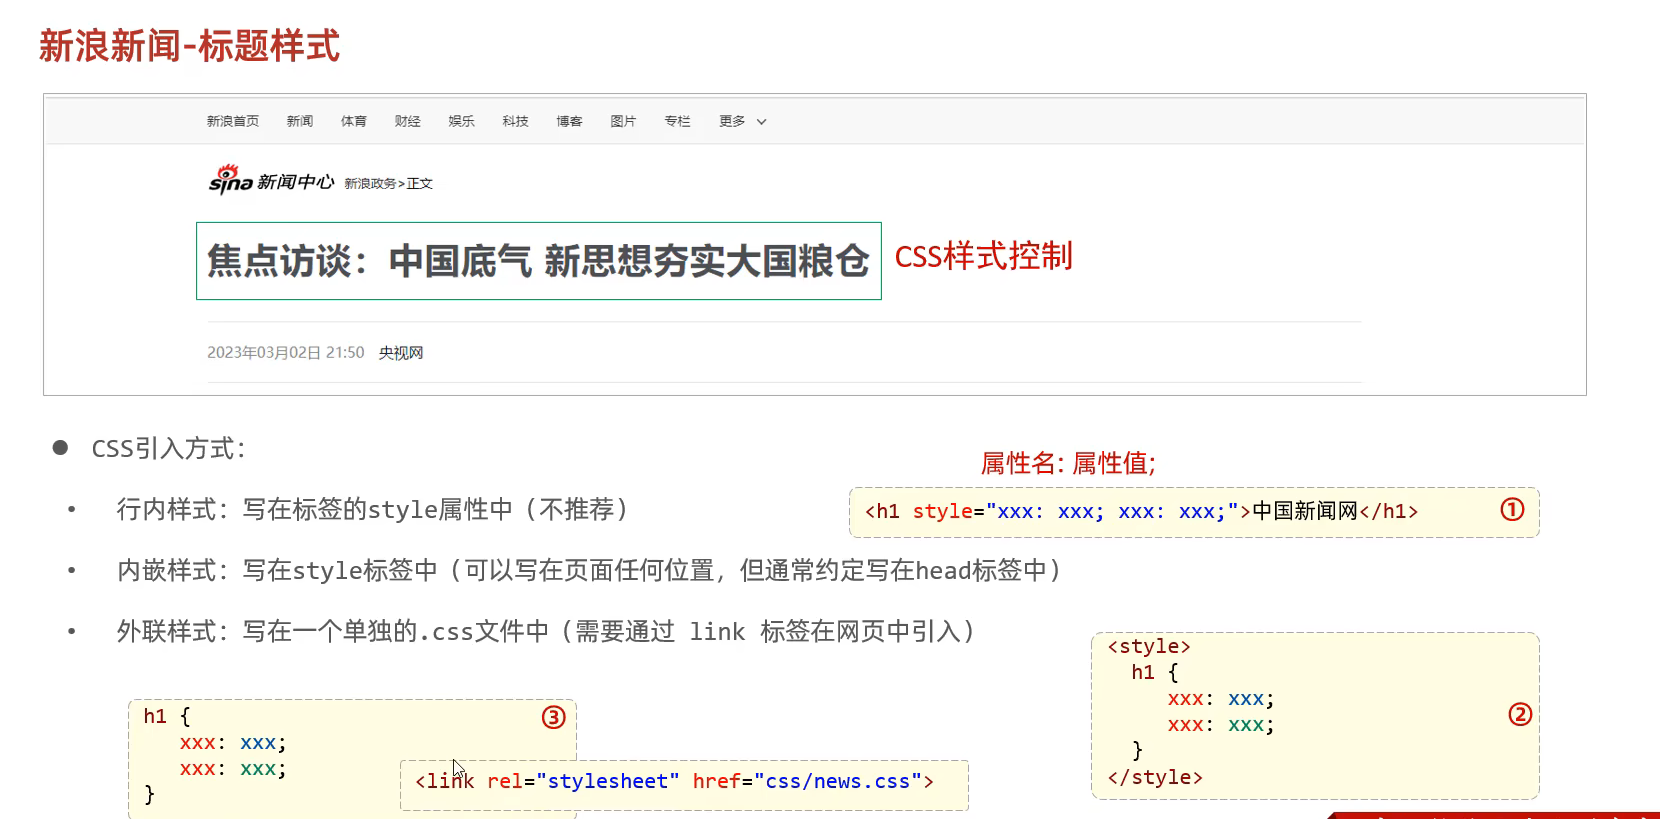
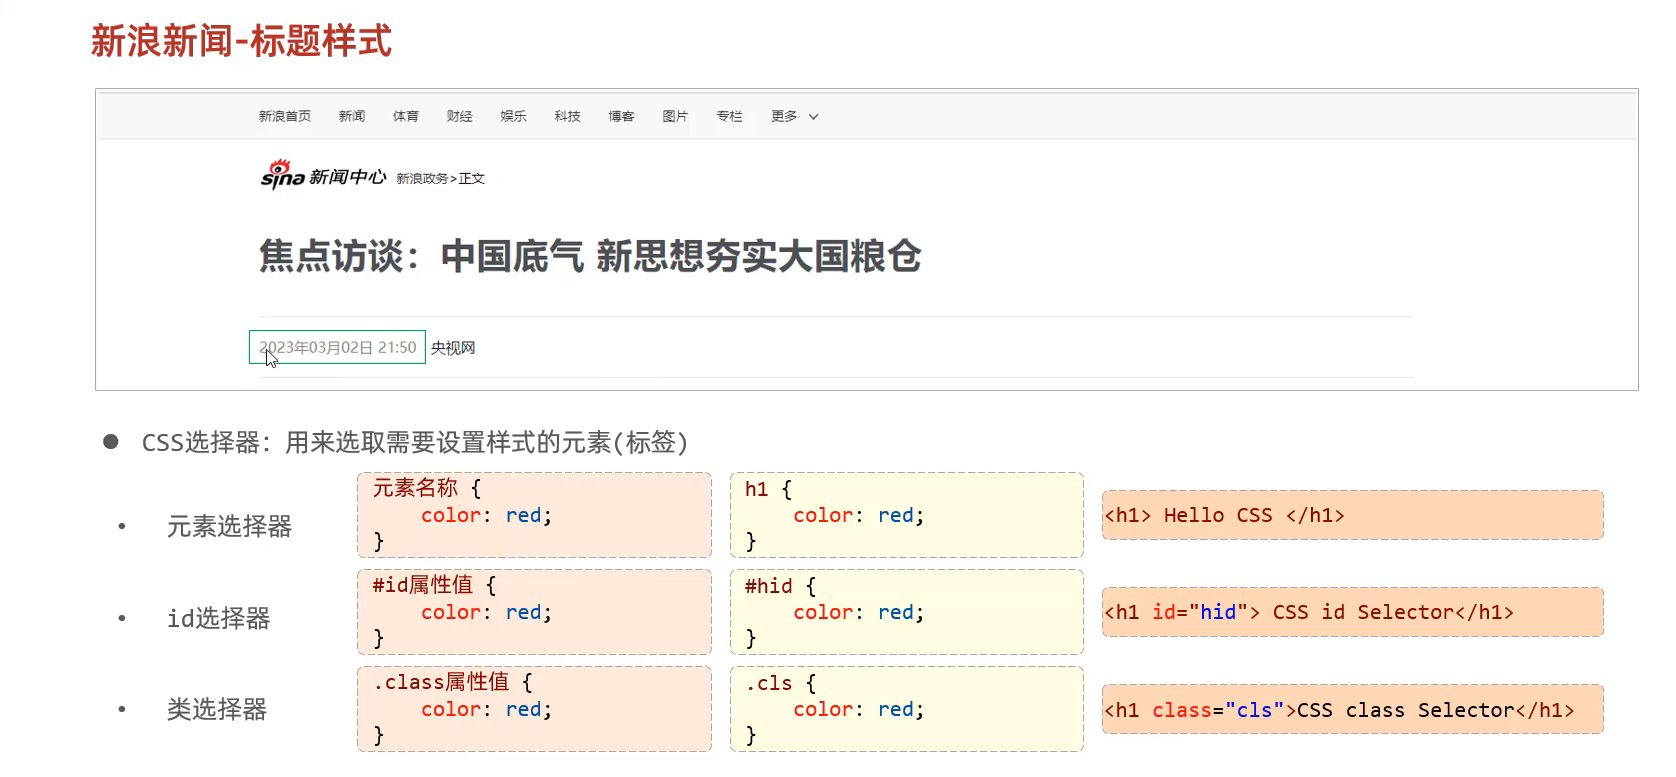
JavaWeb笔记 0.web标准
1
2
[w3school 在线教程](https://www.w3school.com.cn/) 这里面可以找到HTML/CSS/JS的所有语法
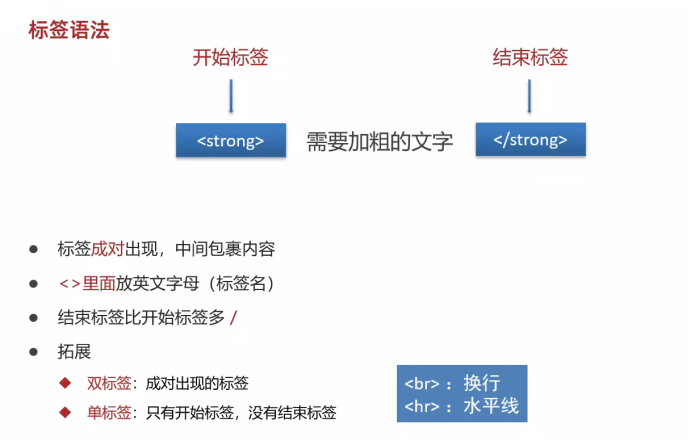
1.标签语法
*加粗语法*
1 2 3 <strong > 我是帅哥</strong > <br > 换行<hr > 水平线
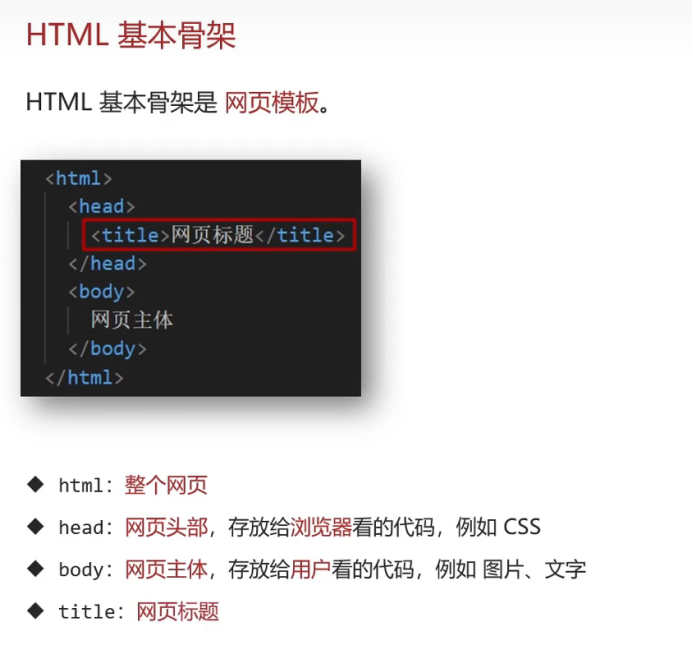
2.HTML基本骨架(快速生成方法: !加Enter键或者Tab键)
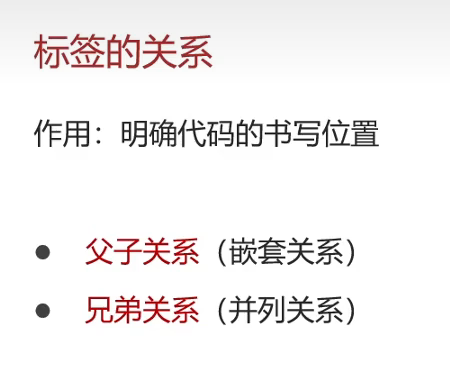
3.标签的关系
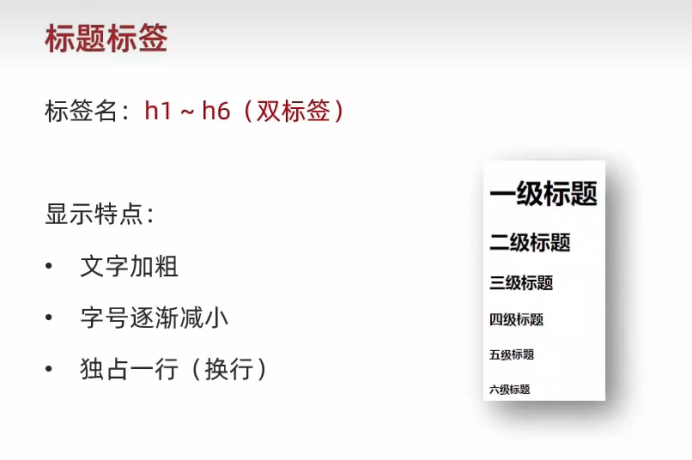
4.注释 5.标签标题
1 2 3 <h1 > 一级标题</h1 > <h2 > 二级标签</h2 >
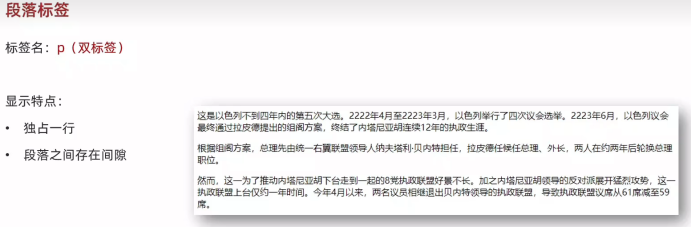
7.段落标签
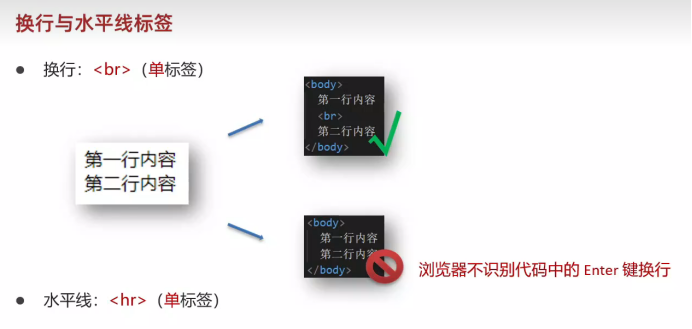
8.换行与水平线标签
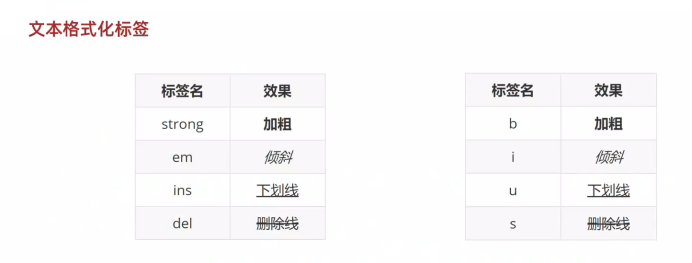
9.文本格式化标签
1 <del > <strong > 这是加粗的 </strong > </del >
可以复合使用
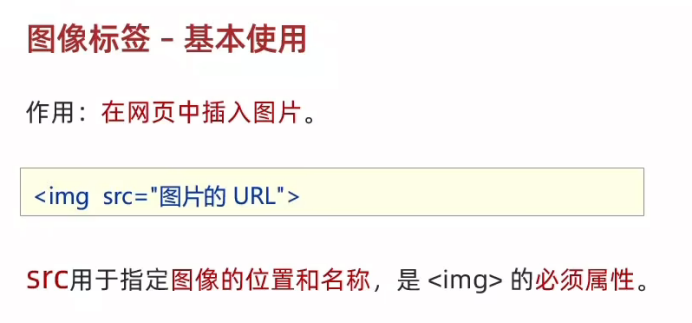
10.图片(图形)标签
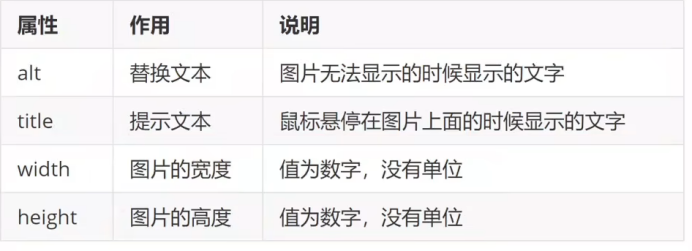
11.图片属性(alt title)
1 <img src ="./图片.jpg" alt ="这是一个图片" title ="这是图片" width ="1000" height ="1000" >
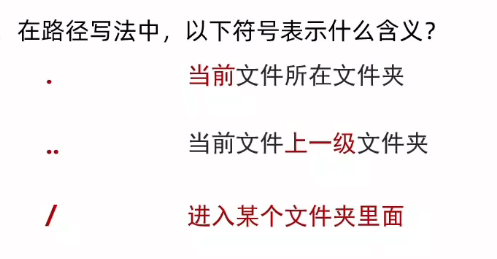
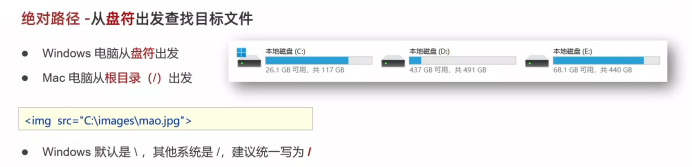
12.相对路径和绝对路径和网络路径 (不仅可以从本地路径 也可以从在线网址找)
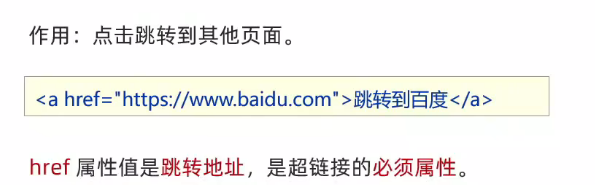
13.超链接a href(不仅可以跳转网址 也可以跳转本地文件)
1 <a href ="https://www.baidu.com/?tn=68018901_2_oem_dg" > 跳转到百度</a >
效果如下
1 <a href ="./图片.jpg" > 跳转到图片</a >
实现在新窗口进行跳转
1 <a href ="https://www.baidu.com" target ="_blank" > 跳转到百度</a >
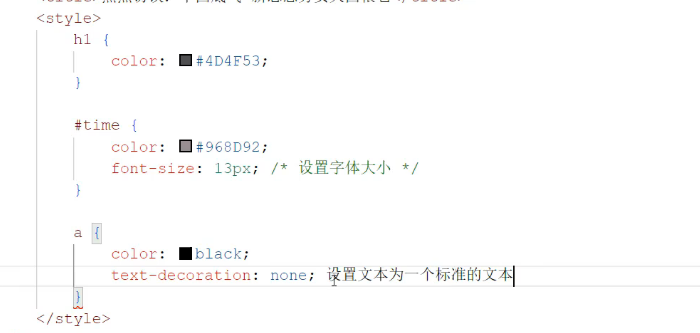
可以设置超链接的样式
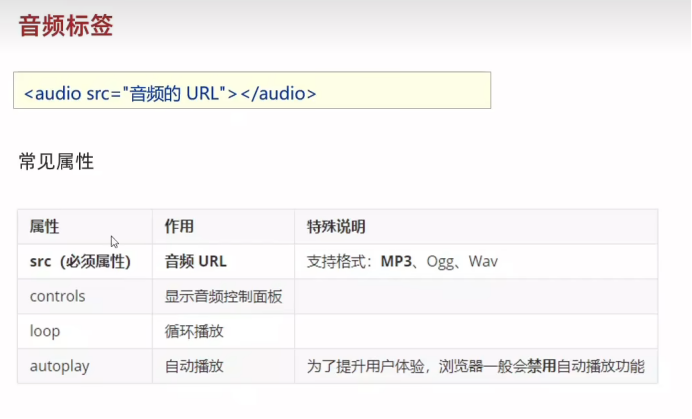
14.音频标签(audio)
1 <audio src ="./bgm.mp3" controls loop autoplay > </audio >
15.css嵌入html语句 从而修改样式
1
2
3
4
5
6
7
8
9
10
11
12
13
14
15
16
17
18
19
20
<!DOCTYPE html > <html lang ="en" > <head > <meta charset ="UTF-8" > <meta name ="viewport" content ="width=device-width, initial-scale=1.0" > <title > Document</title > <style > h1 { color :red } </style > <link rel ="stylesheet" href ="./css文件" > </head > <body > <h1 style ="color:red" > 这是一级标题</h1 > <del > 我很高兴</del > <br > <del > <strong > 这是加粗的</strong > </del > </body > </html >
16.无语义标签 17.设置样式(元素选择器 id选择器 类选择器)
18.视频标签 1 <video src ="video/1.mp4" controls ="controls" > </video >
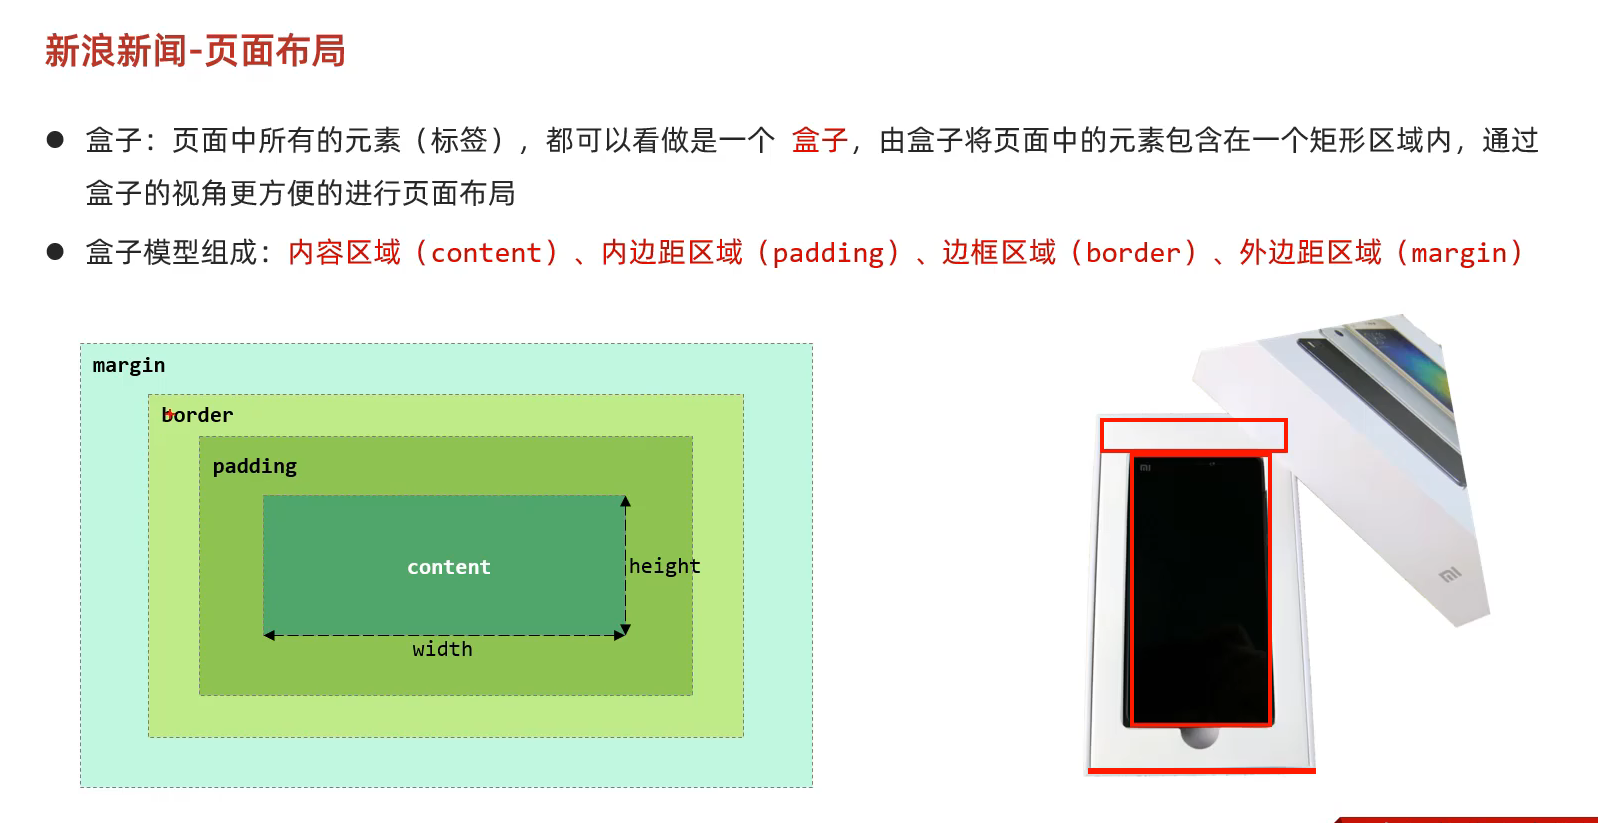
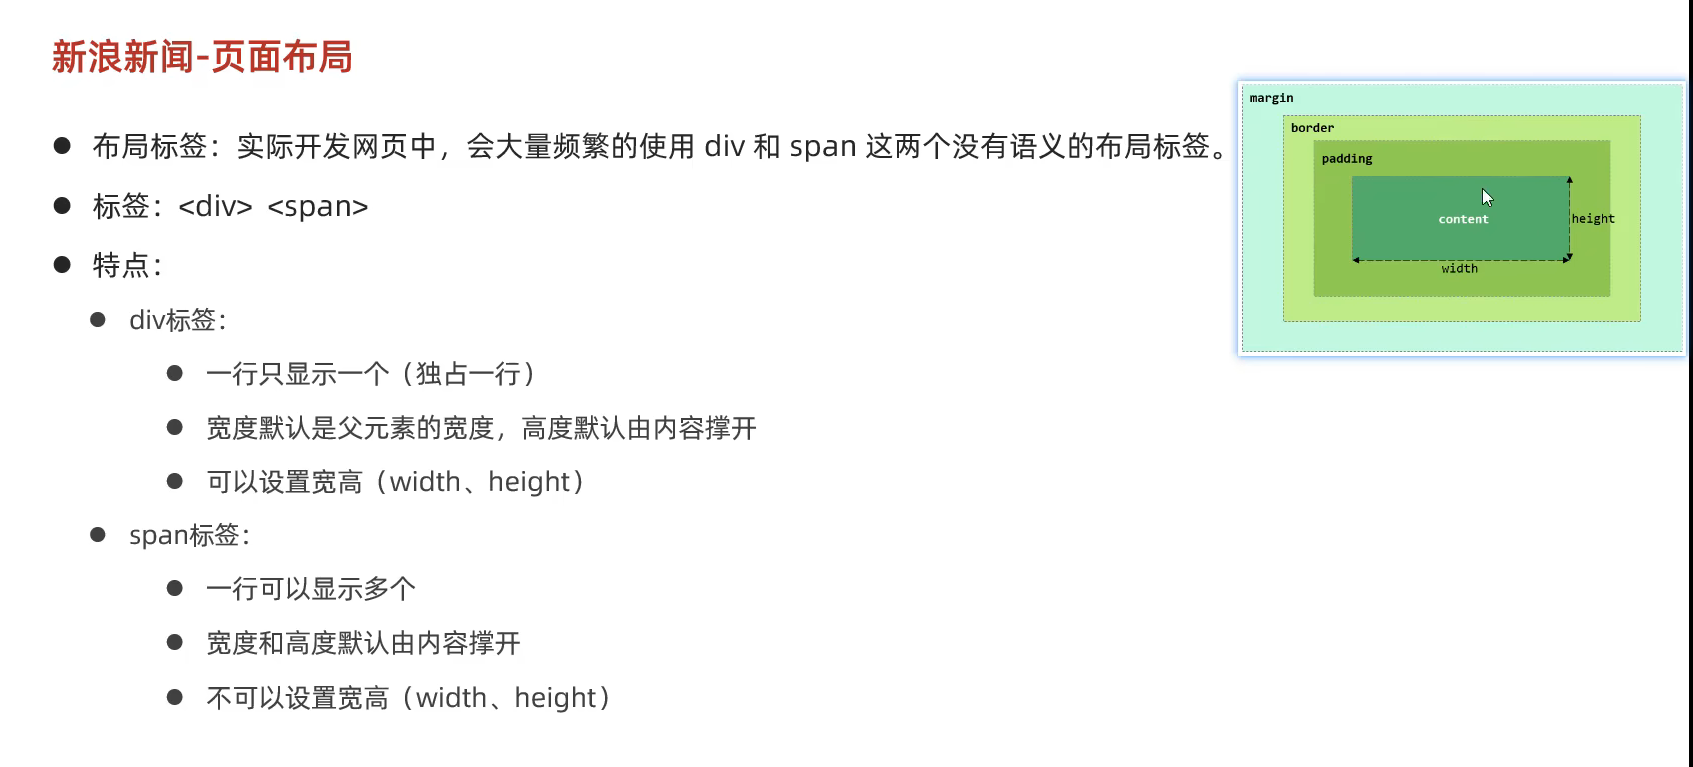
19.css页面布局
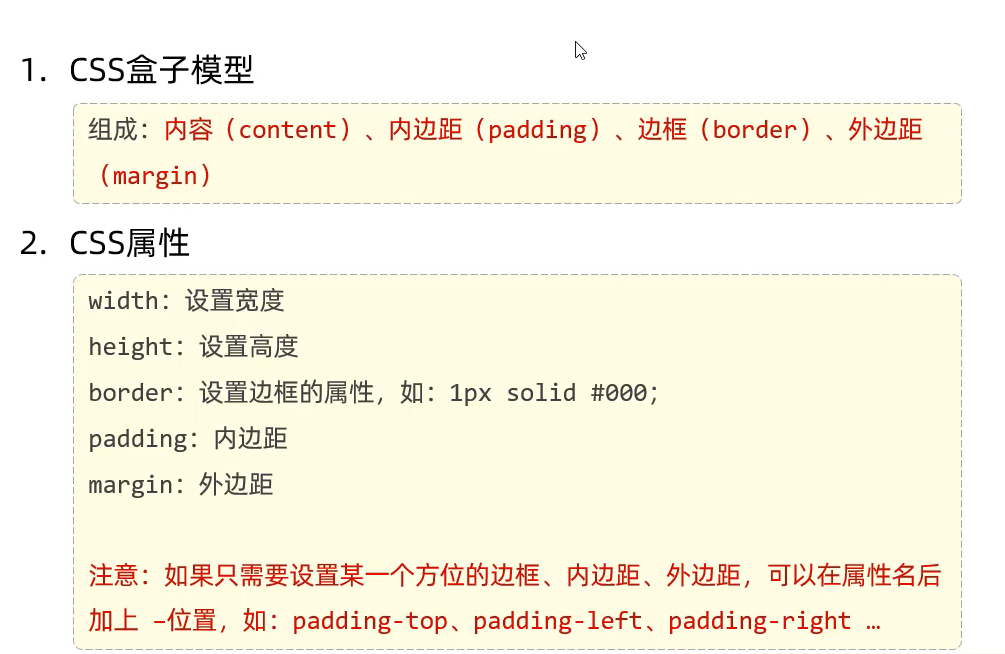
20.css的盒子模型
1
2
3
4
5
6
7
8
9
10
11
12
13
14
15
16
17
18
19
20
21
22
23
24
<!DOCTYPE html > <html lang ="en" > <head > <meta charset ="UTF-8" > <meta name ="viewport" content ="width=device-width, initial-scale=1.0" > <style > div { width : 200px ; height : 200px ; box-sizing : border-box; background-color : aquamarine; padding : 20px ; border : 10px solid red; margin : 30px 30px 30px 30px ; } </style > </head > <body > <div > 今天是个好日子 哈哈哈哈哈哈哈 啦啦啦啦啦啦 </div > </body > </html >
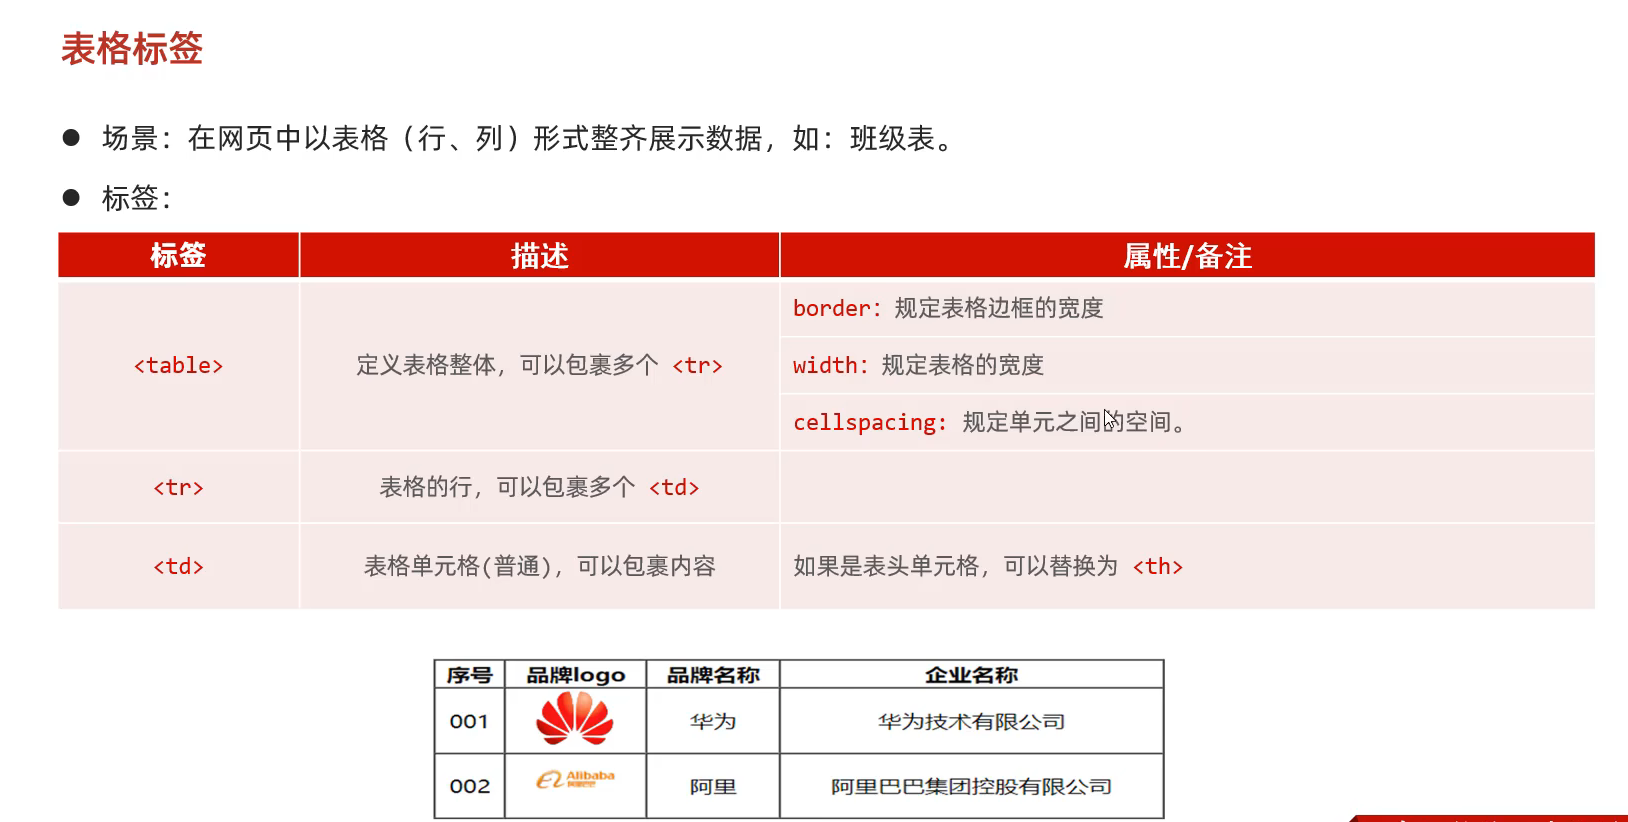
21.表格标签
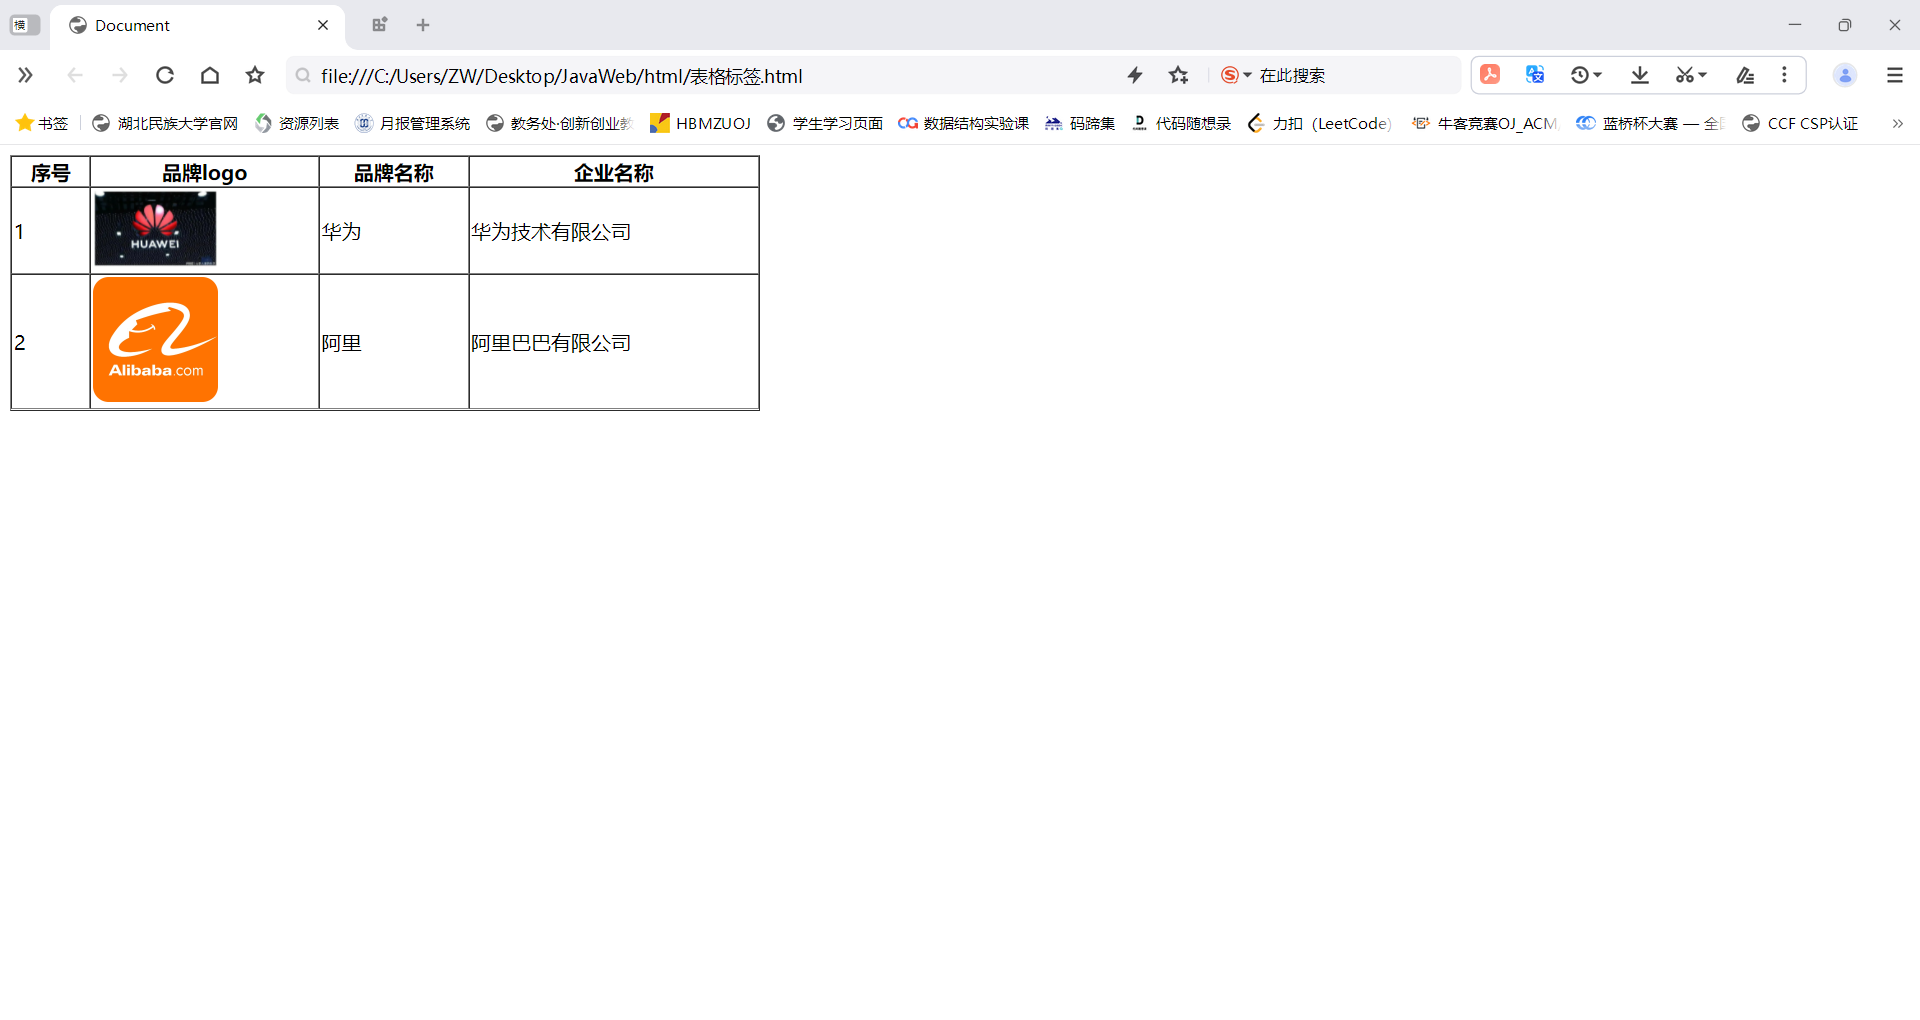
1
2
3
4
5
6
7
8
9
10
11
12
13
14
15
16
17
18
19
20
21
22
23
24
25
26
27
28
29
30
31
<!DOCTYPE html > <html lang ="en" > <head > <meta charset ="UTF-8" > <meta name ="viewport" content ="width=device-width, initial-scale=1.0" > <title > Document</title > </head > <body > <table border ="1px" cellspacing ="0" width ="600px" > <tr > <th > 序号</th > <th > 品牌logo</th > <th > 品牌名称</th > <th > 企业名称</th > </tr > <tr > <td > 1</td > <td > <img src ="https://img2.baidu.com/it/u=2950888892,3212136858&fm=253&fmt=auto&app=120&f=JPEG?w=608&h=375" width ="100px" > </td > <td > 华为</td > <td > 华为技术有限公司</td > </tr > <tr > <td > 2</td > <td > <img src ="https://img0.baidu.com/it/u=2101785888,821758088&fm=253&fmt=auto&app=120&f=PNG?w=500&h=500" width ="100px" > </td > <td > 阿里</td > <td > 阿里巴巴有限公司</td > </tr > </table > </body > </html >
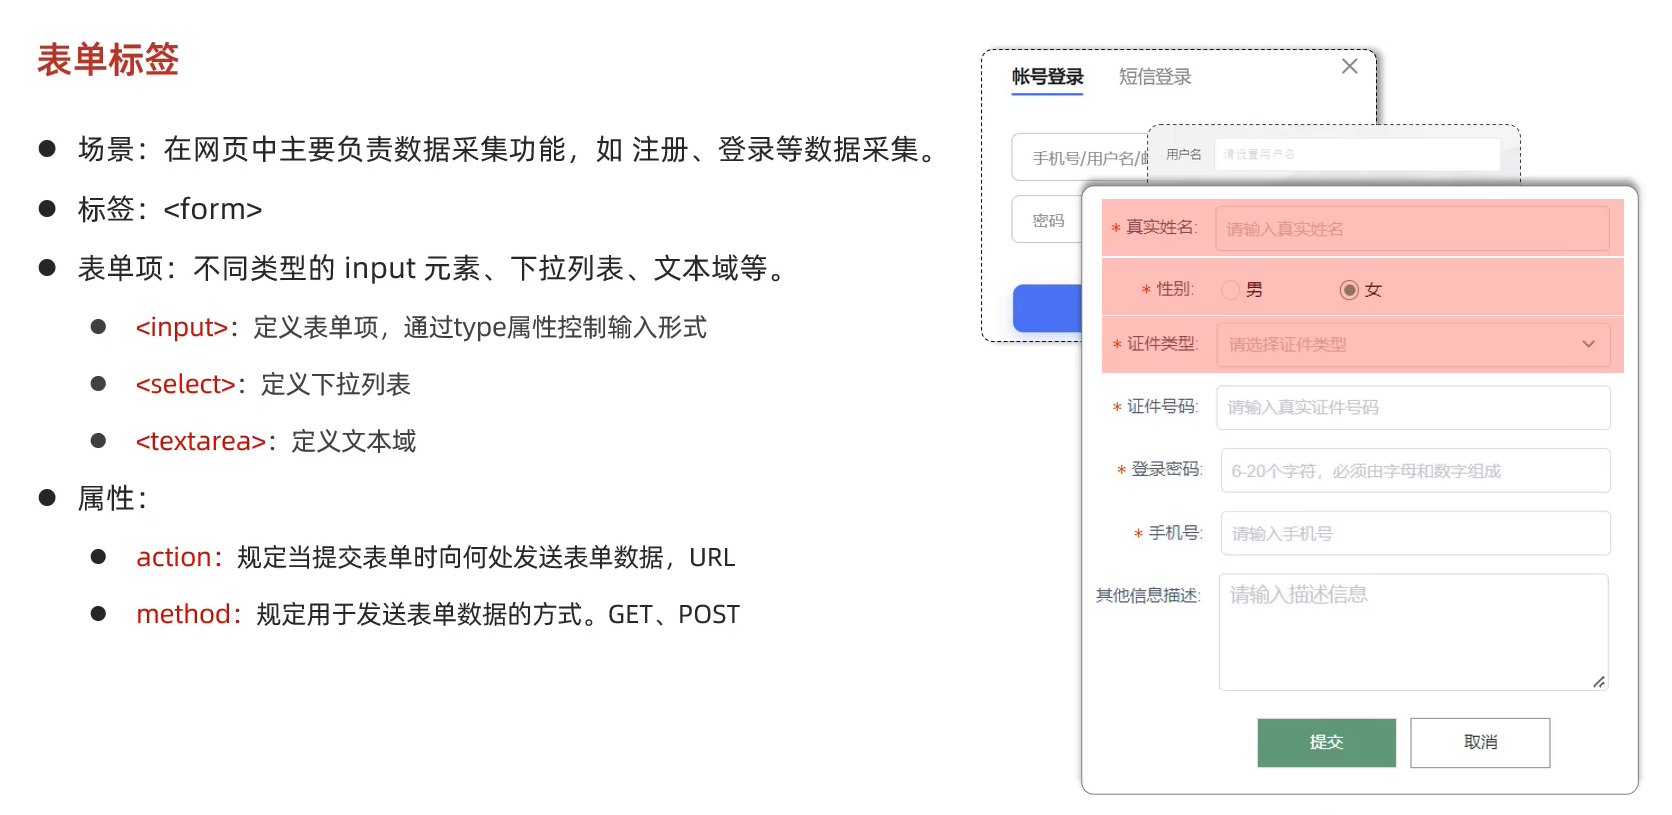
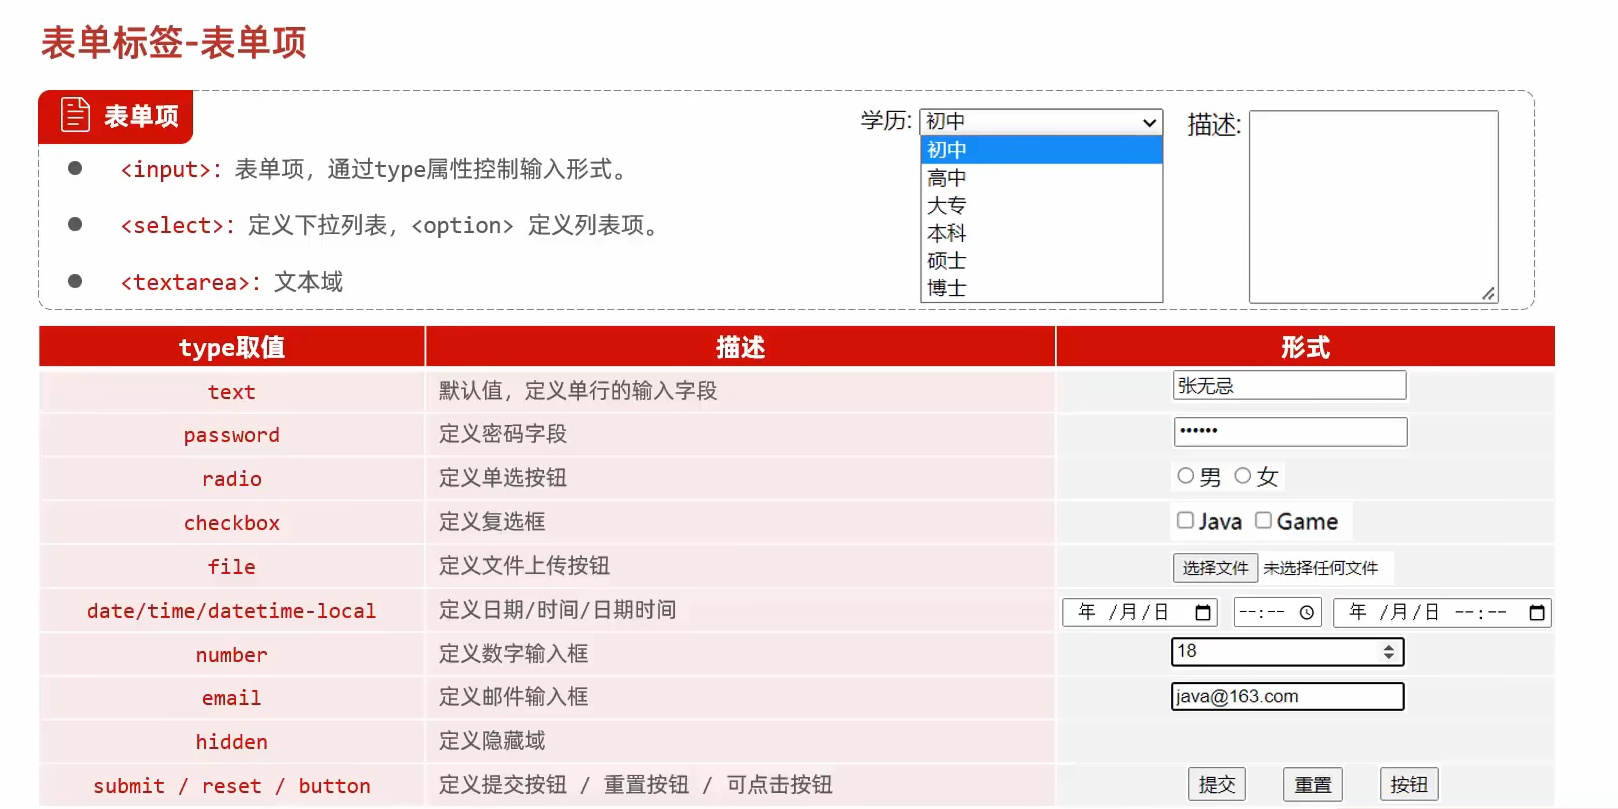
22.表单标签
23.表单标签-表单项
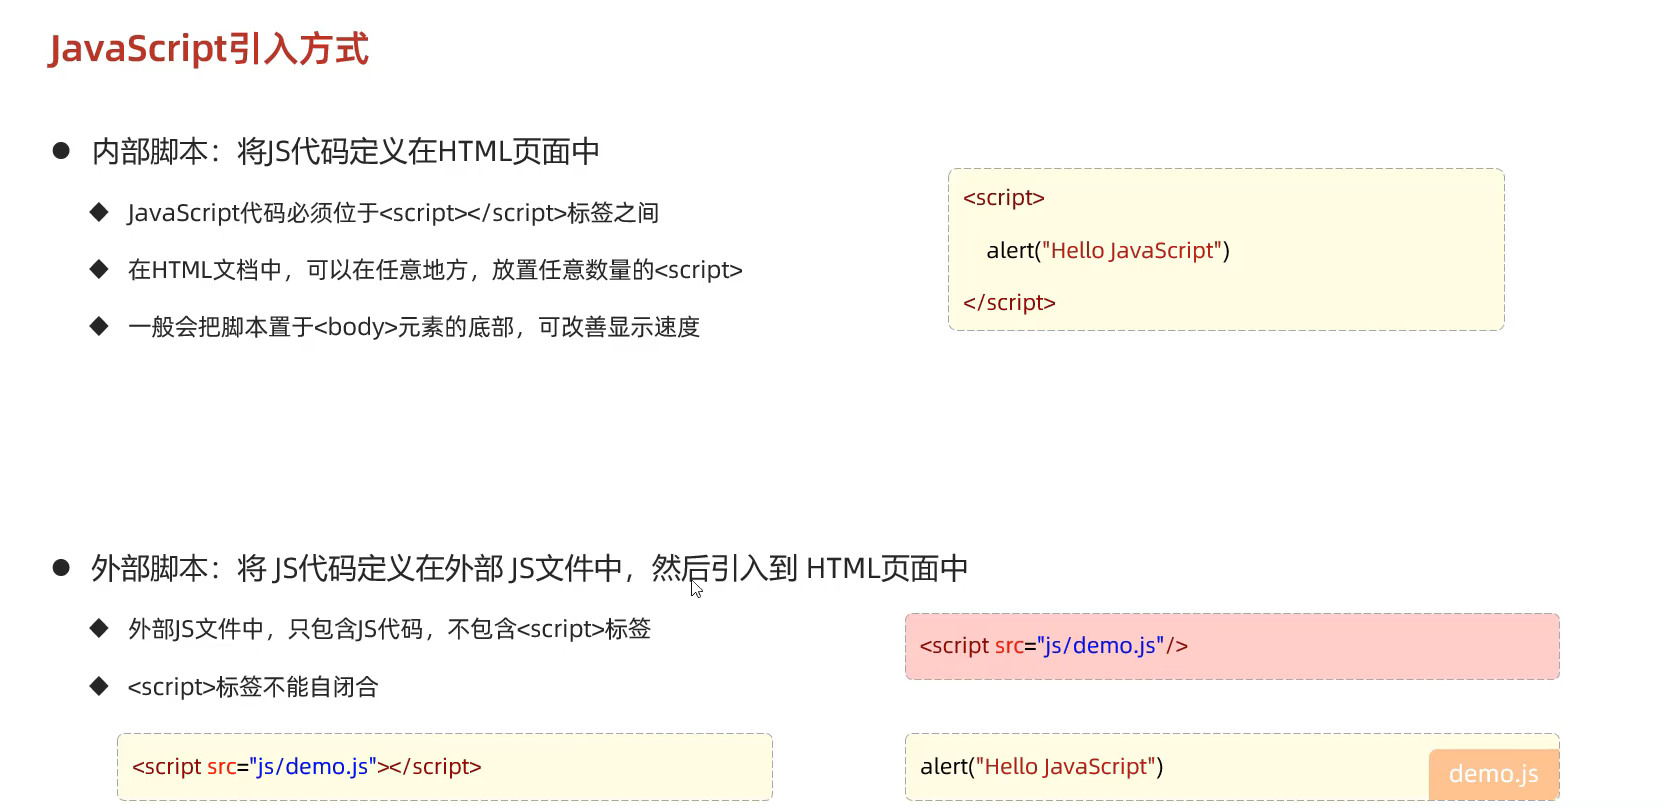
23.JavaScript引入方式
1
2
3
4
5
6
7
8
9
10
11
12
13
14
15
16
17
18
19
20
<!DOCTYPE html > <html lang ="en" > <head > <meta charset ="UTF-8" > <meta name ="viewport" content ="width=device-width, initial-scale=1.0" > <title > Document</title > <script src ="./demo.js" > </script > </head > <body > </body > </html >
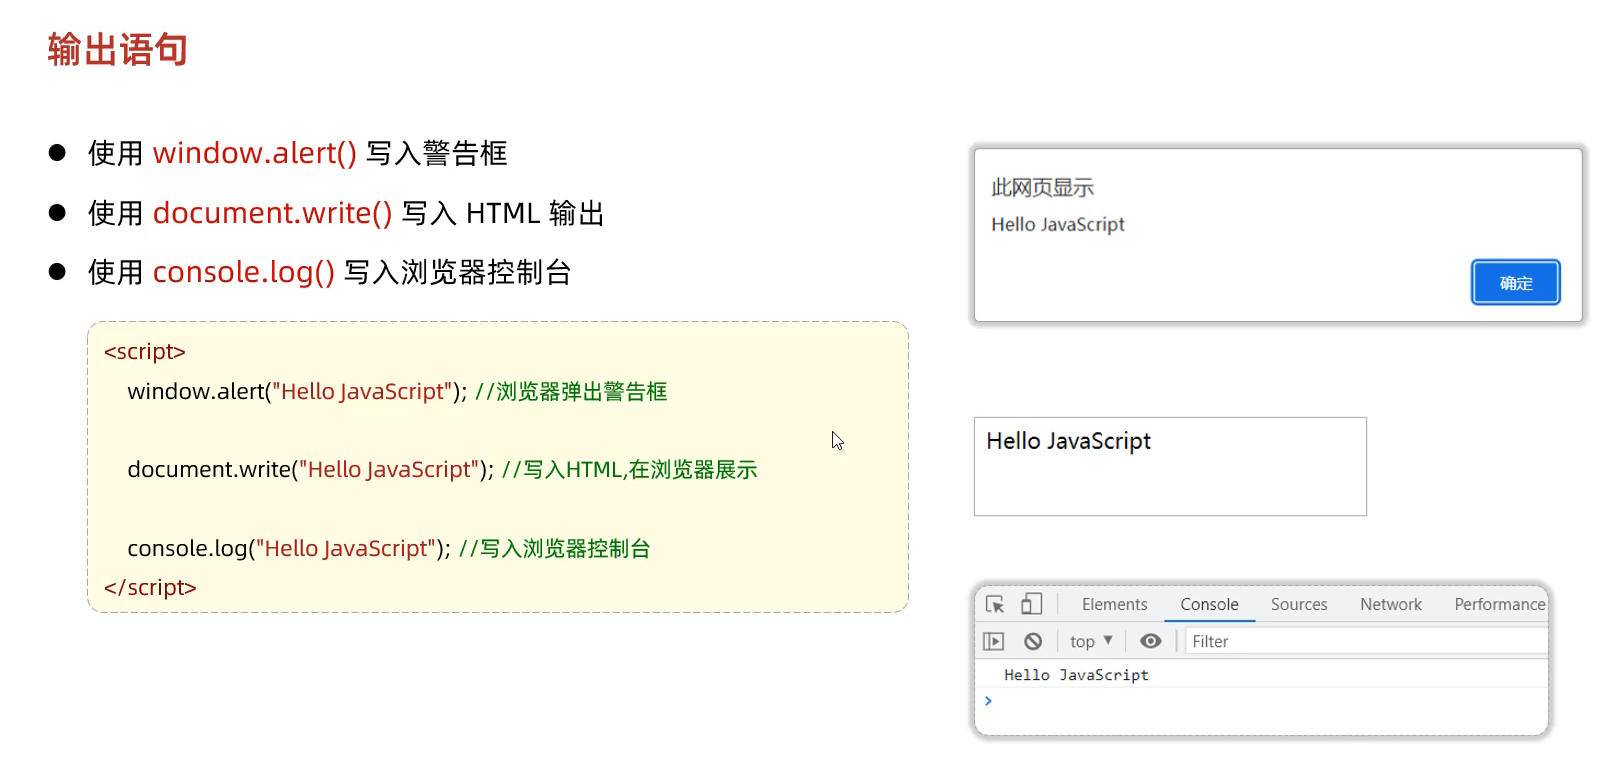
24.JS输出语句
1
2
3
4
5
6
7
8
9
10
11
12
13
14
15
<!DOCTYPE html > <html lang ="en" > <head > <meta charset ="UTF-8" > <meta name ="viewport" content ="width=device-width, initial-scale=1.0" > <title > Document</title > </head > <body > <script > window .alert ("你好" ); document .write ("Hello world" ); console .log ("123456" ); </script > </body > </html >
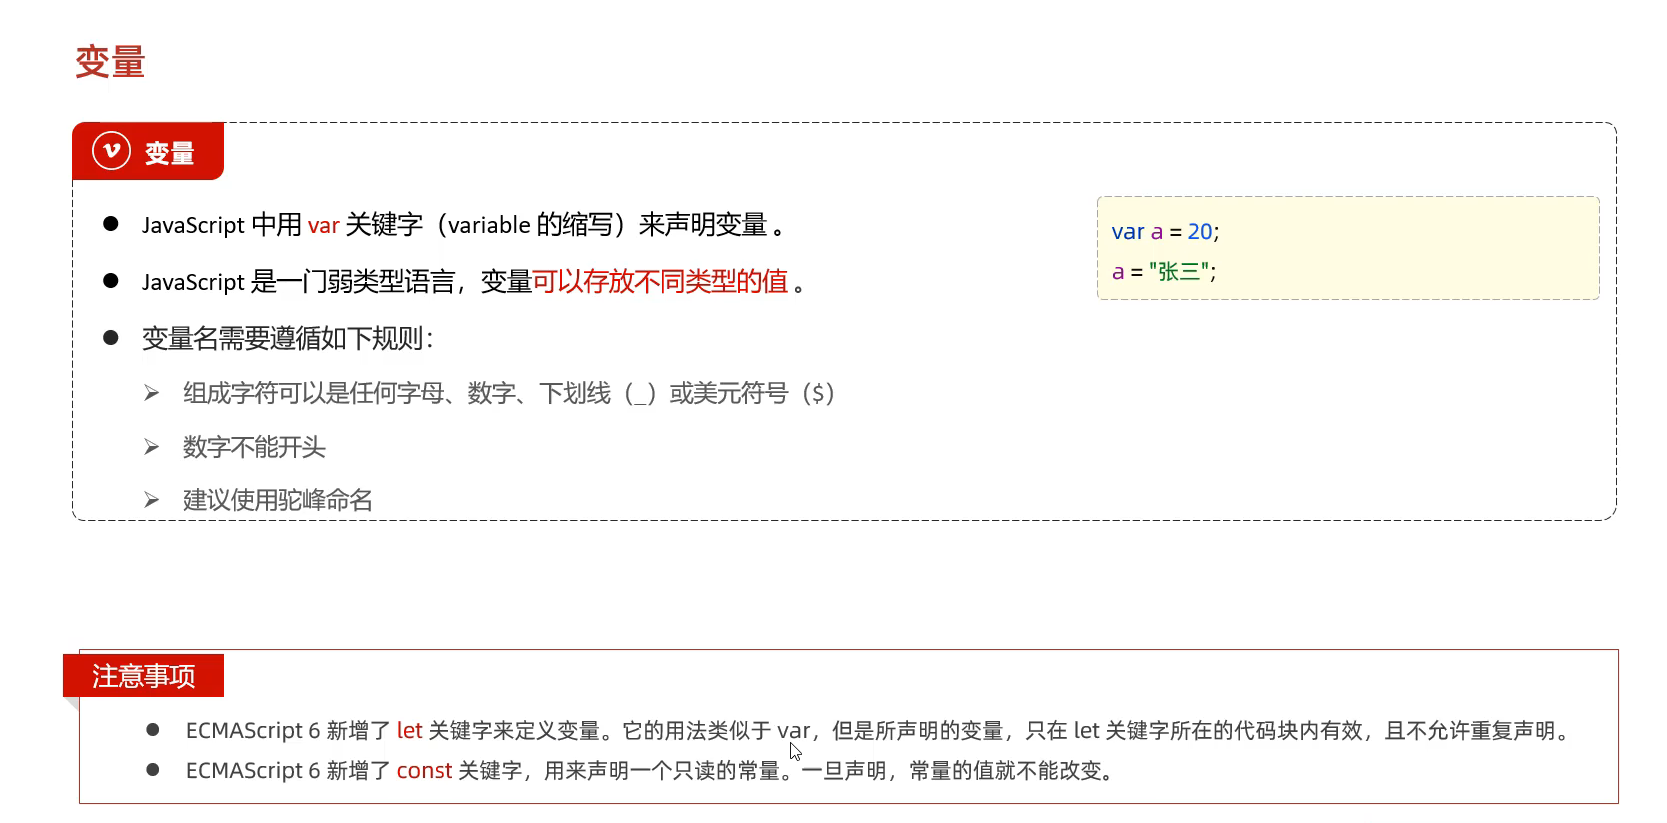
25.JS的变量
var定义的变量的作用域较大为全局变量 并且 可以重复定义(新定义的覆盖原来的)
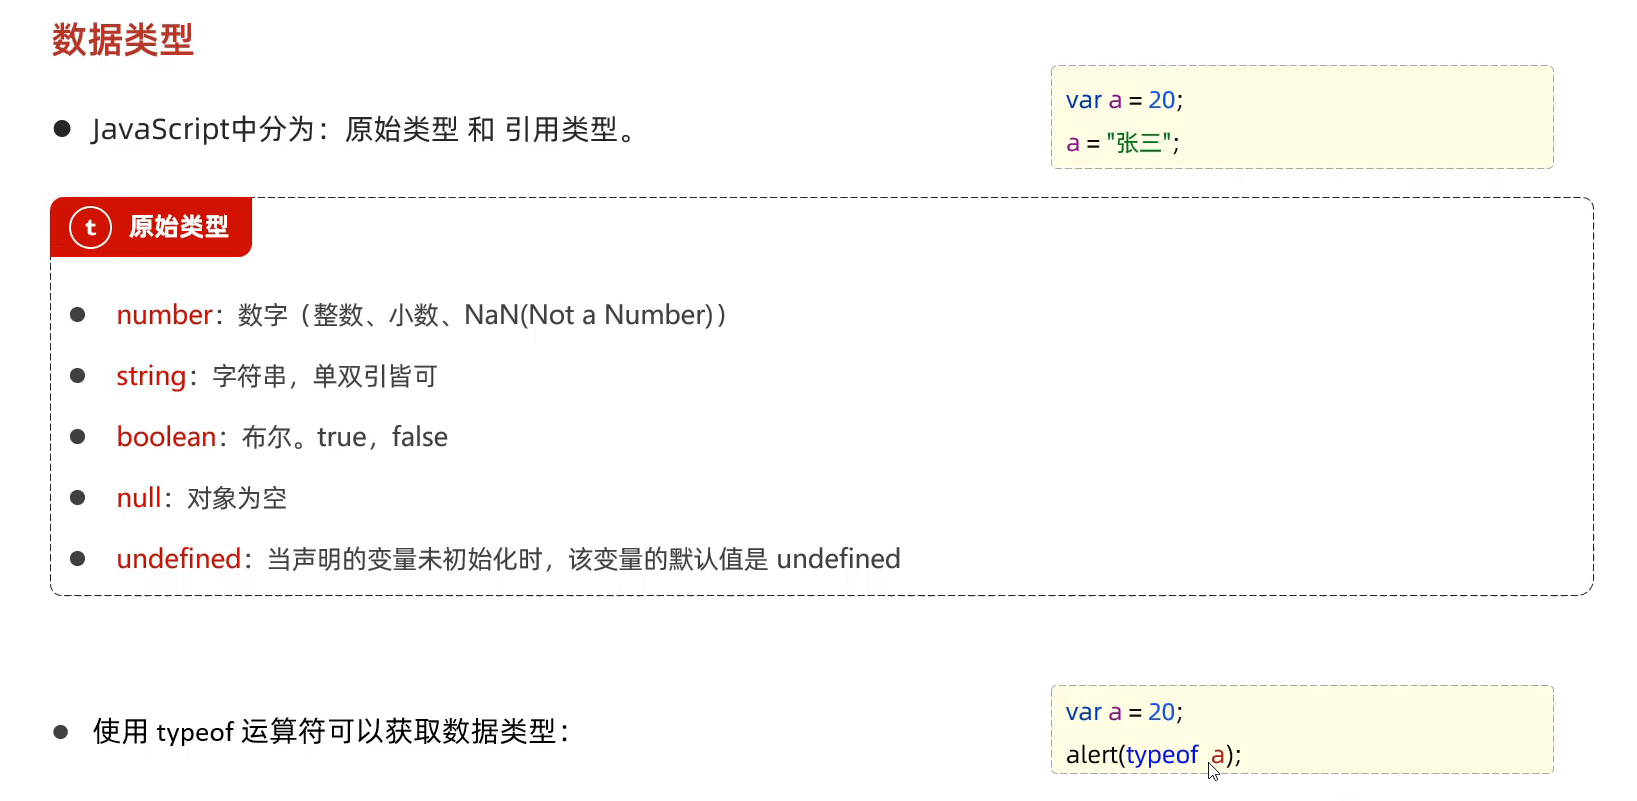
26.JS的数据类型
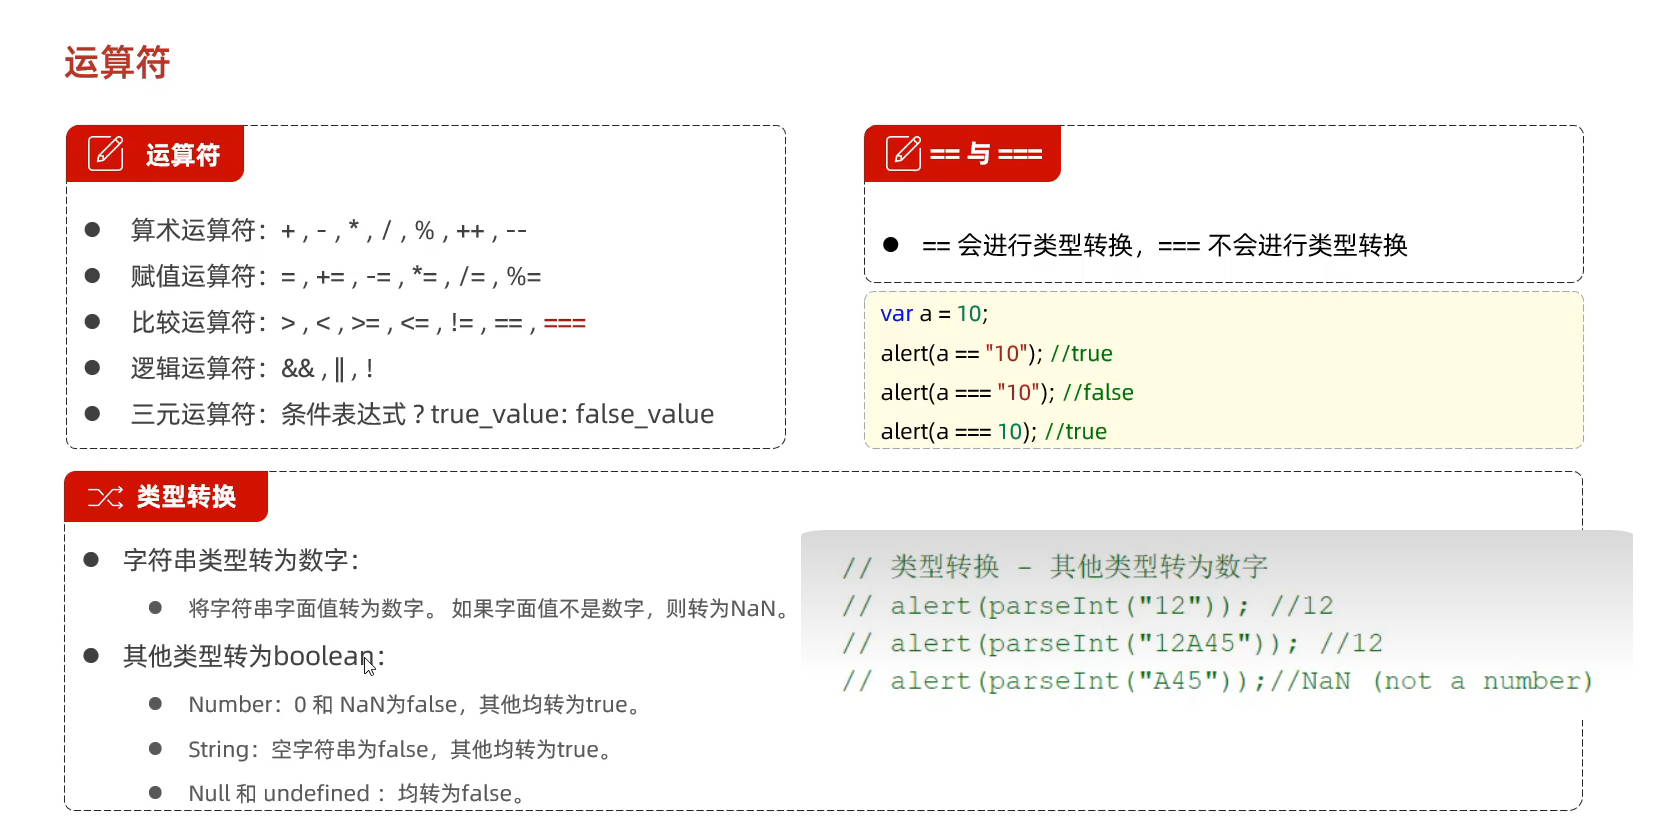
27.JS的运算符
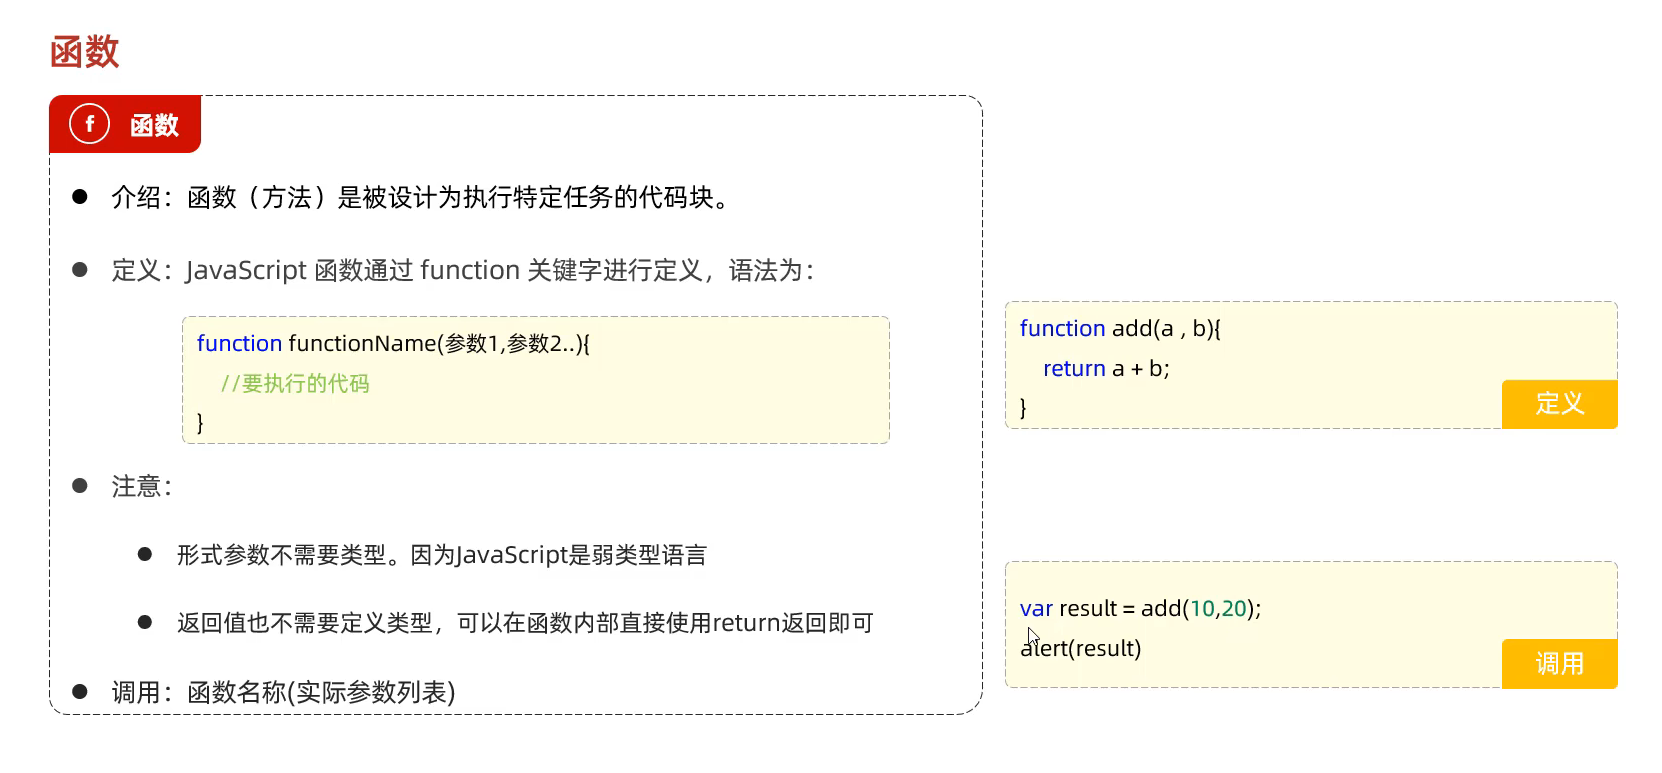
28.JS的函数
1
2
3
4
5
6
7
8
9
10
11
12
13
14
15
16
17
18
19
20
21
22
23
24
<!DOCTYPE html > <html lang ="en" > <head > <meta charset ="UTF-8" > <meta name ="viewport" content ="width=device-width, initial-scale=1.0" > <title > Document</title > </head > <body > <script > function add1 (a, b ) { return a+b; } document .write (add1 (10 ,20 )); document .write ("<br>" ); var add2 = function (a,b ){ return a+b; } document .write (add2 (30 ,40 )); </script > </body > </html >
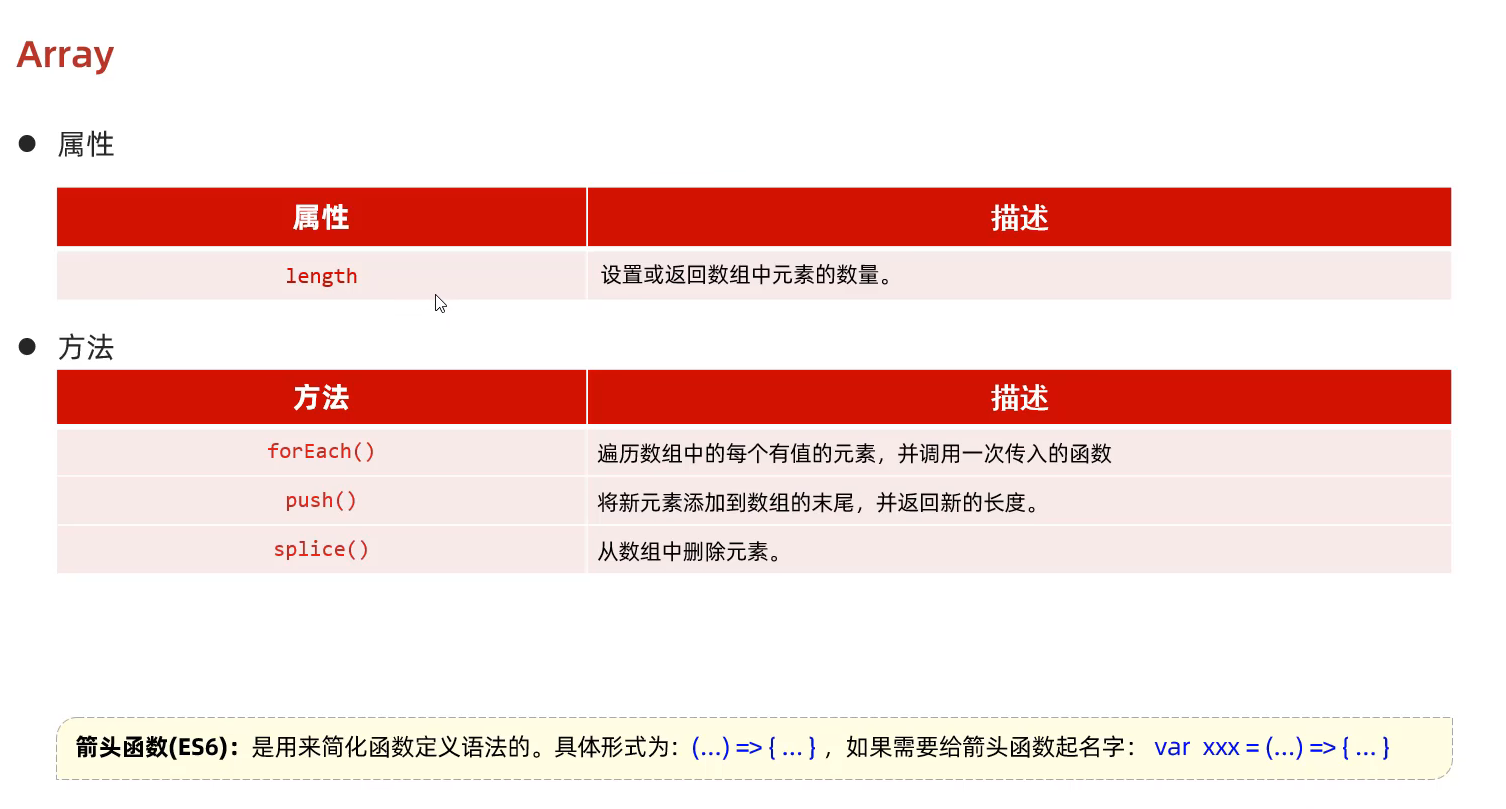
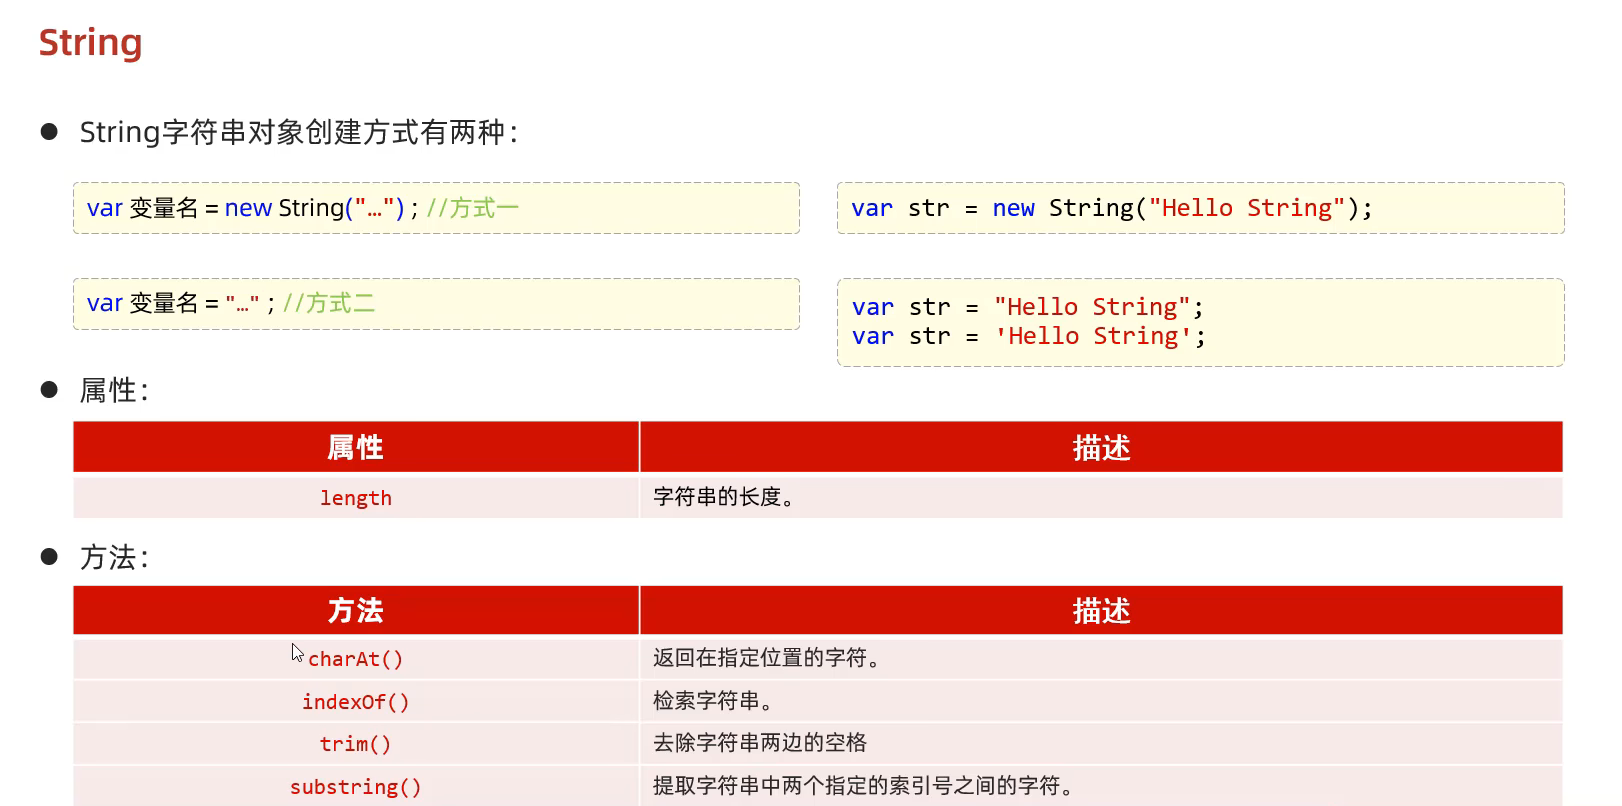
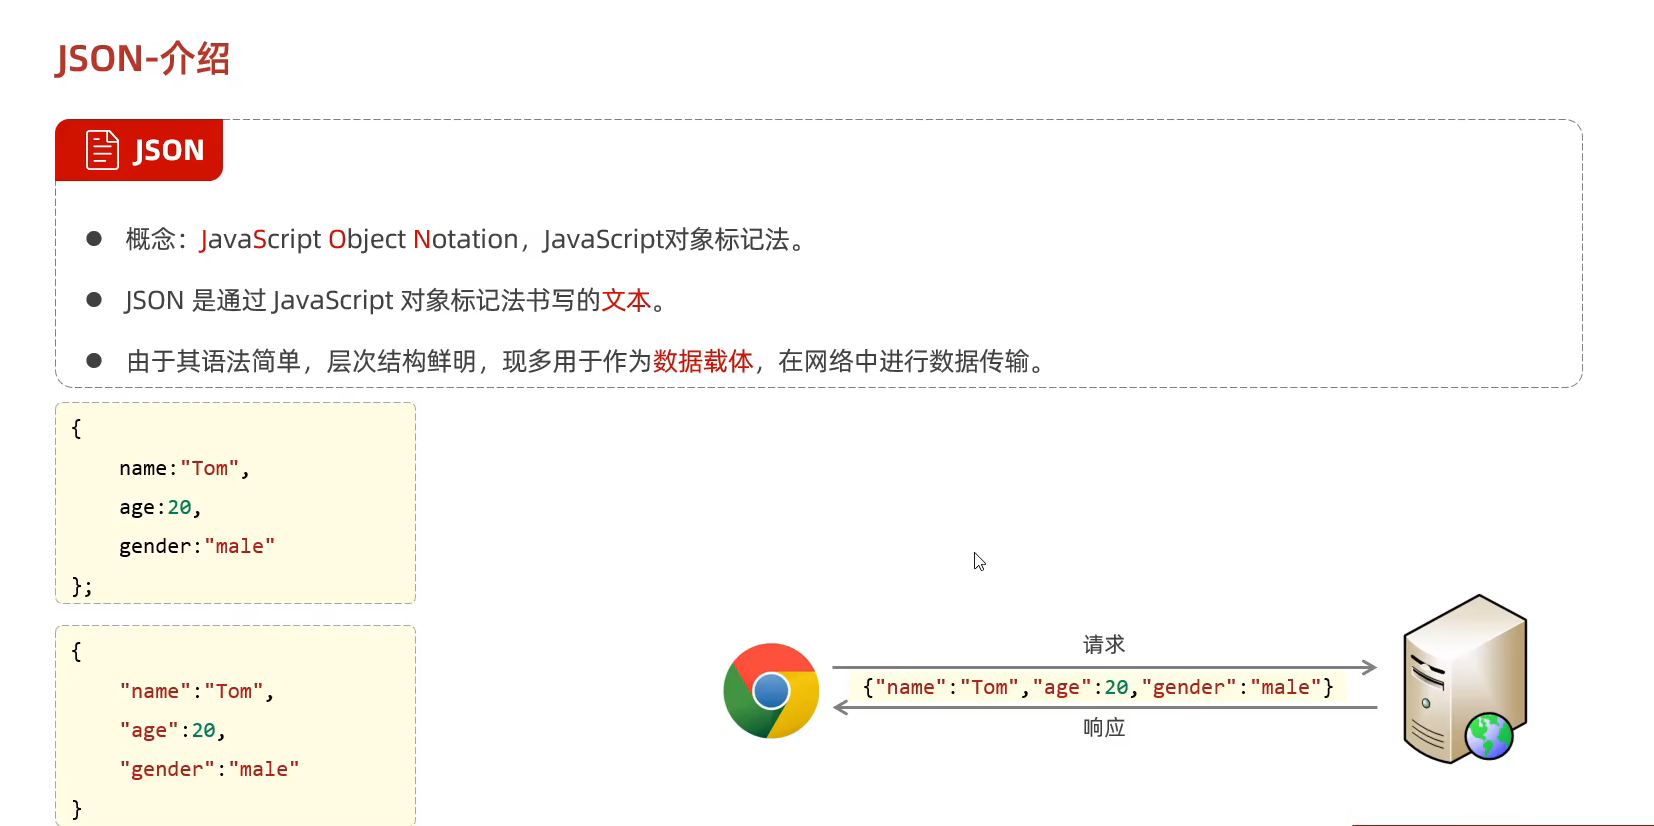
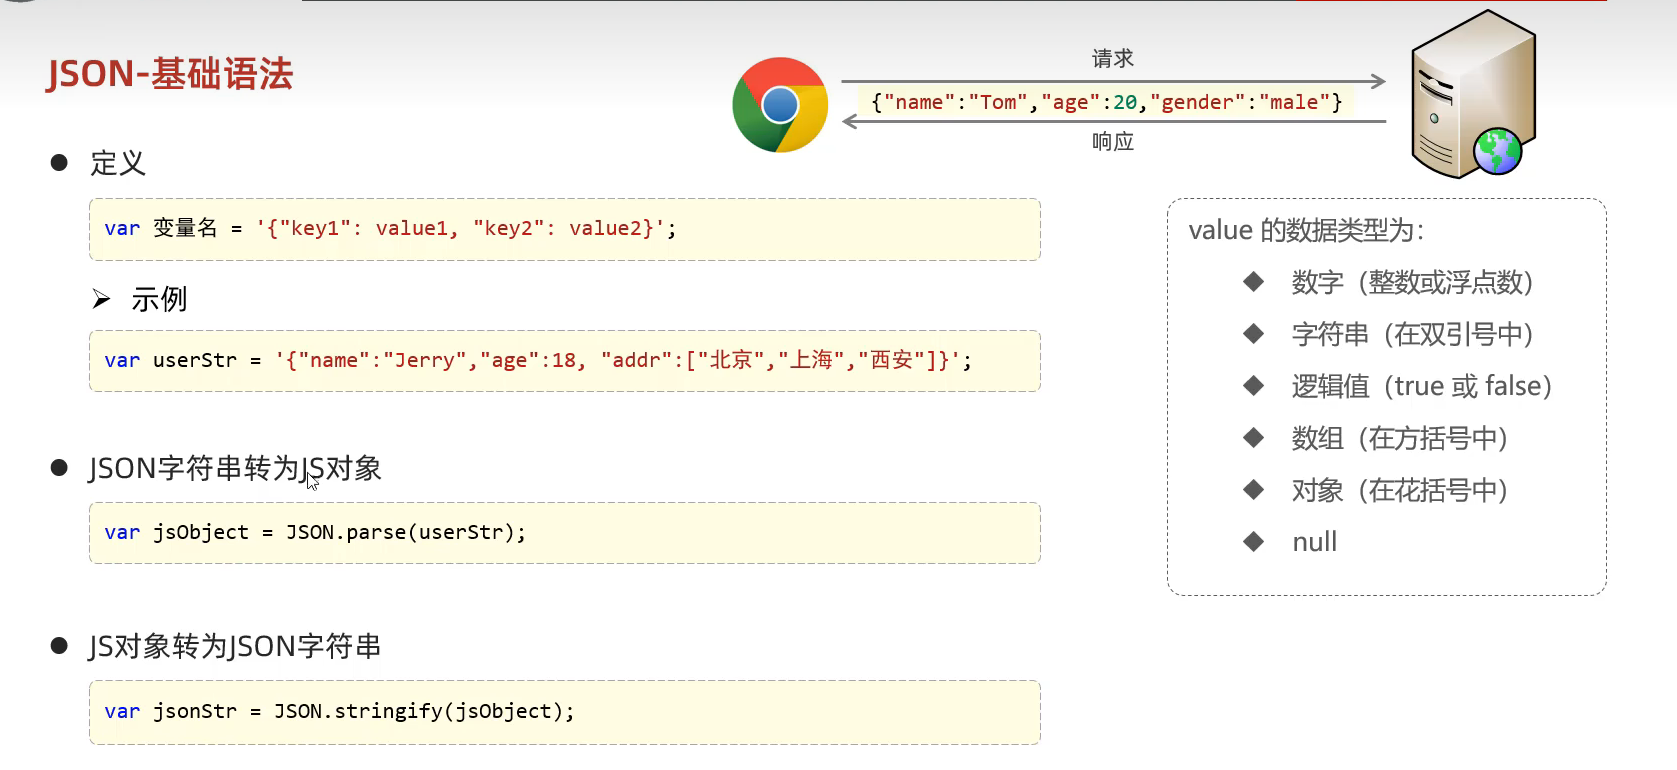
29.JS的对象(Array String JSON BOM DOM) (JavaScript 和 HTML DOM 参考手册 (w3school.com.cn) )
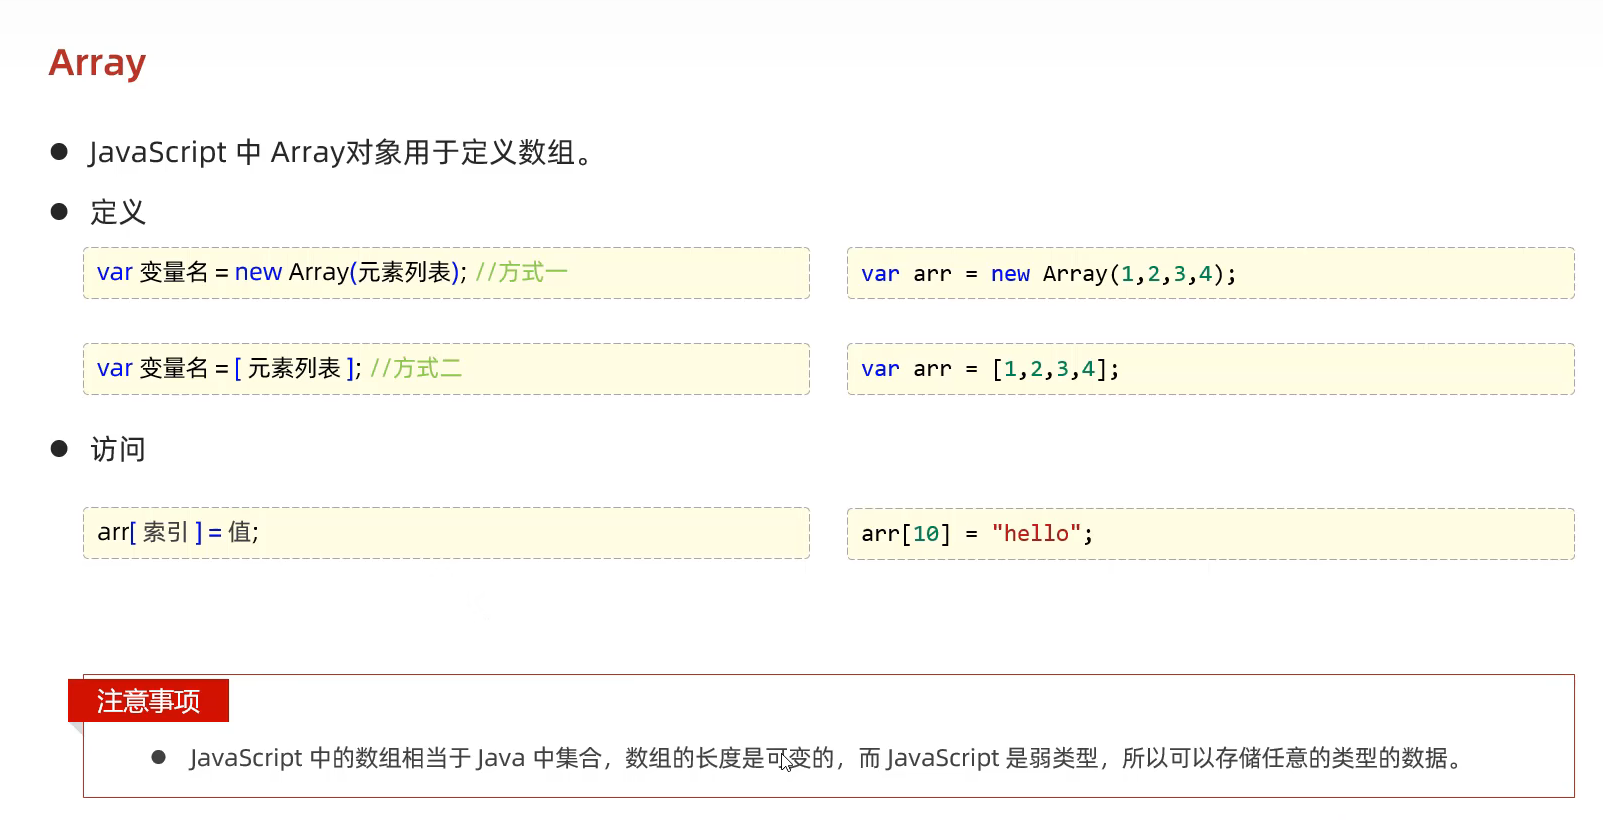
①Array对象
②String对象
③JSON对象
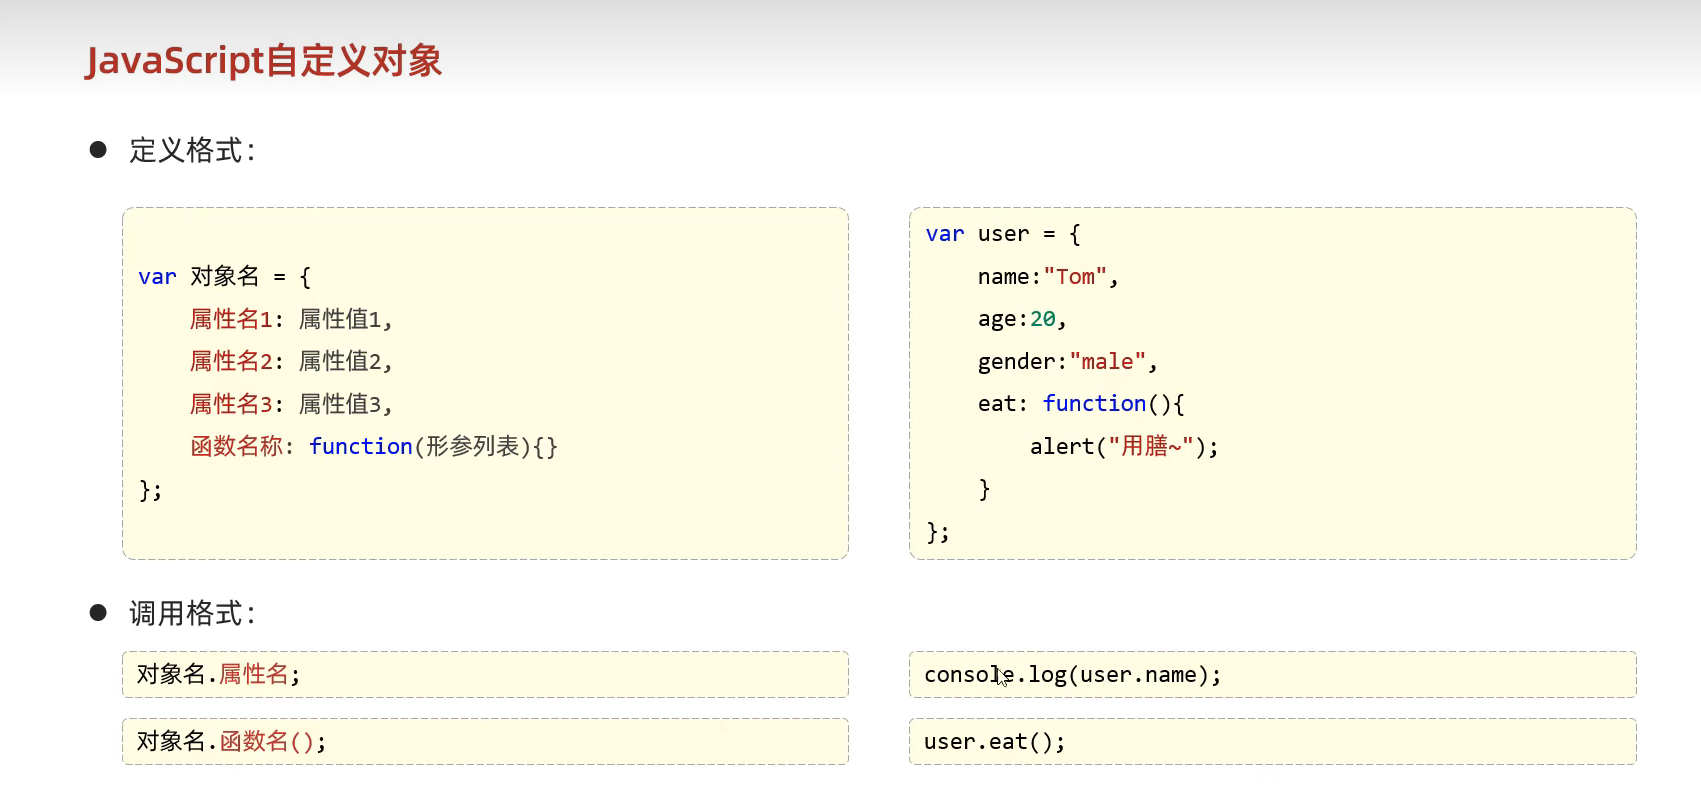
④自定义的对象
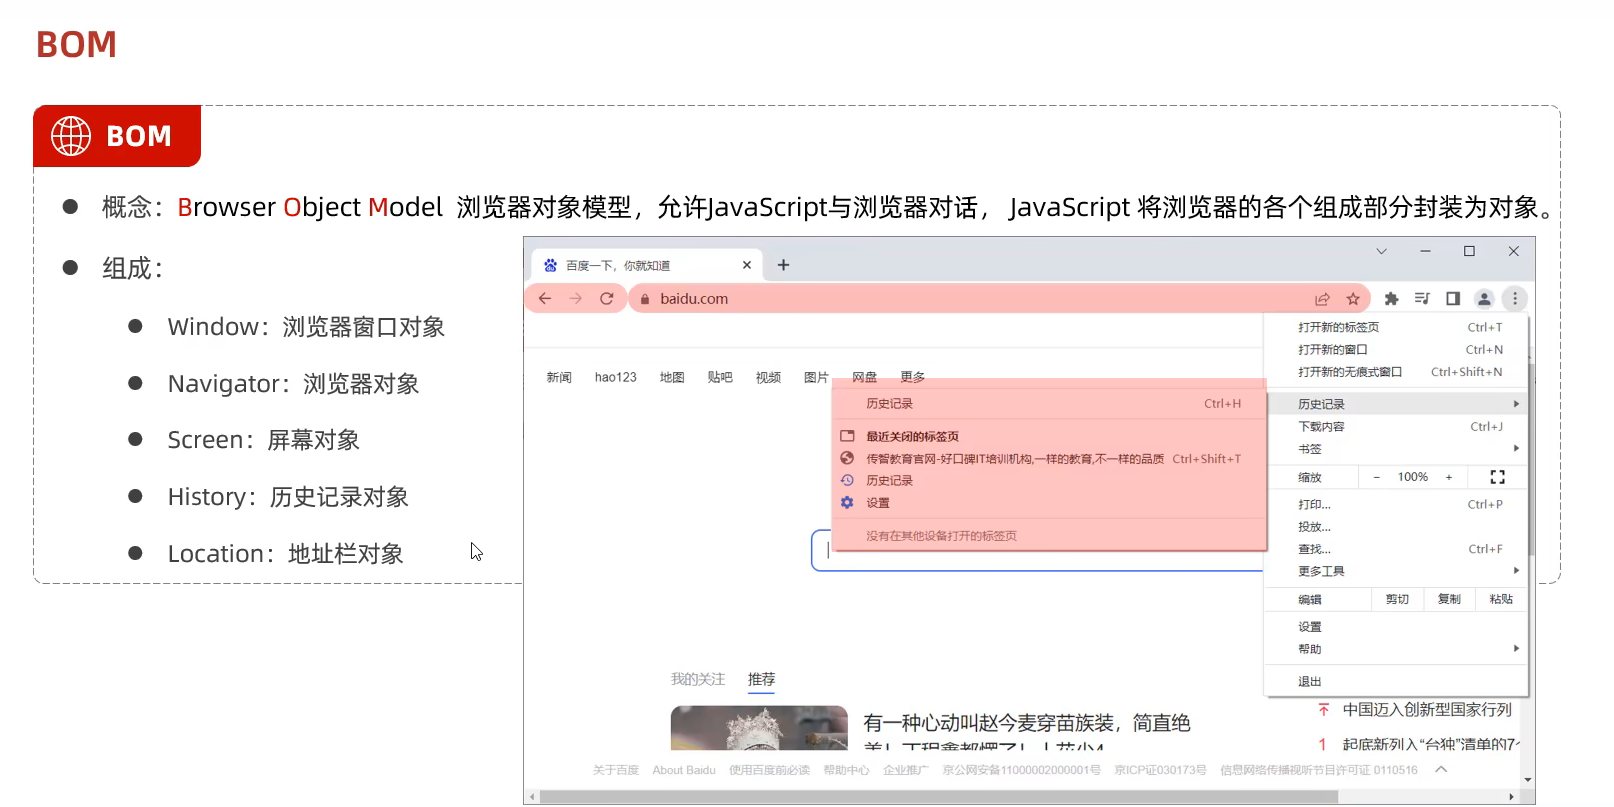
⑤BOM对象
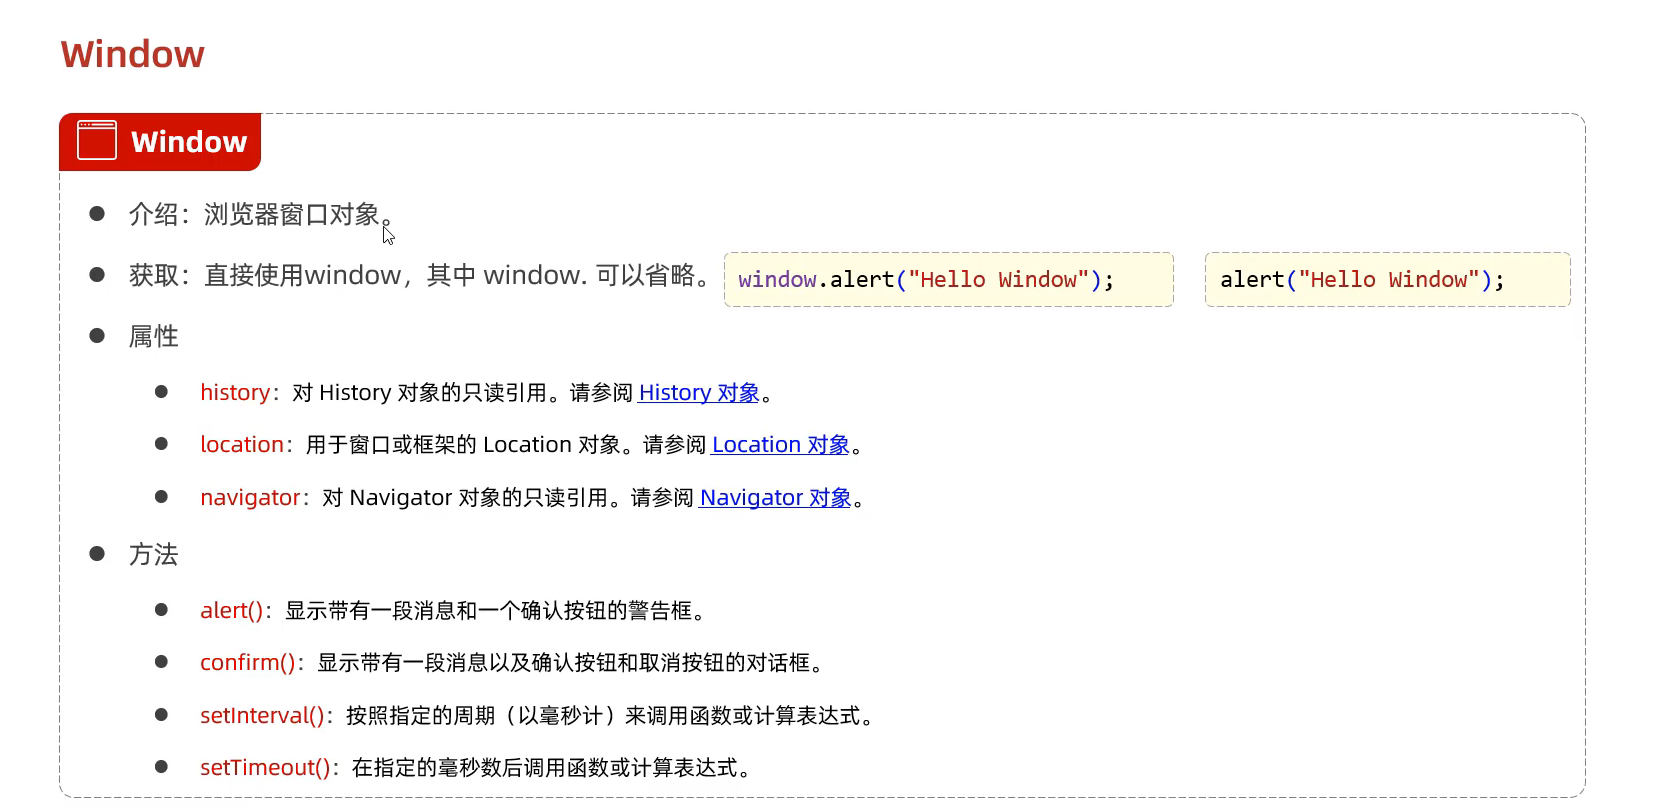
BOM中的Window对象
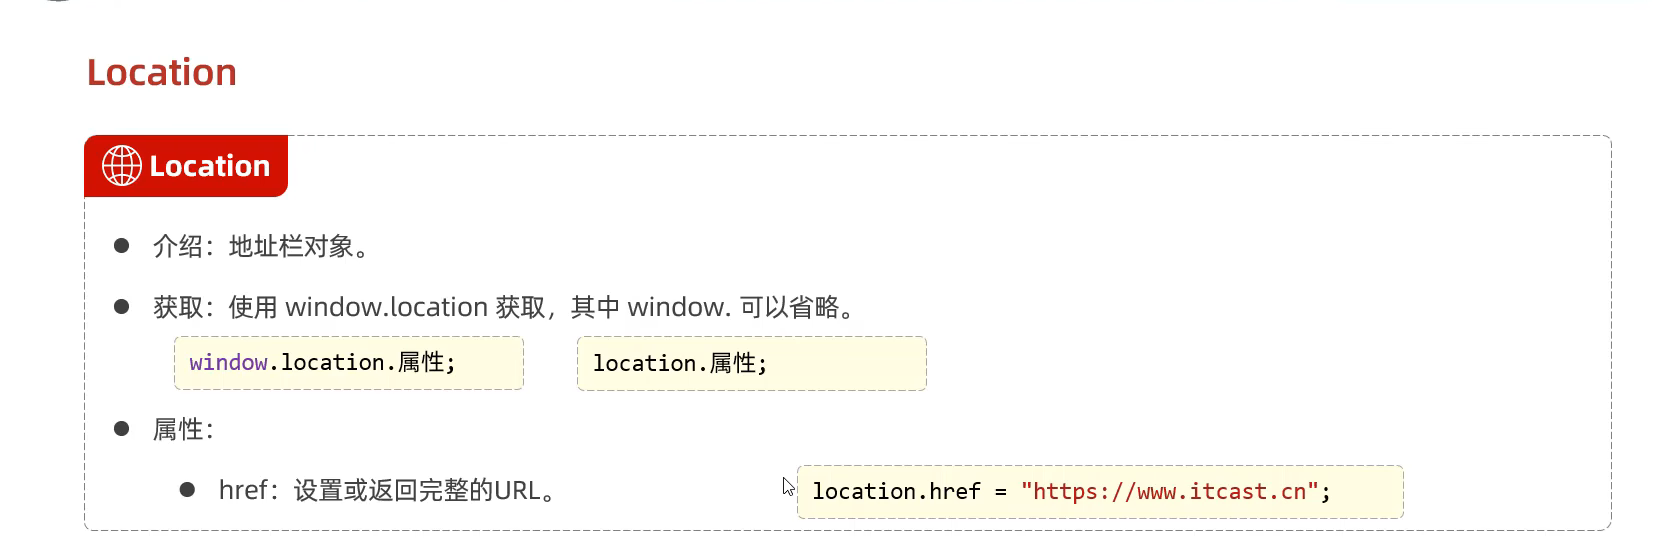
BOM中的location对象
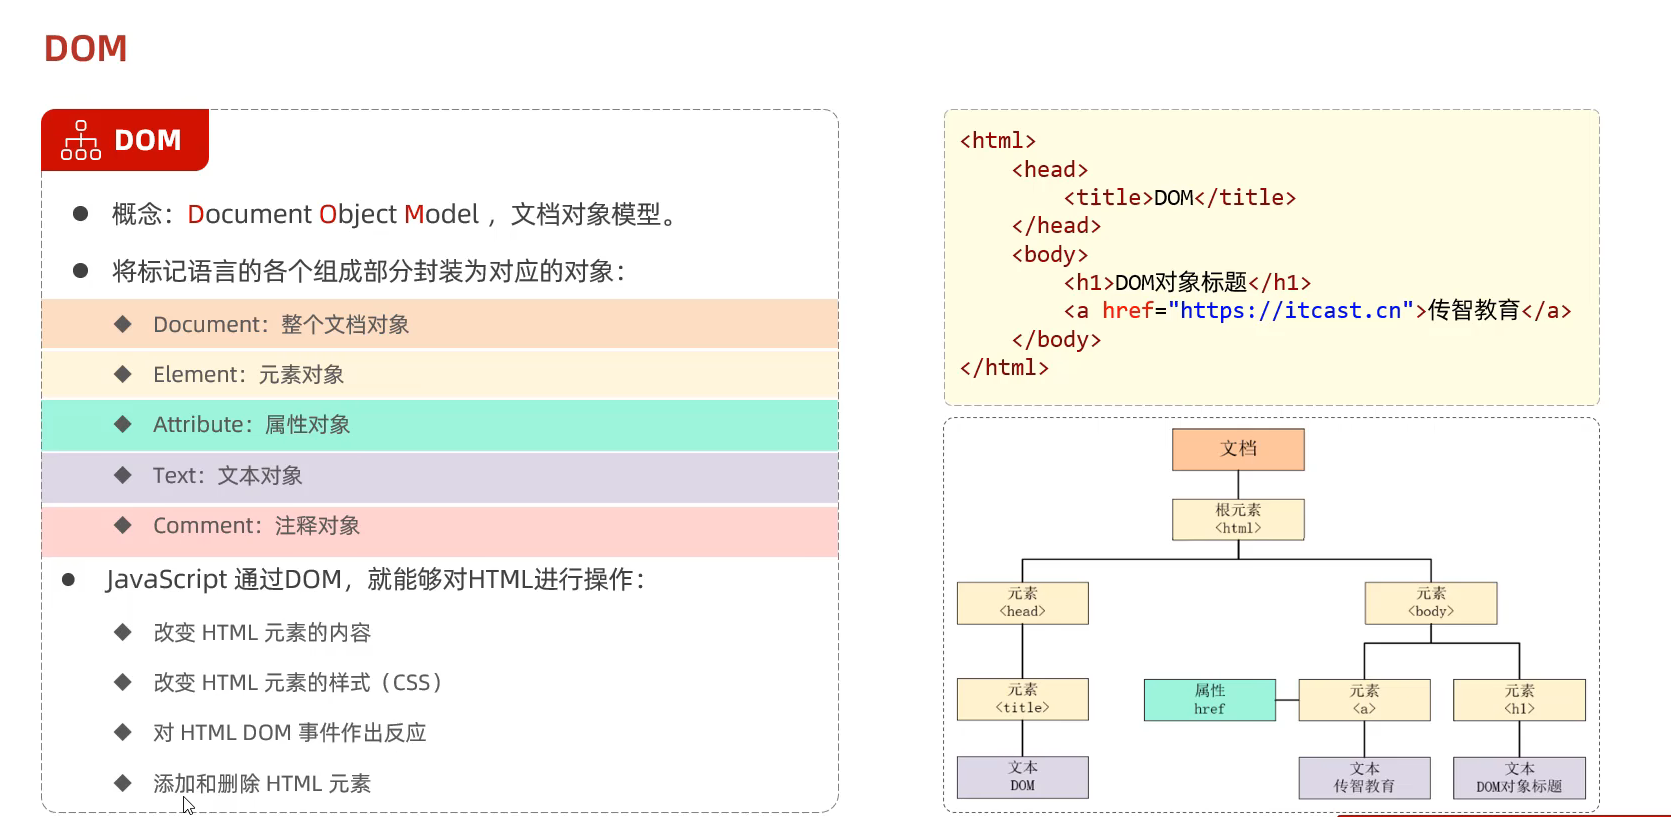
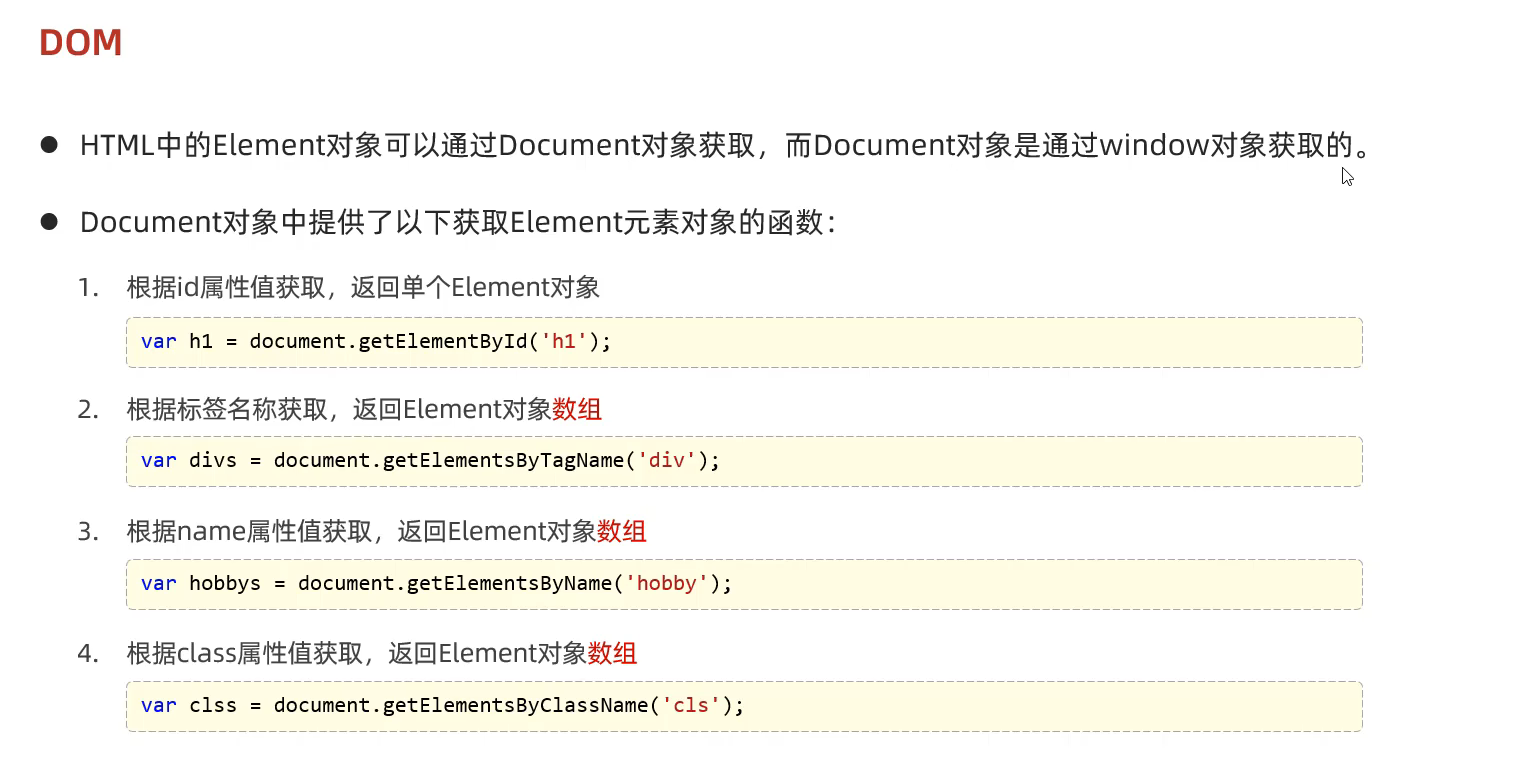
⑥DOM对象
DOM案例(属性 函数参考HTML DOM Anchor 对象 (w3school.com.cn) )
1
2
3
4
5
6
7
8
9
10
11
12
13
14
15
16
17
18
19
20
21
22
23
24
25
26
27
28
29
30
31
32
33
34
35
36
<!DOCTYPE html > <html lang ="en" > <head > <meta charset ="UTF-8" > <meta name ="viewport" content ="width=device-width, initial-scale=1.0" > <title > Document</title > </head > <body > <img id = 'h1' src ="https://img0.baidu.com/it/u=3854371968,2837637628&fm=253&fmt=auto&app=138&f=JPEG?w=610&h=486" > <br > <br > <div class ="cls" > 我是大帅比</div > <br > <div class ="'cls" > 12345 上山打老虎</div > <br > <input type ="checkbox" name ='hobby' > 电影 <input type ="checkbox" name ='hobby' > 游戏 <input type ="checkbox" name ='hobby' > 学习 </body > <script > var img = document .getElementById ('h1' ); img.src = "https://img0.baidu.com/it/u=1848150008,1086365409&fm=253&fmt=auto&app=138&f=JPEG?w=640&h=472" ; var divs = document .getElementsByTagName ('div' ); for (let i = 0 ; i < divs.length ; i++) { divs[i].innerHTML +="<font color='red'> very good </font>" ; } var hobbys = document .getElementsByName ('hobby' ); for (let index = 0 ; index < hobbys.length ; index++) { const element = hobbys[index]; element.checked = true ; } </script > </html >
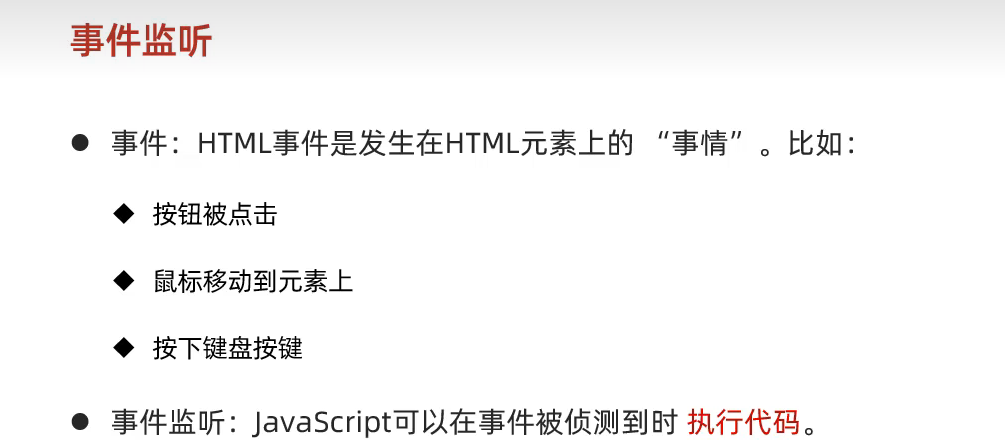
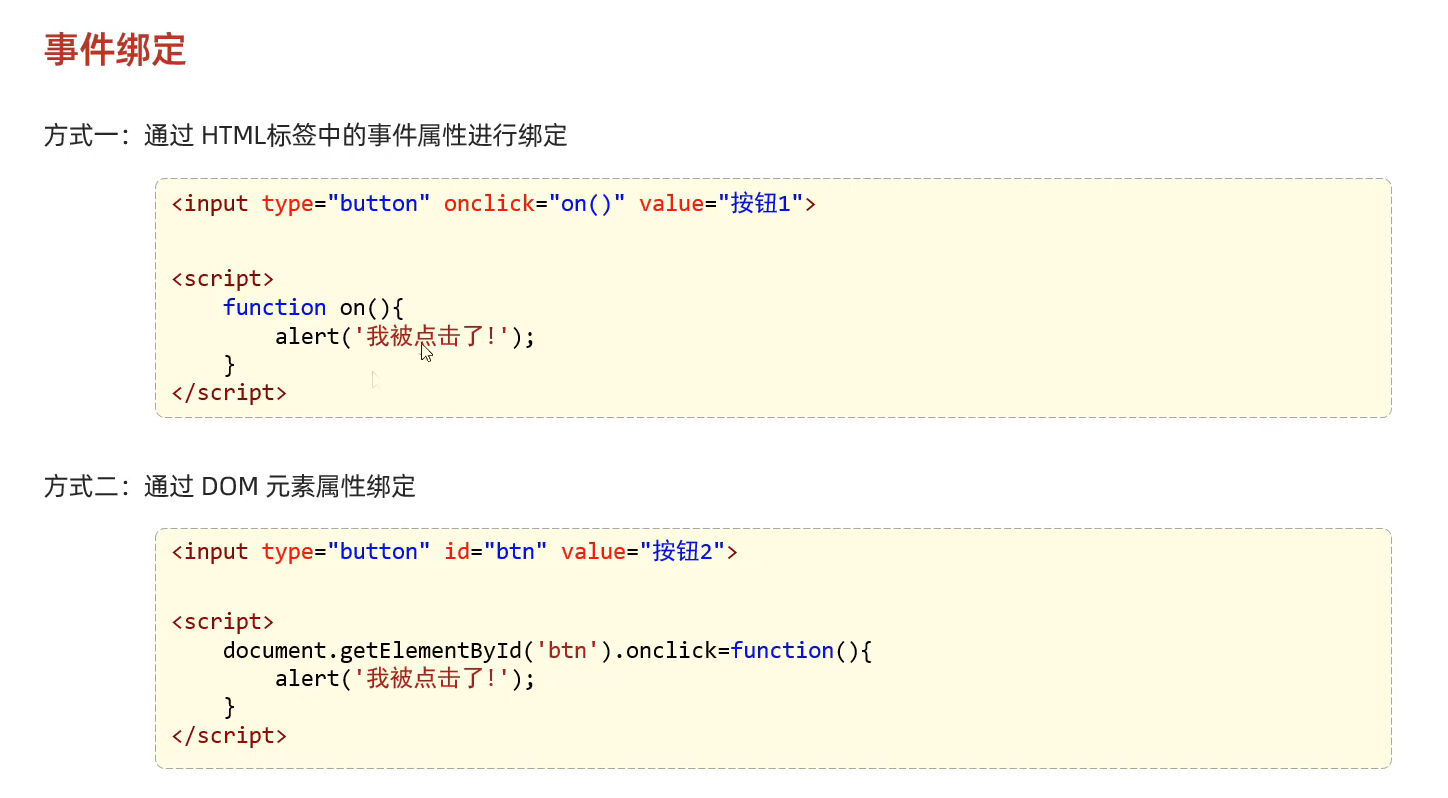
30.JS时间监听
1
2
3
4
5
6
7
8
9
10
11
12
13
14
15
16
17
18
19
20
21
<!DOCTYPE html > <html lang ="en" > <head > <meta charset ="UTF-8" > <meta name ="viewport" content ="width=device-width, initial-scale=1.0" > <title > Document</title > </head > <body > <input type ="button" id ="btn1" value ="事件绑定1" onclick ="on1()" > <input type ="button" id ="btn2" value ="事件绑定2" > </body > <script > function on1 ( alert ("按钮1被点击" ); } document .getElementById ('btn2' ).onclick =function ( alert ("按钮2被点击" ); } </script > </html >
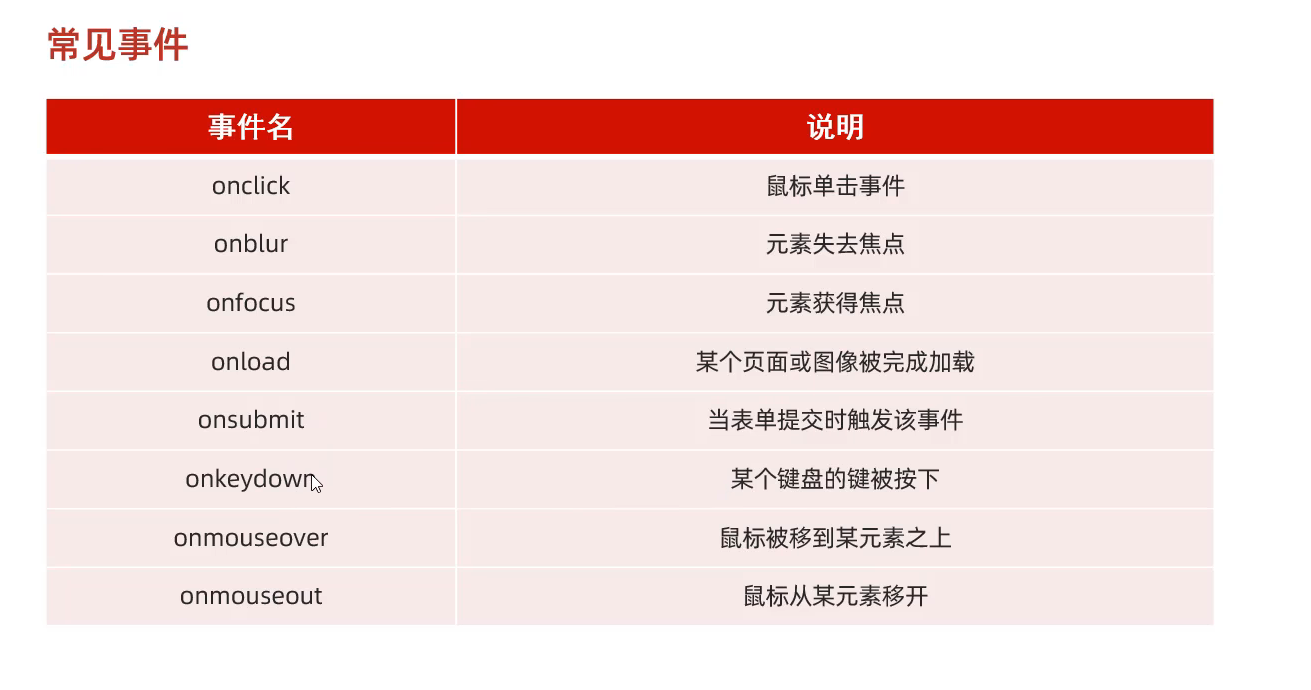
JS的常见事件
监控事件的案例
1
2
3
4
5
6
7
8
9
10
11
12
13
14
15
16
17
18
19
20
21
22
23
24
25
26
27
28
29
30
31
32
33
34
35
36
37
38
39
40
41
42
43
44
45
46
47
48
49
50
51
52
53
54
55
56
57
58
59
60
61
62
63
64
65
66
67
68
69
70
71
72
73
<!DOCTYPE html > <html lang ="en" > <head > <meta charset ="UTF-8" > <meta name ="viewport" content ="width=device-width, initial-scale=1.0" > <title > Document</title > </head > <body > <img id = 'h1' src ="https://img0.baidu.com/it/u=3854371968,2837637628&fm=253&fmt=auto&app=138&f=JPEG?w=610&h=486" > <br > <input type ="button" value ="点亮" onclick ="on()" > <input type ="button" value ="熄灭" onclick ="off()" > <br > <br > <input type ="text" id ="name" value ="ABCDEF" onfocus ="onf()" onblur ="onb()" > <br > <br > <input type ="checkbox" name ='hobby' > 电影 <input type ="checkbox" name ='hobby' > 游戏 <input type ="checkbox" name ='hobby' > 学习 <br > <input type ="button" value ="全选" onclick ="checkall()" > <input type ="button" value ="反选" onclick ="cancleall()" > </body > <script > function on ( { var img = document .getElementById ('h1' ); img.src = "https://img0.baidu.com/it/u=1848150008,1086365409&fm=253&fmt=auto&app=138&f=JPEG?w=640&h=472" ; } function off ( { var img = document .getElementById ('h1' ); img.src = "https://img0.baidu.com/it/u=3854371968,2837637628&fm=253&fmt=auto&app=138&f=JPEG?w=610&h=486" ; } function onf ( { var tmp = document .getElementById ('name' ); tmp.value = tmp.value .toLowerCase (); } function onb ( { var tmp = document .getElementById ('name' ); tmp.value = tmp.value .toUpperCase (); } function checkall ( { var array = document .getElementsByName ('hobby' ); for (let index = 0 ; index < array.length ; index++) { array[index].checked =true ; } } function cancleall ( { var array = document .getElementsByName ('hobby' ); for (let index = 0 ; index < array.length ; index++) { array[index].checked =false ; } } </script > </html >
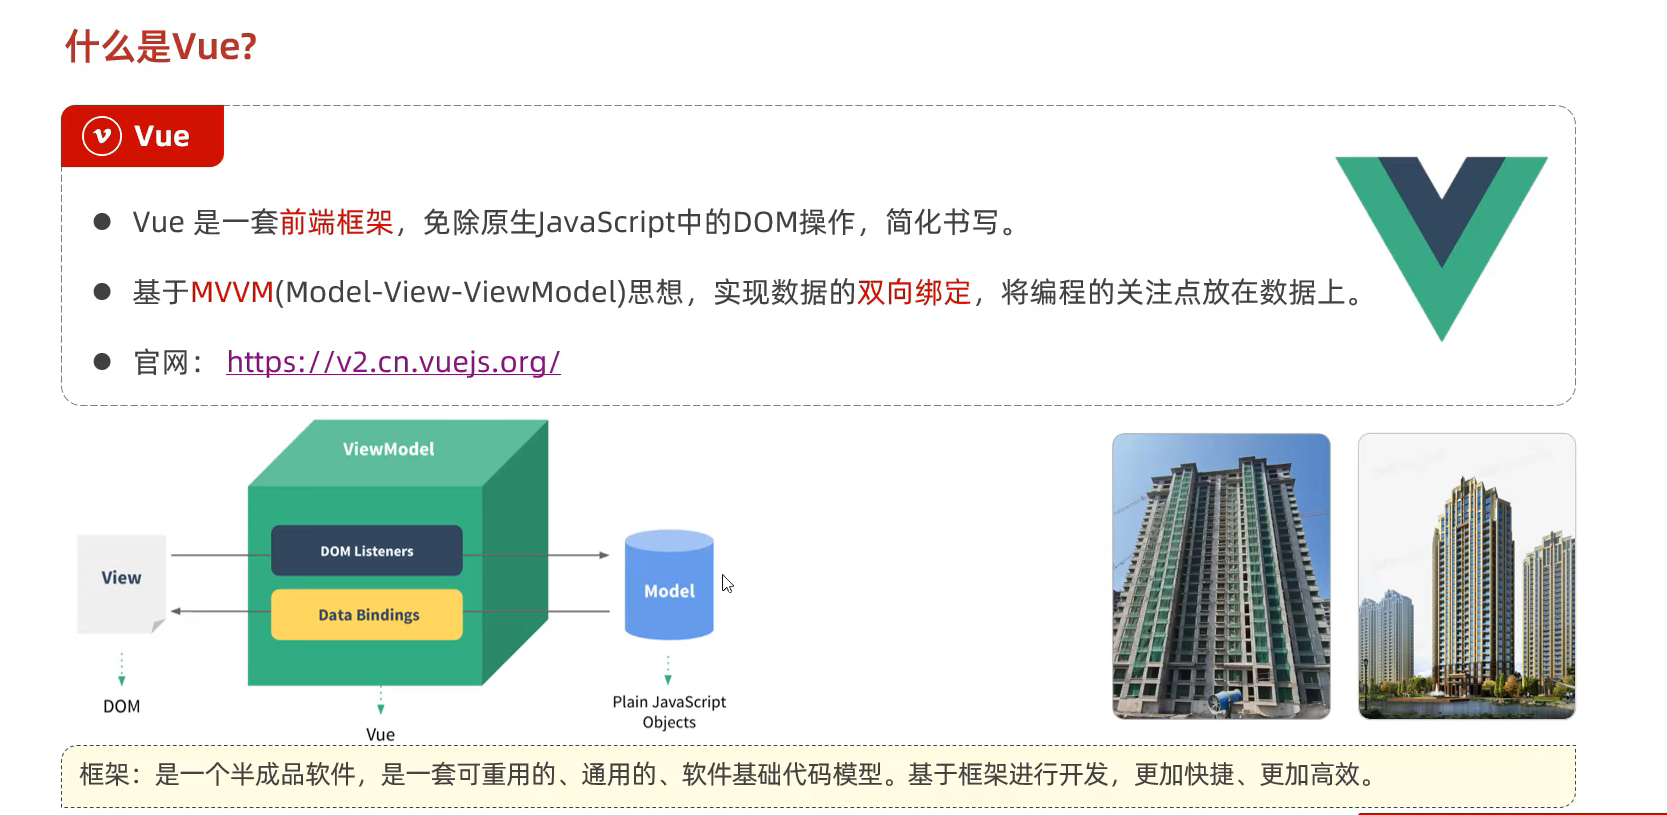
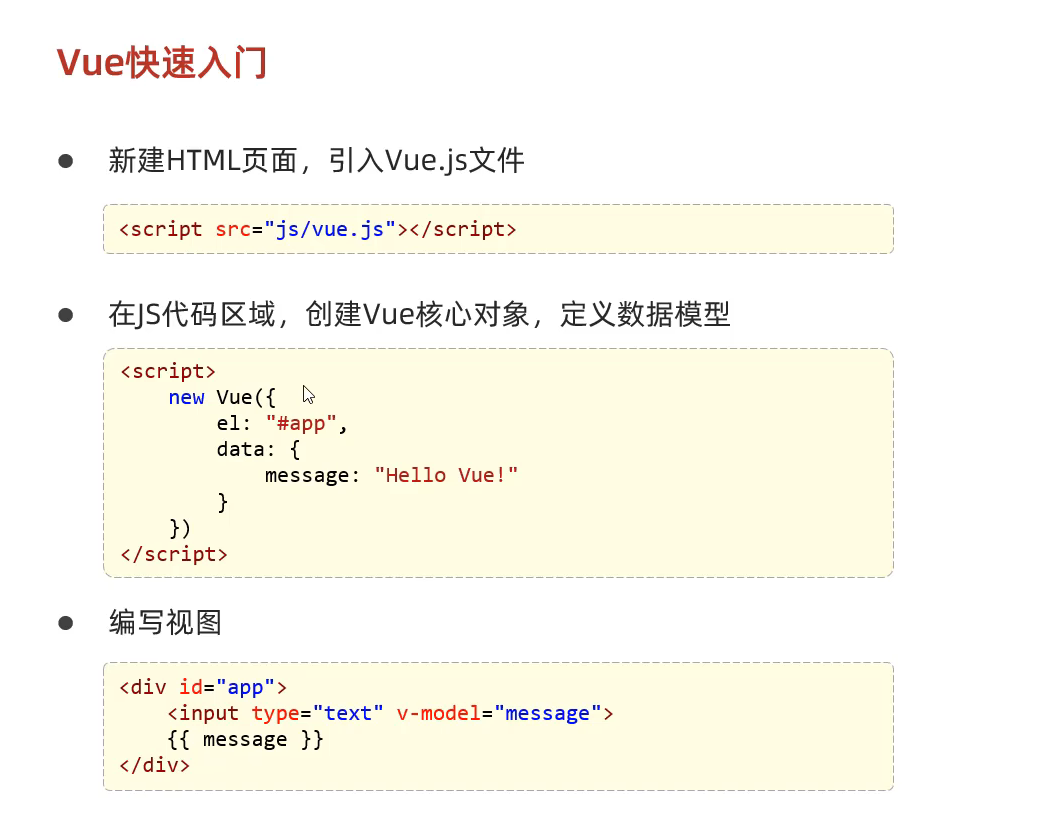
31.VUE
32.vue2的导入链接 和 vue2的导入链接 vue2的导入链接
1 <script src ="https://cdn.jsdelivr.net/npm/vue/dist/vue.js" > </script >
vue2的导入链接
1 <script src ="https://unpkg.com/vue@3/dist/vue.global.js" > </script >
示例代码
1
2
3
4
5
6
7
8
9
10
11
12
13
14
15
16
17
18
19
20
21
22
23
24
25
26
27
<!DOCTYPE html > <html lang ="en" > <head > <meta charset ="UTF-8" > <meta name ="viewport" content ="width=device-width, initial-scale=1.0" > <title > Document</title > </head > <body > <script src ="https://cdn.jsdelivr.net/npm/vue/dist/vue.js" > </script > <div id ="app" > {{ message }} </div > <script > var app =new Vue ( { el :"#app" , data :{ message :"Hello World!" } } ) </script > </body > </html >
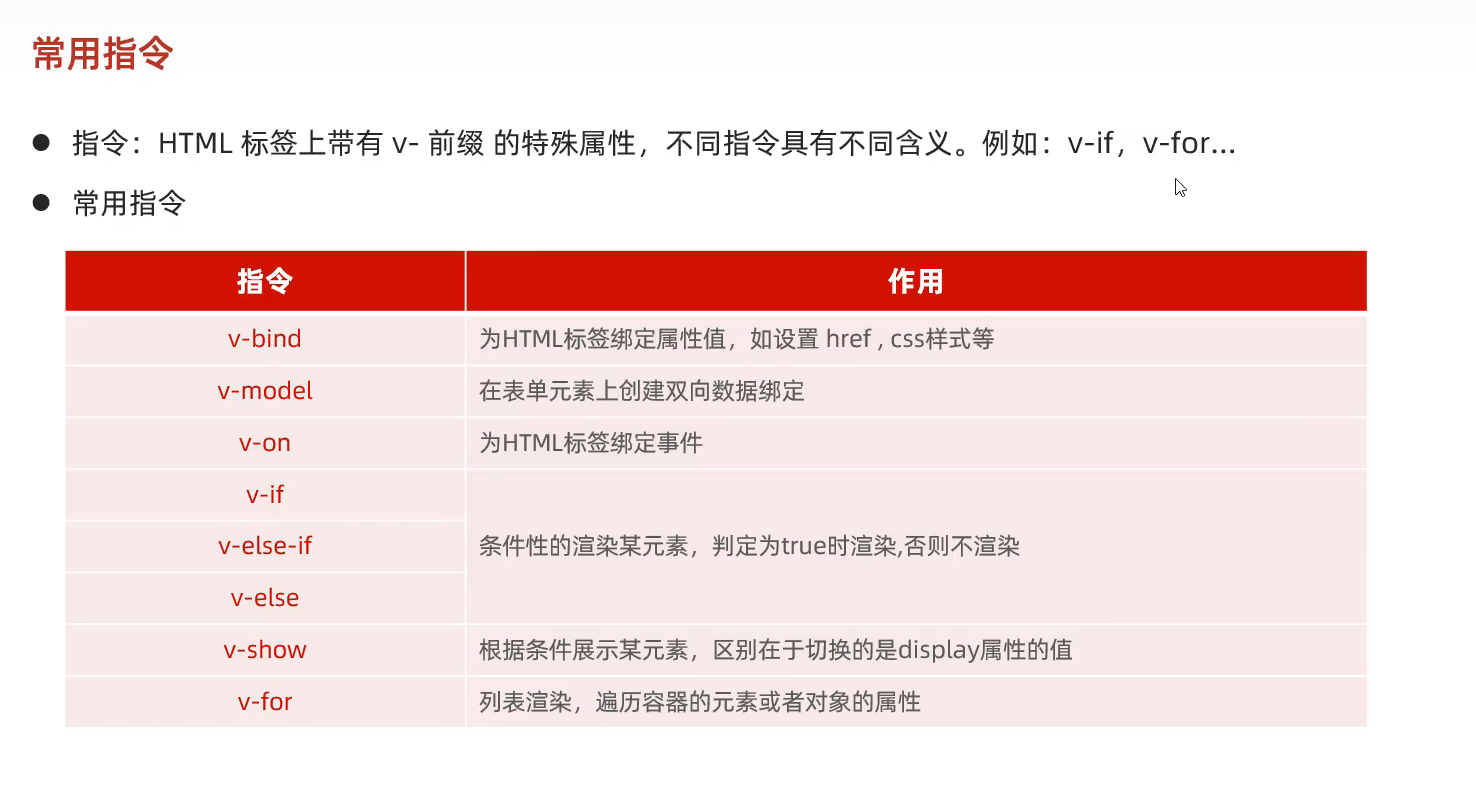
33.vue的常用指令
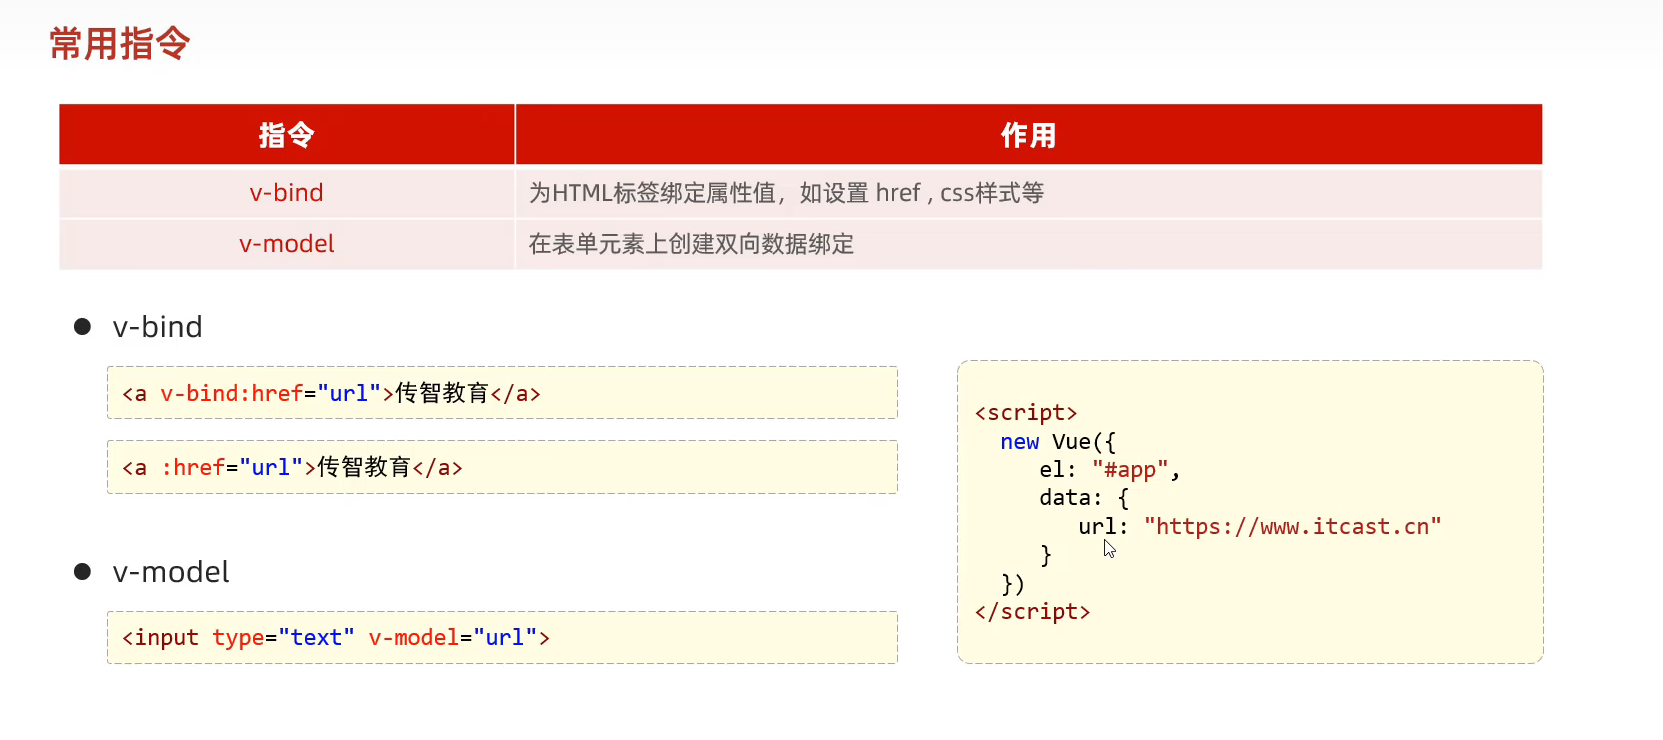
①v-bind指令和v-model指令
1
2
3
4
5
6
7
8
9
10
11
12
13
14
15
16
17
18
19
20
21
22
23
24
25
26
27
<!DOCTYPE html > <html lang ="en" > <head > <meta charset ="UTF-8" > <meta name ="viewport" content ="width=device-width, initial-scale=1.0" > <title > Document</title > <script src ="https://cdn.jsdelivr.net/npm/vue/dist/vue.js" > </script > </head > <body > <div id ="app" > <a v-bind:href ="url" > 链接1</a > <input type ="text" v-model ="url" > </div > </body > <script > new Vue ({ el :"#app" , data :{ url :"https://www.baidu.com" } }) </script > </html >
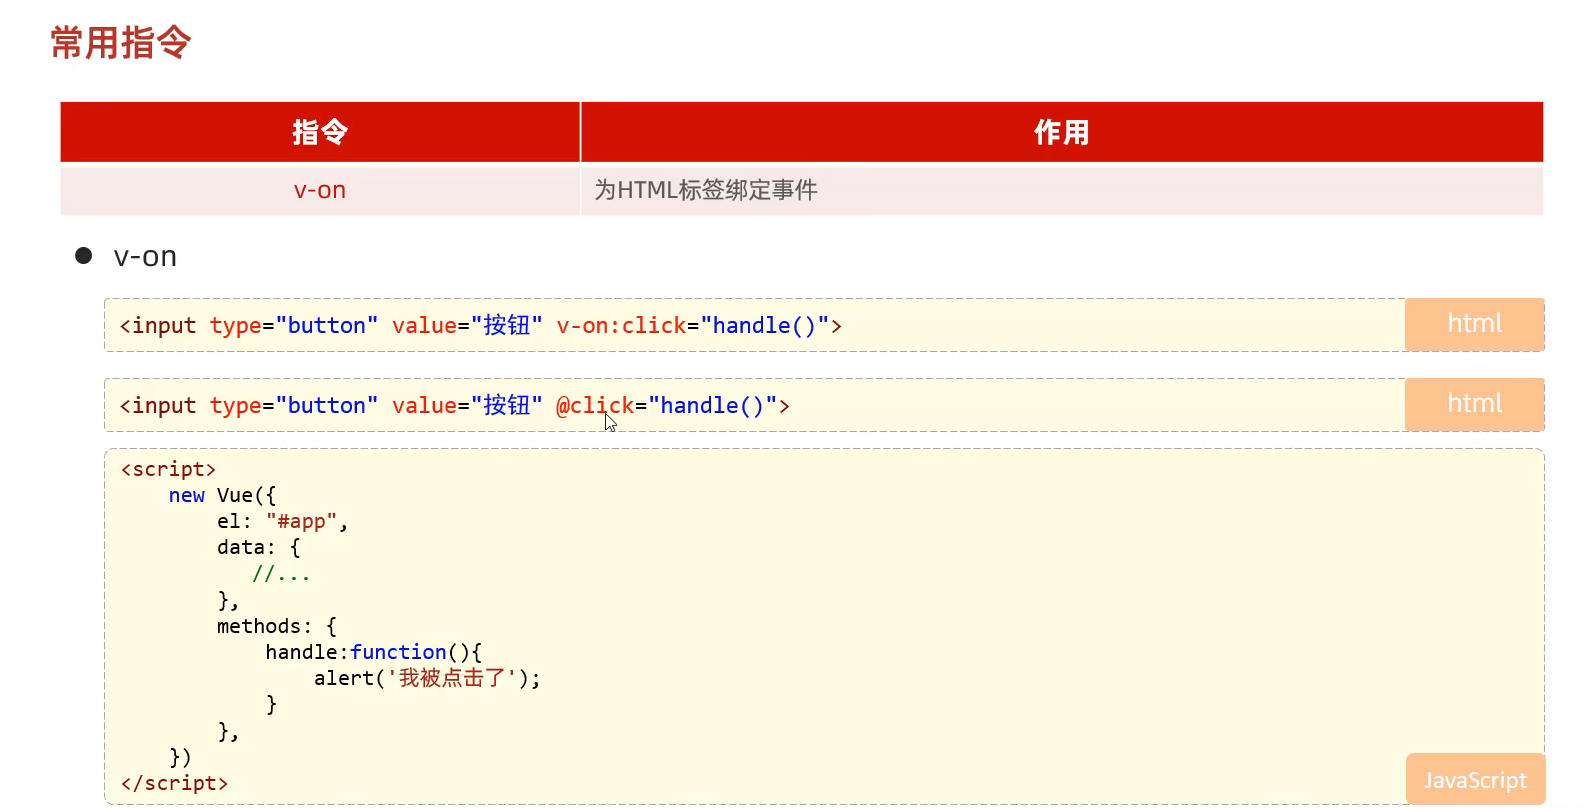
②v-on指令
1
2
3
4
5
6
7
8
9
10
11
12
13
14
15
16
17
18
19
20
21
22
23
24
25
26
27
28
29
30
<!DOCTYPE html > <html lang ="en" > <head > <meta charset ="UTF-8" > <meta name ="viewport" content ="width=device-width, initial-scale=1.0" > <title > Document</title > <script src ="https://cdn.jsdelivr.net/npm/vue/dist/vue.js" > </script > </head > <body > <div id ="app" > <input type ="button" value ="点击" v-on:click ="handle()" > <input type ="button" value ="点击" @click ="handle()" > </div > </body > <script > new Vue ({ el :"#app" , data :{ }, methods :{ handle :function ( alert ("被点击了一下" ); } } }) </script > </html >
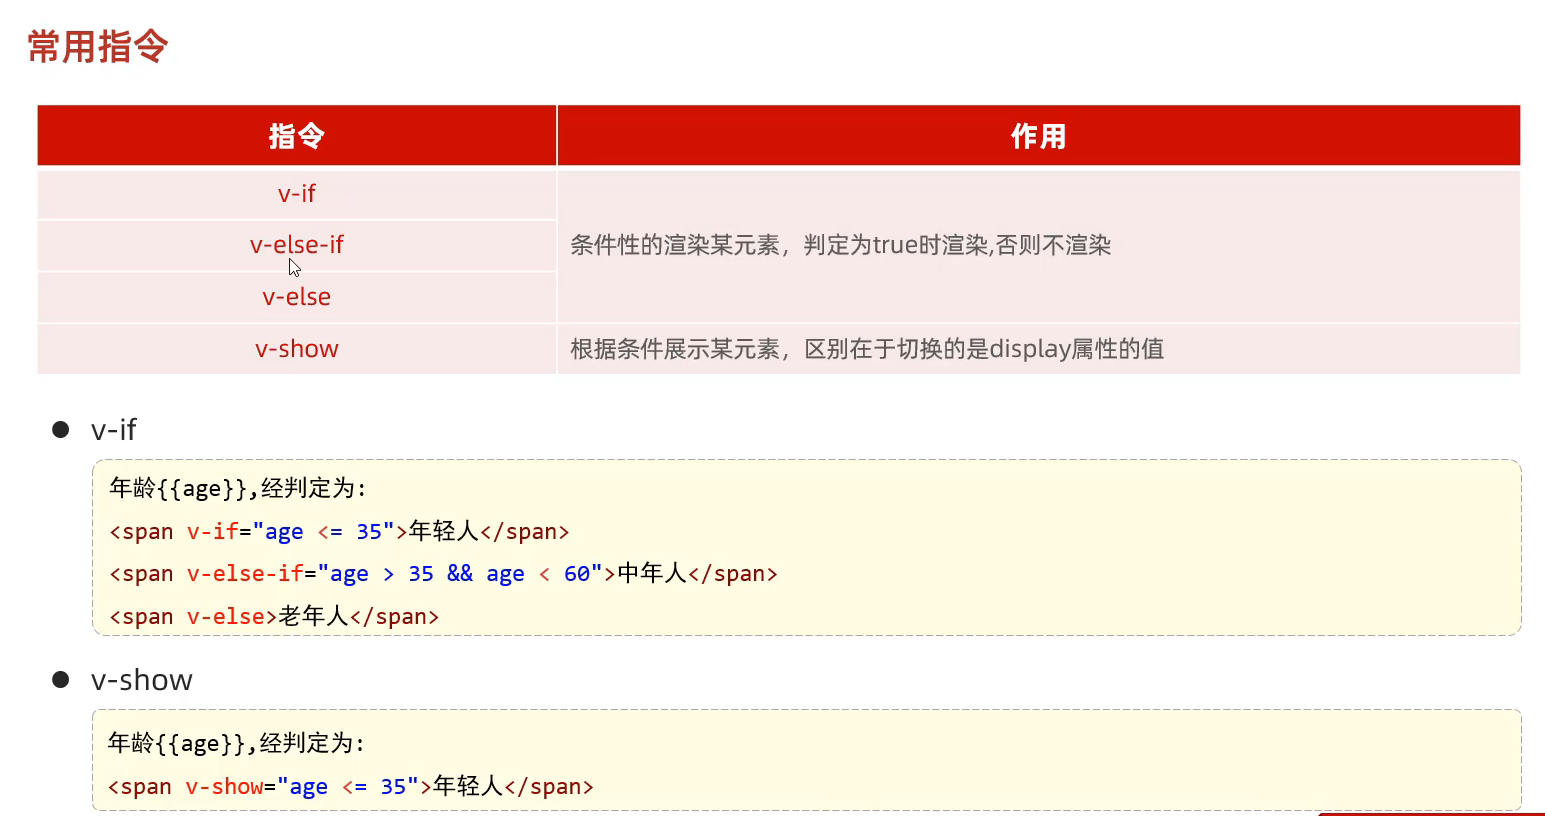
③v-if v-else-if v-else v-show
1
2
3
4
5
6
7
8
9
10
11
12
13
14
15
16
17
18
19
20
21
22
23
24
25
26
27
28
29
30
31
32
33
34
<!DOCTYPE html > <html lang ="en" > <head > <meta charset ="UTF-8" > <meta name ="viewport" content ="width=device-width, initial-scale=1.0" > <title > Document</title > <script src ="https://cdn.jsdelivr.net/npm/vue/dist/vue.js" > </script > </head > <body > <div id ="app" > 年龄<input type ="text" v-model ="age" > 经判定,为: <span v-if ="age<=35" > 年轻人(35及以下)</span > <span v-else-if ="age>35 && age < 60" > 中年人(35-60)</span > <span v-else > 老年人(60以上)</span > <br > <br > 年龄<input type ="text" v-model ="age" > 经判定,为: <span v-show ="age<=35" > 年轻人(35及以下)</span > <span v-show ="age>35 && age < 60" > 中年人(35-60)</span > <span v-show ="age>=60" > 老年人(60以上)</span > </div > </body > <script > new Vue ({ el :"#app" , data :{ age :20 }, methods :{ } }) </script > </html >
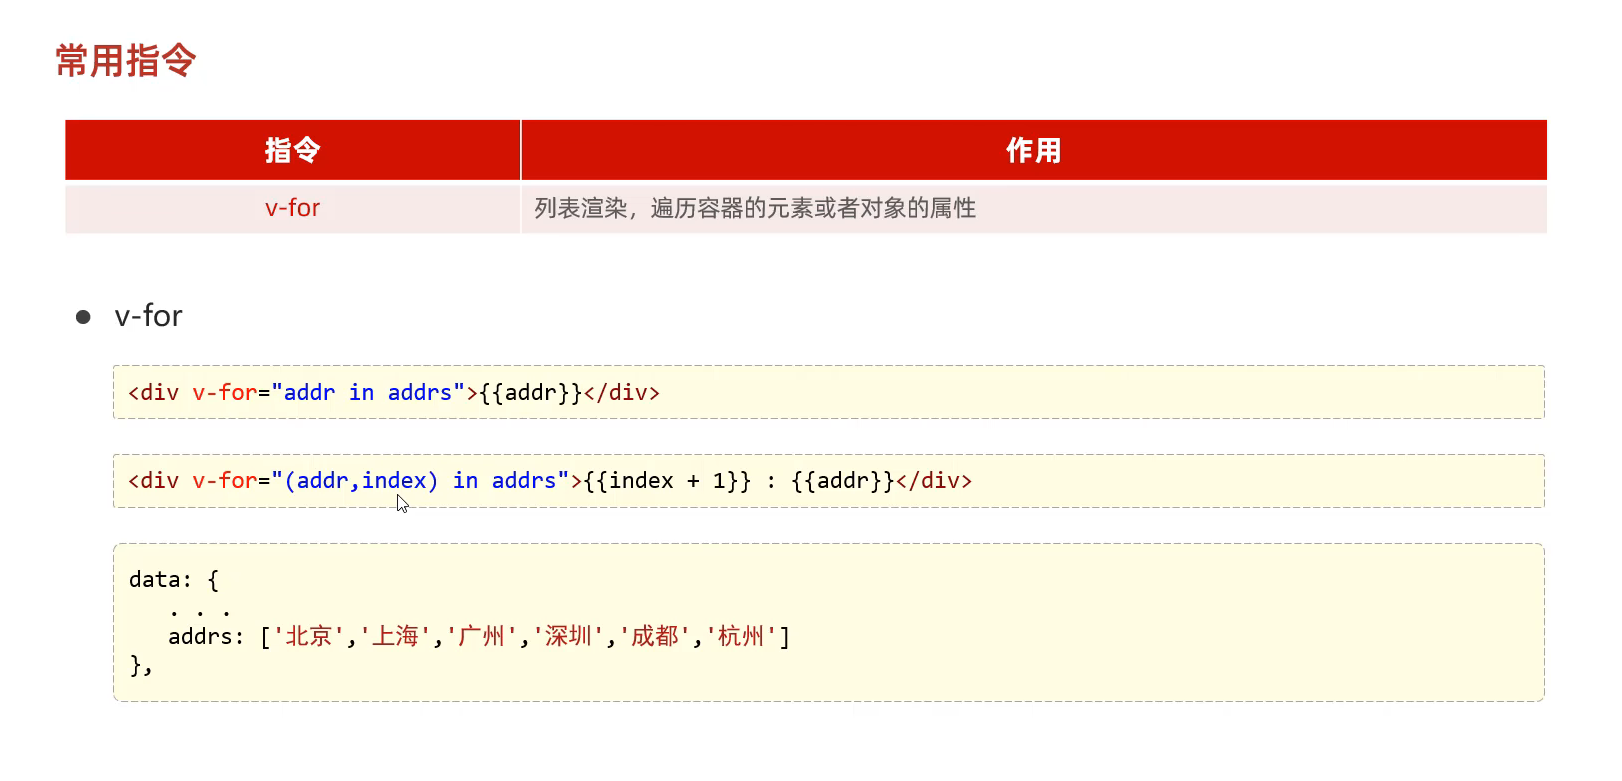
④v-for指令
1
2
3
4
5
6
7
8
9
10
11
12
13
14
15
16
17
18
19
20
21
22
23
24
25
26
27
28
<!DOCTYPE html > <html lang ="en" > <head > <meta charset ="UTF-8" > <meta name ="viewport" content ="width=device-width, initial-scale=1.0" > <title > Document</title > <script src ="https://cdn.jsdelivr.net/npm/vue/dist/vue.js" > </script > </head > <body > <div id ="app" > <div v-for ="addr in addrs" > {{addr}}</div > <hr > <div v-for ="(addr,index) in addrs" > {{index}} : {{addr}}</div > </div > </body > <script > new Vue ({ el :"#app" , data :{ addrs :["北京" ,"上海" ,"广州" ,"武汉" ] }, methods :{ } }) </script > </html >
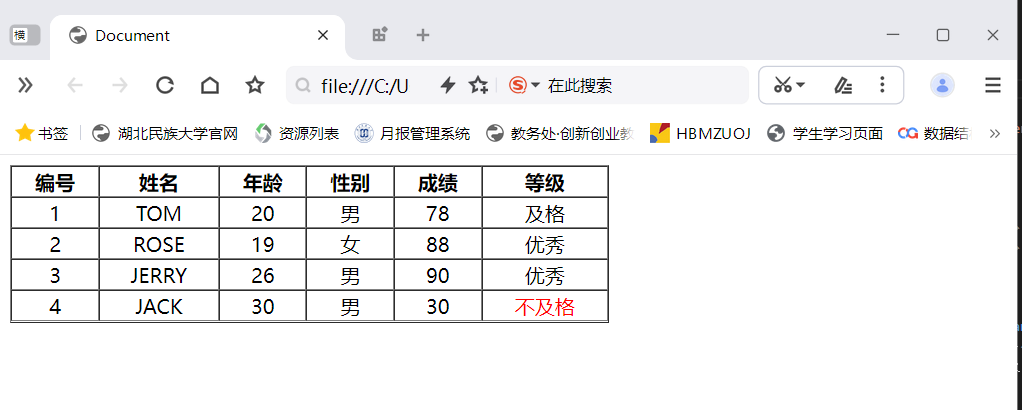
34.VUE的综合简单案例
1
2
3
4
5
6
7
8
9
10
11
12
13
14
15
16
17
18
19
20
21
22
23
24
25
26
27
28
29
30
31
32
33
34
35
36
37
38
39
40
41
42
43
44
45
46
47
48
49
50
51
52
53
54
55
56
57
58
59
60
61
62
63
64
65
66
67
68
69
70
71
72
73
<!DOCTYPE html > <html lang ="en" > <head > <meta charset ="UTF-8" > <meta name ="viewport" content ="width=device-width, initial-scale=1.0" > <title > Document</title > <script src ="https://cdn.jsdelivr.net/npm/vue/dist/vue.js" > </script > </head > <body > <div id ="app" > <table border ="1" cellspacing ="0" width ="60%" > <tr > <th > 编号</th > <th > 姓名</th > <th > 年龄</th > <th > 性别</th > <th > 成绩</th > <th > 等级</th > </tr > <tr align ="center" v-for ="(user,index) in users" > <td > {{index+1}}</td > <td > {{user.name}}</td > <td > {{user.age}}</td > <td > <span v-if ="user.gender==1" > 男</span > <span v-if ="user.gender==2" > 女</span > </td > <td > {{user.score}}</td > <td > <span v-if ="user.score>=85" > 优秀</span > <span v-else-if ="user.score>=60" > 及格</span > <span style ="color:red" v-else > 不及格</span > </td > </tr > </table > </div > </body > <script > new Vue ({ el :"#app" , data :{ users :[{ name :"TOM" , age :20 , gender :1 , score :78 }, { name :"ROSE" , age :19 , gender :2 , score :88 }, { name :"JERRY" , age :26 , gender :1 , score :90 }, { name :"JACK" , age :30 , gender :1 , score :30 }] }, methods :{ } }) </script > </html >
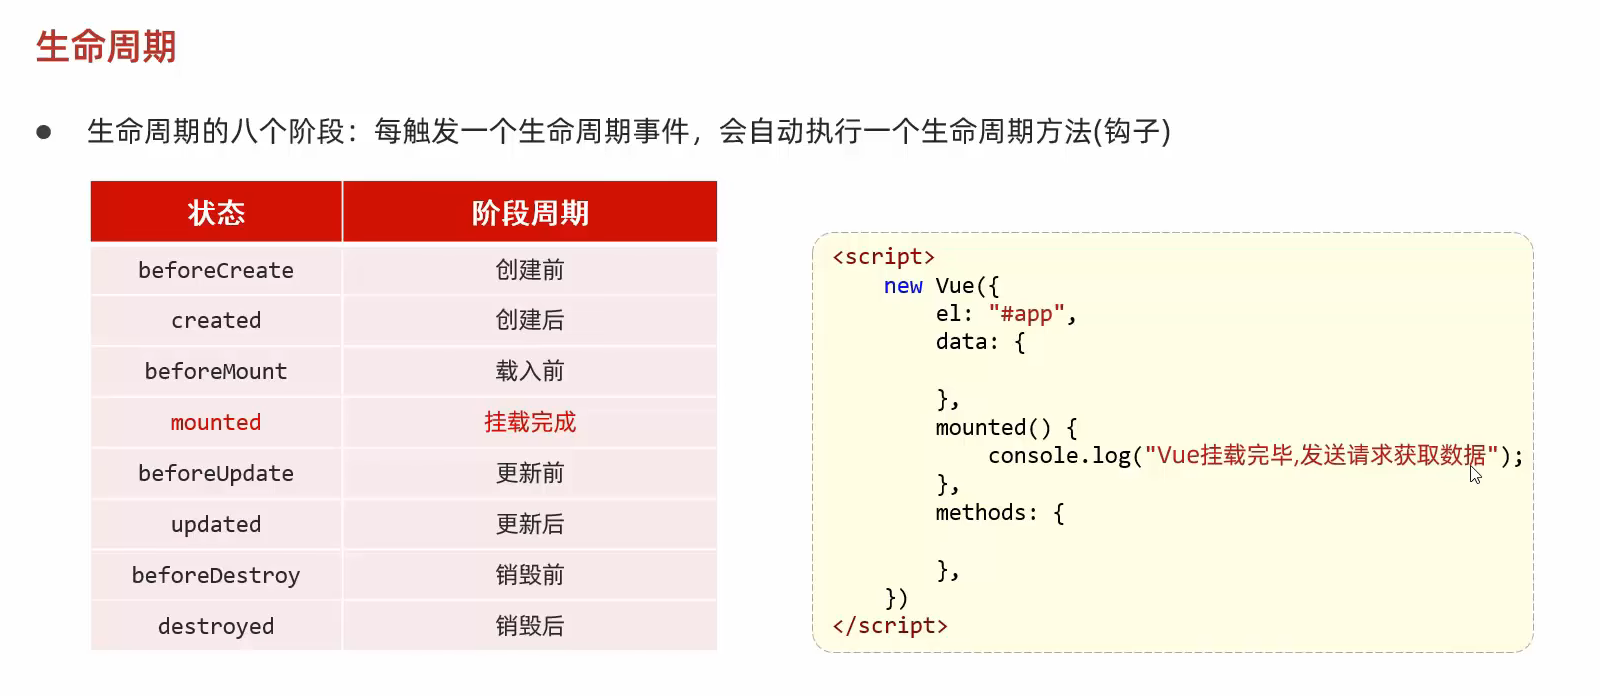
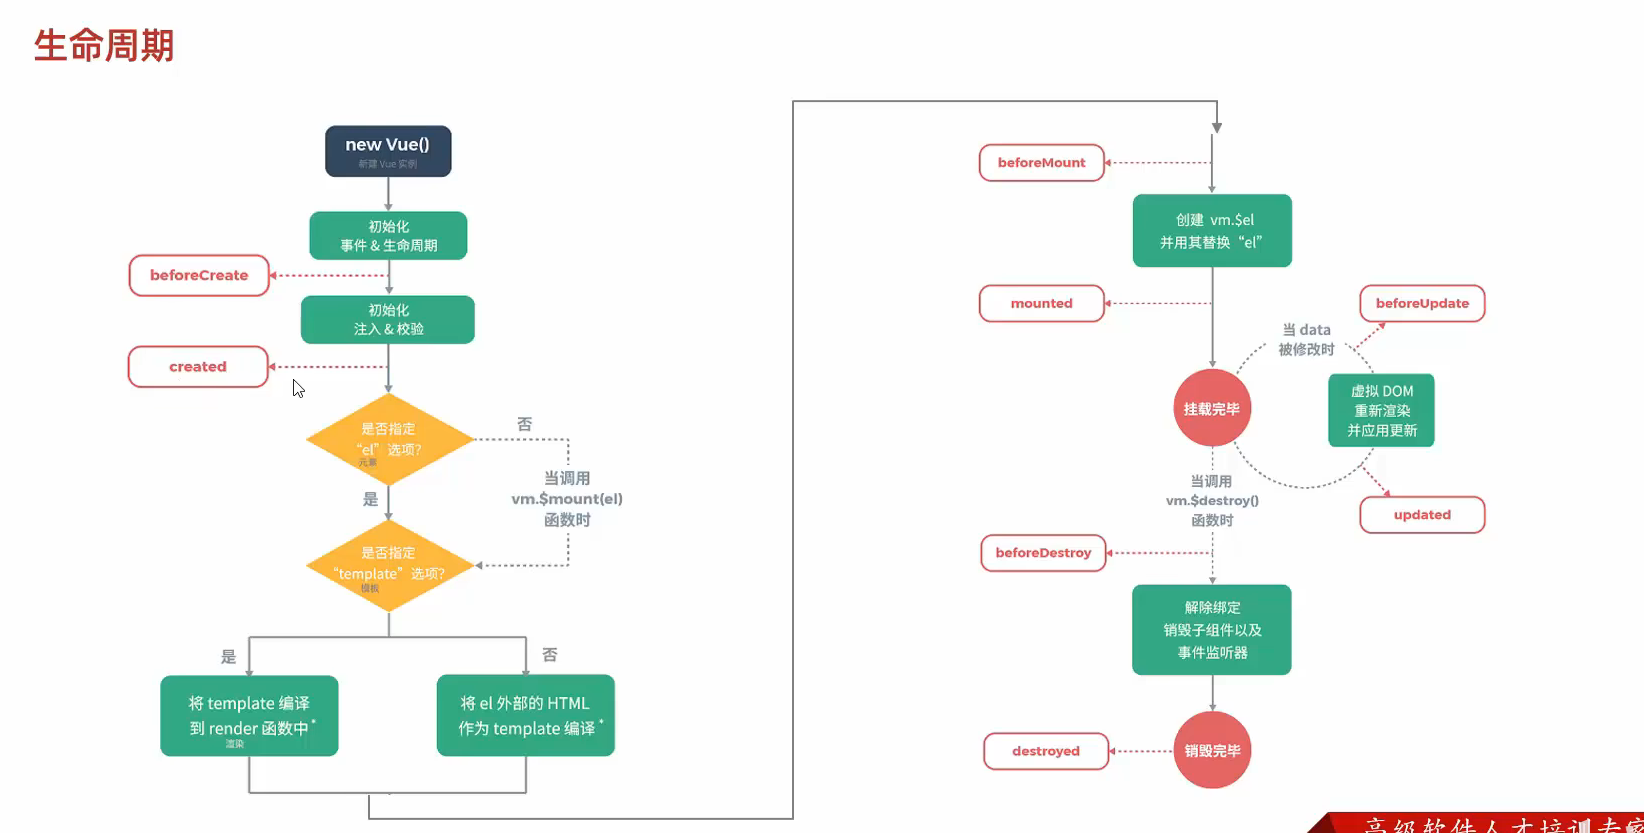
35.VUE的生命周期
1
2
3
4
5
6
7
8
9
10
11
12
13
14
15
16
17
18
19
20
21
22
23
24
25
26
27
<!DOCTYPE html > <html lang ="en" > <head > <meta charset ="UTF-8" > <meta name ="viewport" content ="width=device-width, initial-scale=1.0" > <title > Document</title > <script src ="https://cdn.jsdelivr.net/npm/vue/dist/vue.js" > </script > </head > <body > <div id ="app" > </div > </body > <script > new Vue ({ el :"#app" , data :{ }, methods :{ }, mounted ( alert ("挂载完成 发送请求到服务端" ); } }) </script > </html >
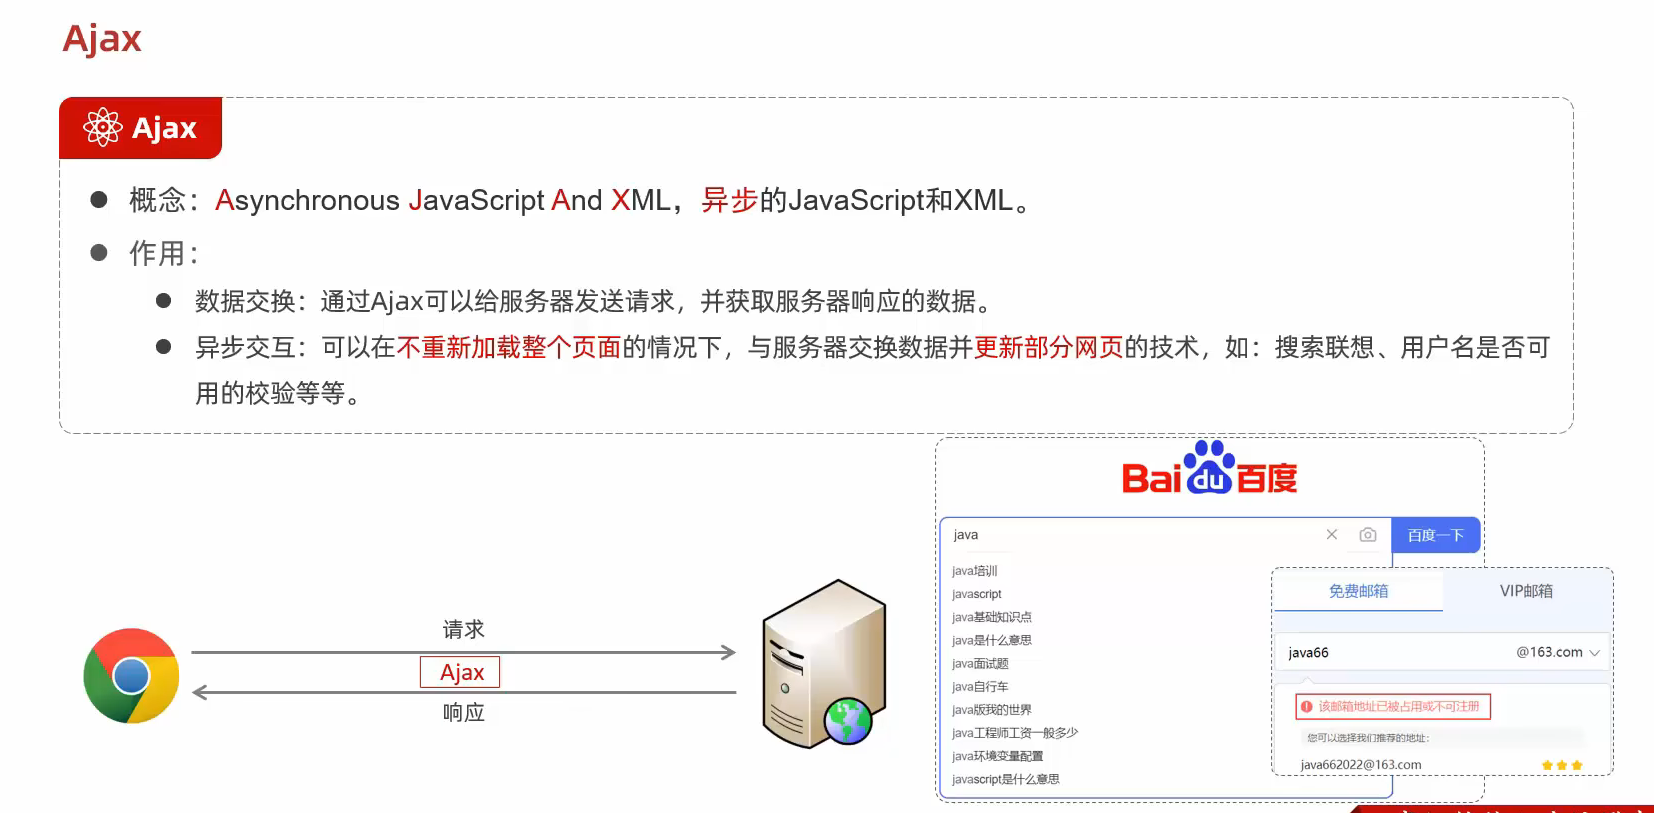
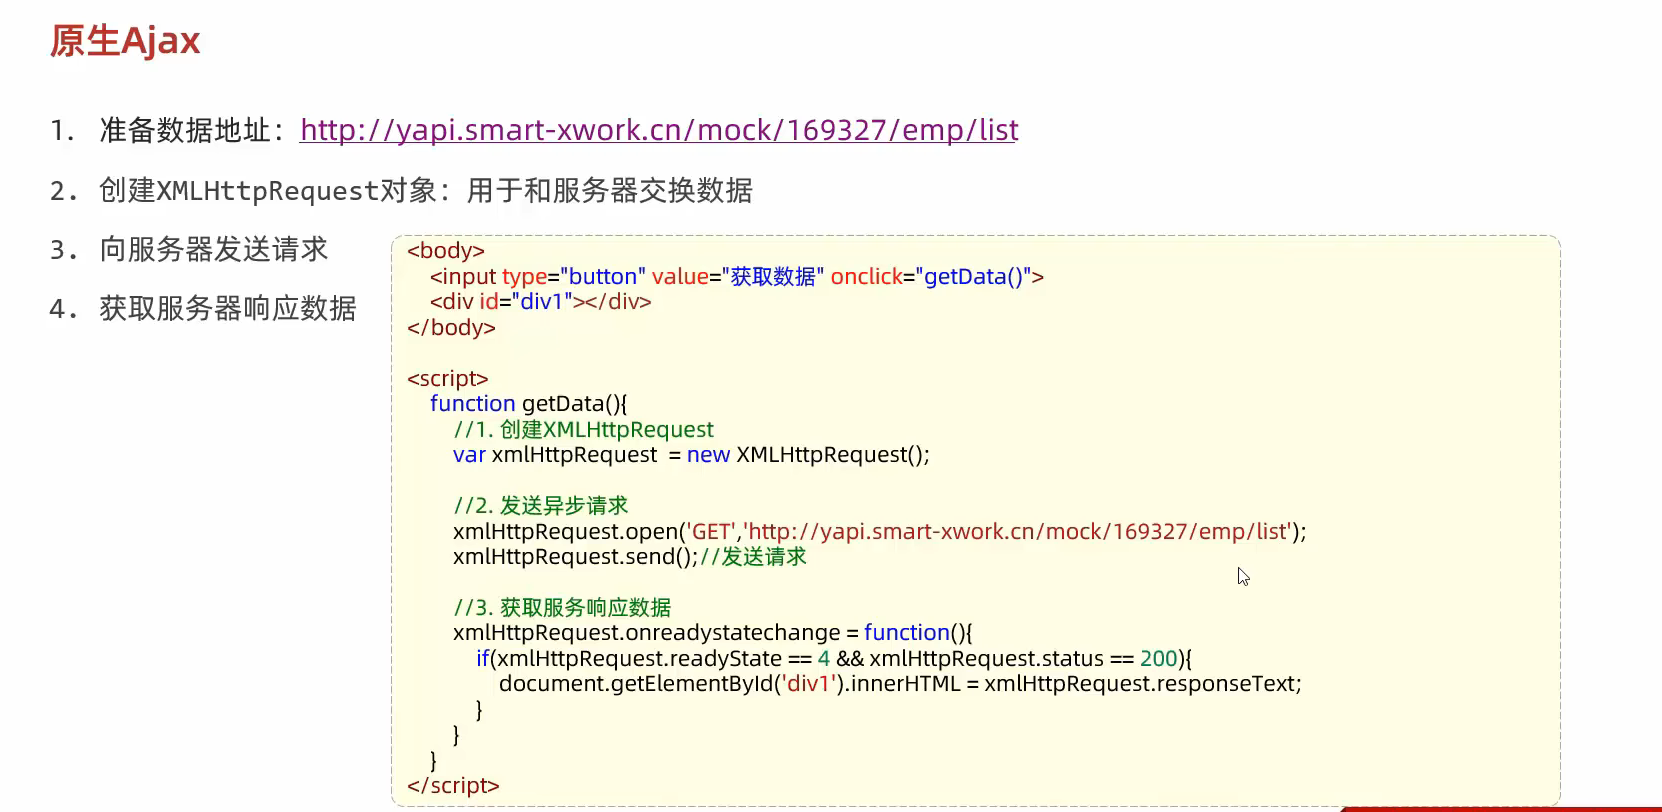
36.Ajax
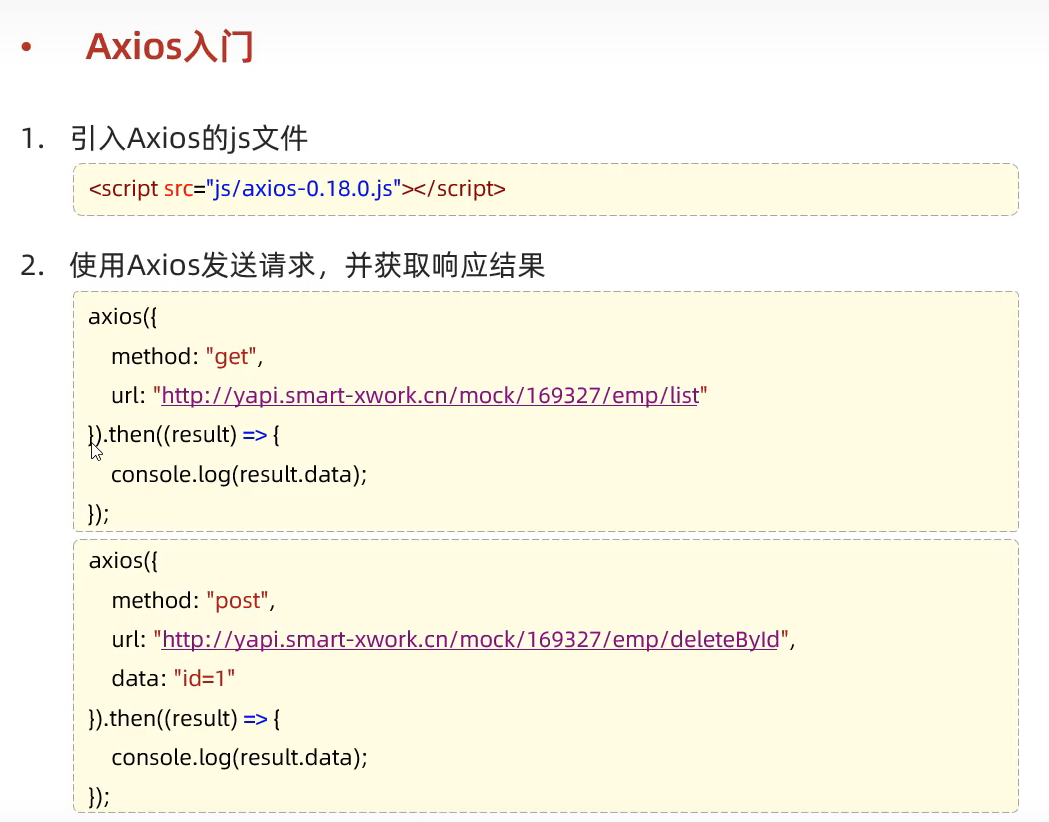
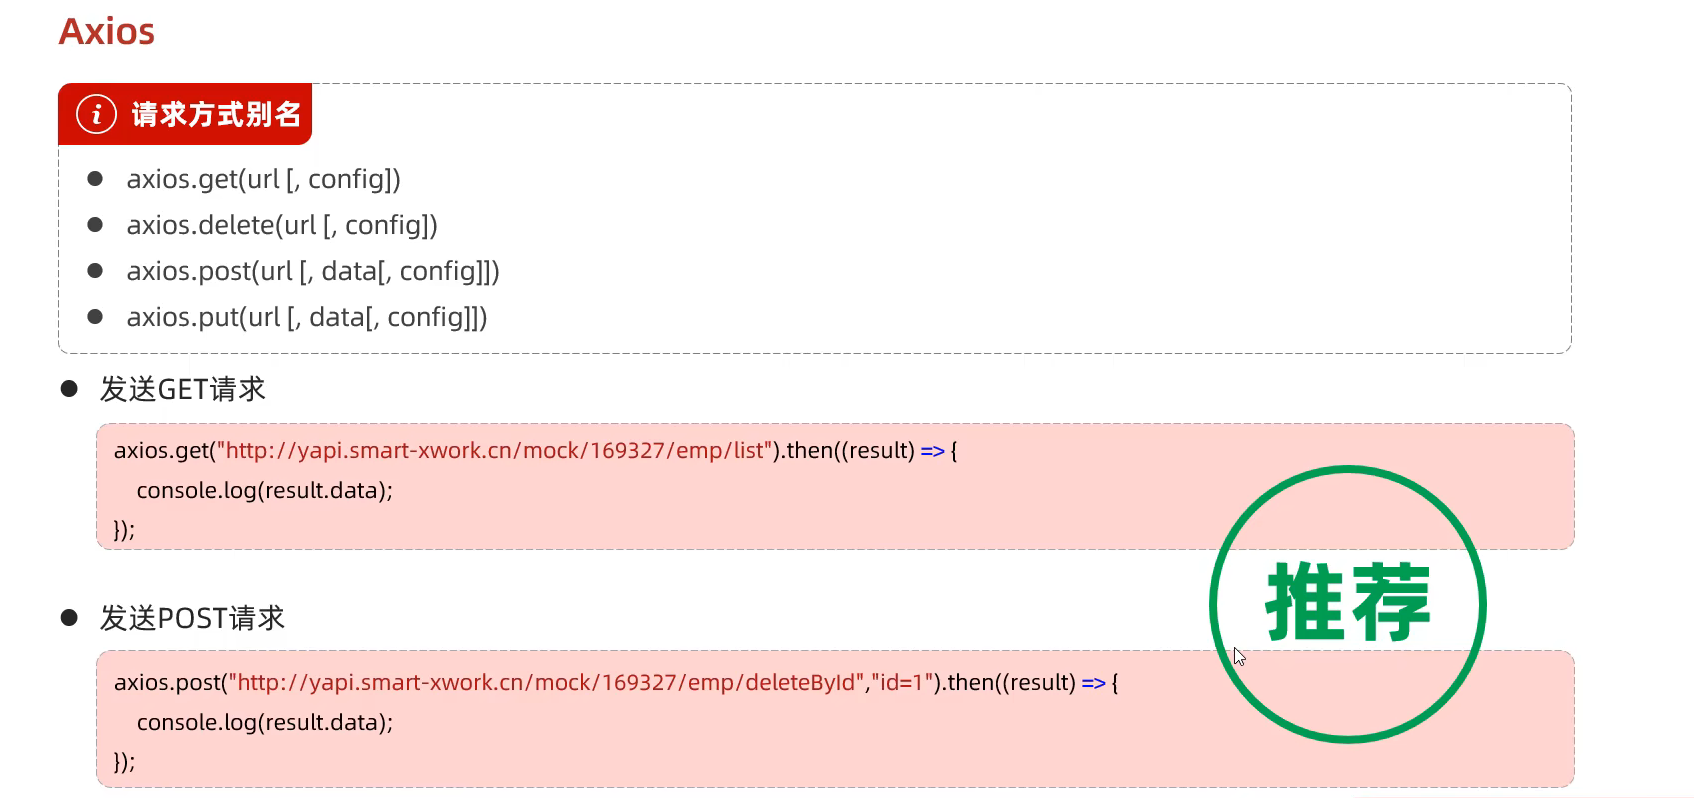
37.Axios 1 2 <script src ="https://cdn.jsdelivr.net/npm/axios/dist/axios.min.js" > </script >
由于原生的Ajax访问请求数据极为繁琐 于是就出现了封装的Axios
Axios 是一个基于 promise node.jsisomorphic http 模块, 而在客户端 (浏览端) 则使用 XMLHttpRequests。
使用方式
1 2 3 4 5 6 7 8 9 10 11 12 13 14 15 16 17 18 19 20 21 22 23 24 25 26 27 28 29 30 31 32 33 34 35 36 37 <!DOCTYPE html > <html lang ="en" > <head > <meta charset ="UTF-8" > <meta name ="viewport" content ="width=device-width, initial-scale=1.0" > <title > Document</title > <script src ="https://cdn.jsdelivr.net/npm/axios/dist/axios.min.js" > </script > </head > <body > <input type ="button" value ="读取数据" onclick ="getData()" > <input type ="button" value ="删除数据" onclick ="postData()" > </body > <script > function getData ( axios ({ method :"get" , url :"https://mock.apifox.cn/m1/3128855-0-default/emp/list" }).then (result => console .log (result.data ); }) } function postData ( axios ({ method :"post" , url :"https://mock.apifox.cn/m1/3128855-0-default/emp/deleteById" , data :"id=1" }).then (result => console .log (result.data ); }) } </script > </html >
封装成函数的简化后:
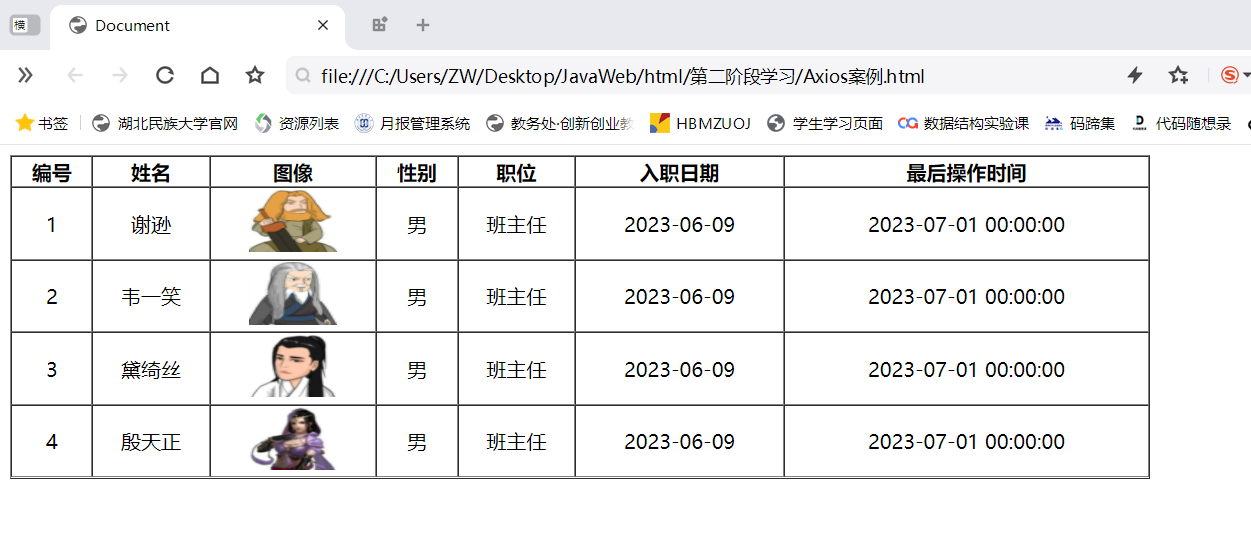
Axios的案例 1 2 3 4 5 6 7 8 9 10 11 12 13 14 15 16 17 18 19 20 21 22 23 24 25 26 27 28 29 30 31 32 33 34 35 36 37 38 39 40 41 42 43 44 45 46 47 48 49 50 51 52 53 54 55 56 <!DOCTYPE html > <html lang ="en" > <head > <meta charset ="UTF-8" > <meta name ="viewport" content ="width=device-width, initial-scale=1.0" > <title > Document</title > <script src ="https://cdn.jsdelivr.net/npm/axios/dist/axios.min.js" > </script > <script src ="https://cdn.jsdelivr.net/npm/vue/dist/vue.js" > </script > </head > <body > <div id ="app" > <table border ="1" cellspacing ="0" width ="60%" > <tr > <th > 编号</th > <th > 姓名</th > <th > 图像</th > <th > 性别</th > <th > 职位</th > <th > 入职日期</th > <th > 最后操作时间</th > </tr > <tr align ="center" v-for ="(emp,index) in emps" > <td > {{index+1}}</td > <td > {{emp.name}}</td > <td > <img v-bind:src ="emp.image" width ="70px" height ="50px" > </td > <td > <span v-if ="emp.gender==1" > 男</span > <span v-if ="emp.gender==2" > 女</span > </td > <td > {{emp.job}}</td > <td > {{emp.entrydate}}</td > <td > {{emp.updatetime}}</td > </tr > </table > </div > </body > <script > new Vue ({ el :"#app" , data :{ emps :[] }, mounted ( axios.get ("https://mock.apifox.cn/m1/3128855-0-default/emp/list" ).then (result => this .emps =result.data .data ; }) } }) </script > </html >
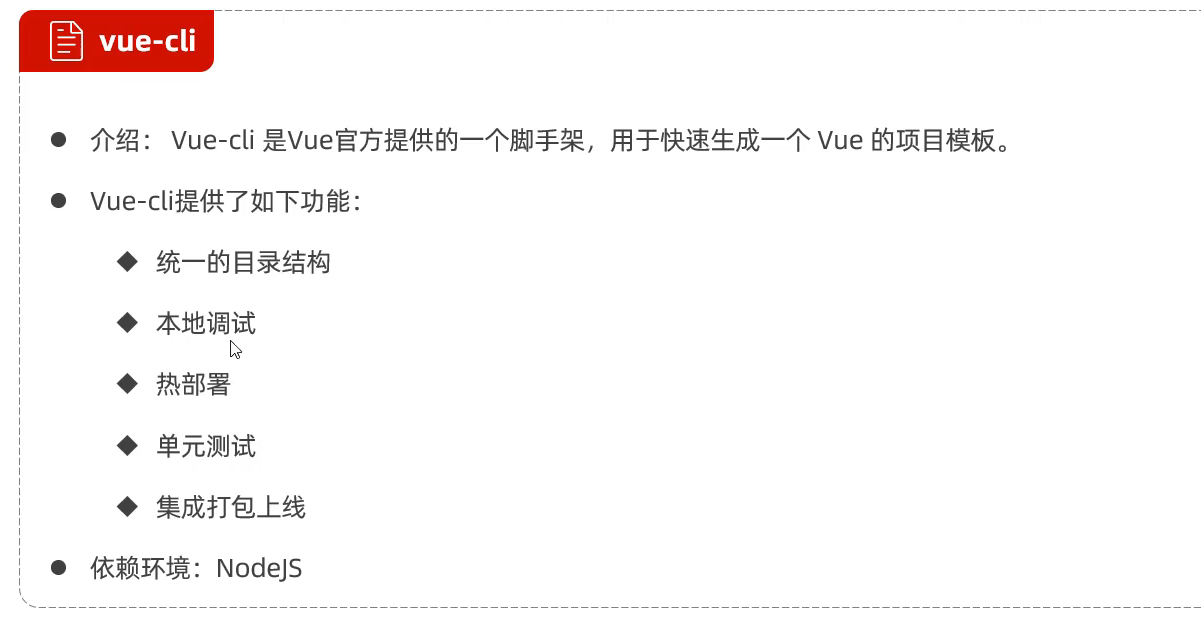
38.Vue-cil vue的npm镜像
npm config set registry https://mirrors.huaweicloud.com/repository/npm/ (华为)
npm config set registry http://mirrors.cloud.tencent.com/npm/ (腾讯)
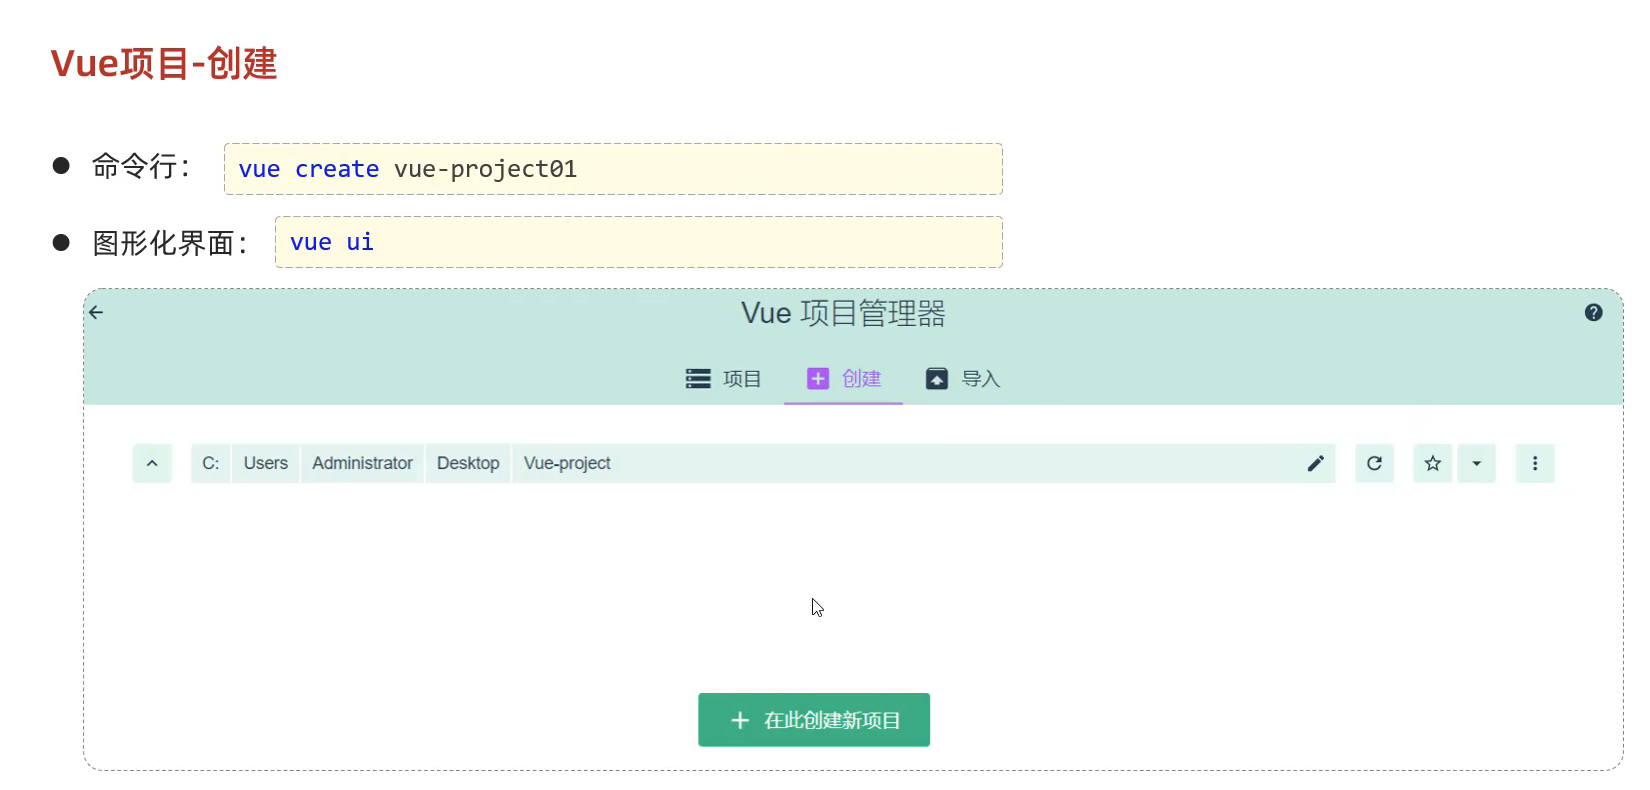
进入vue的方式
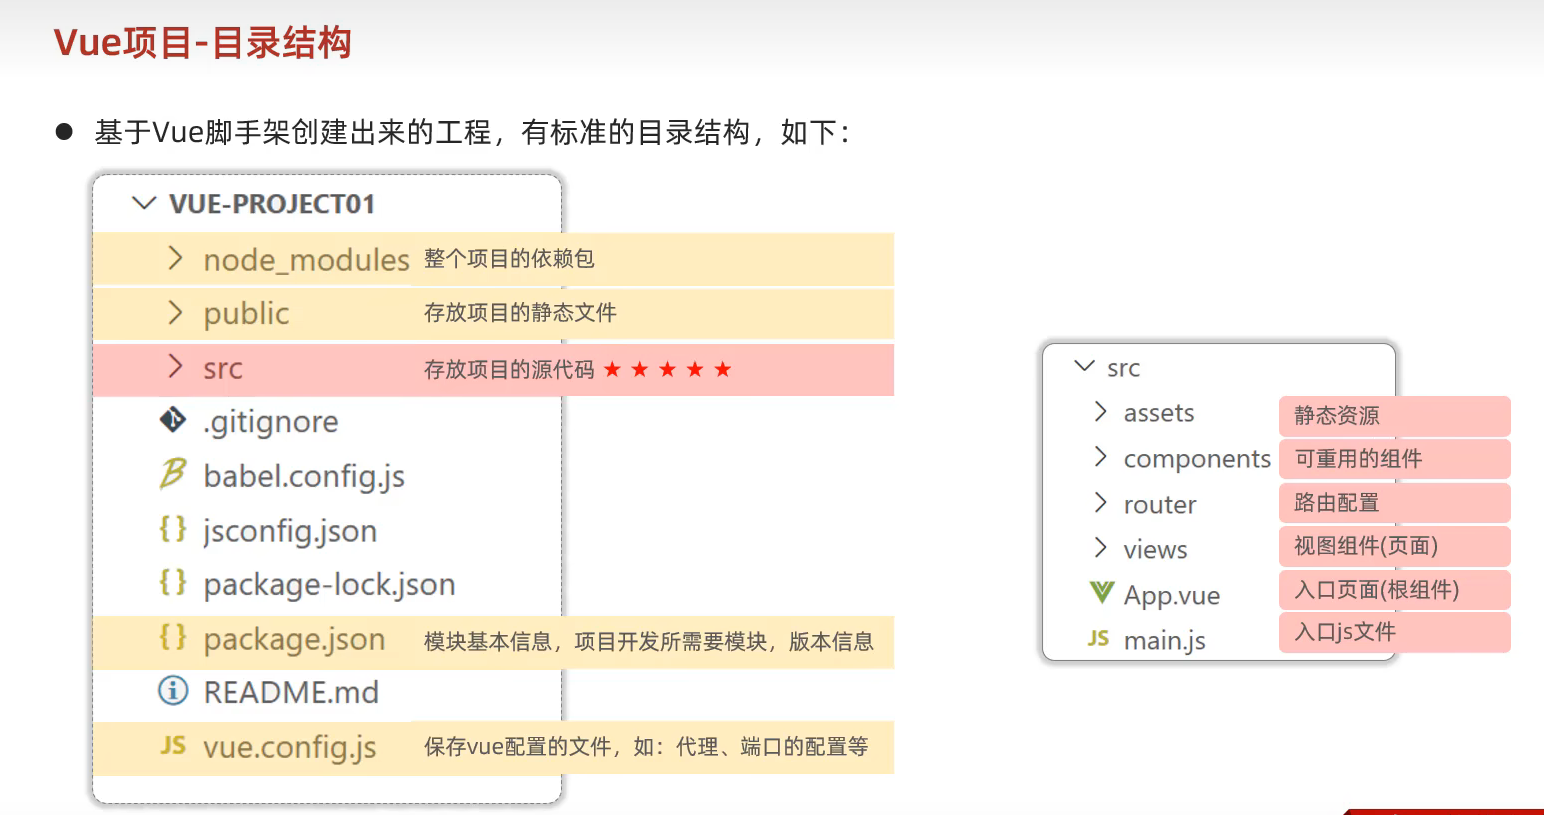
vue项目的目录结构
运行npm的方法
ctrl+shift+p 搜索npm 然后选择serve运行即可
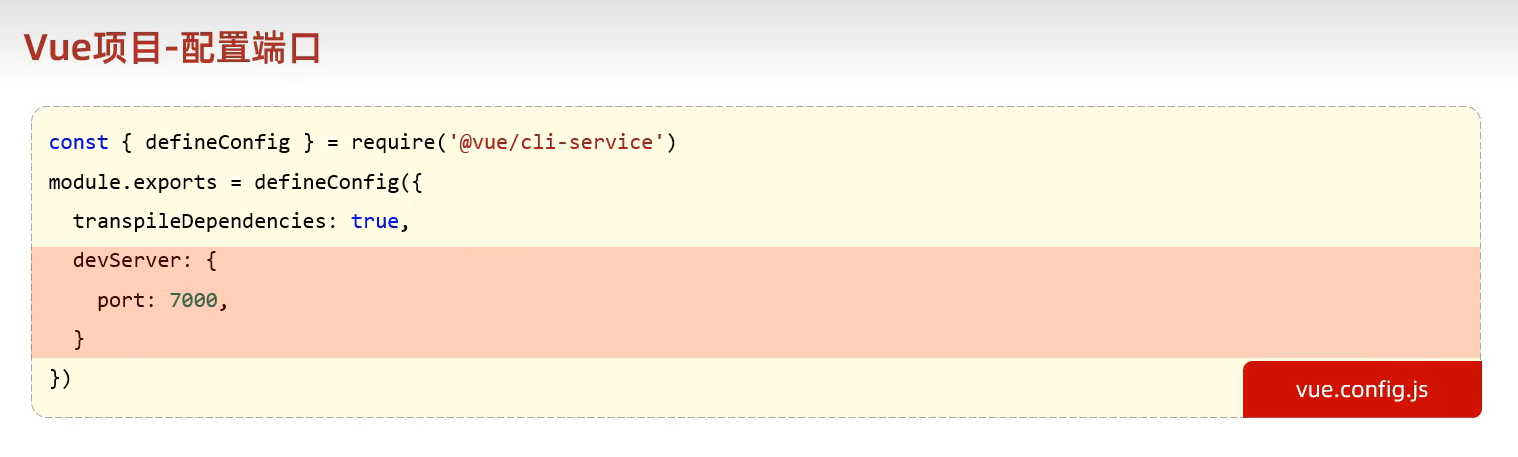
39.修改vue项目的端口号
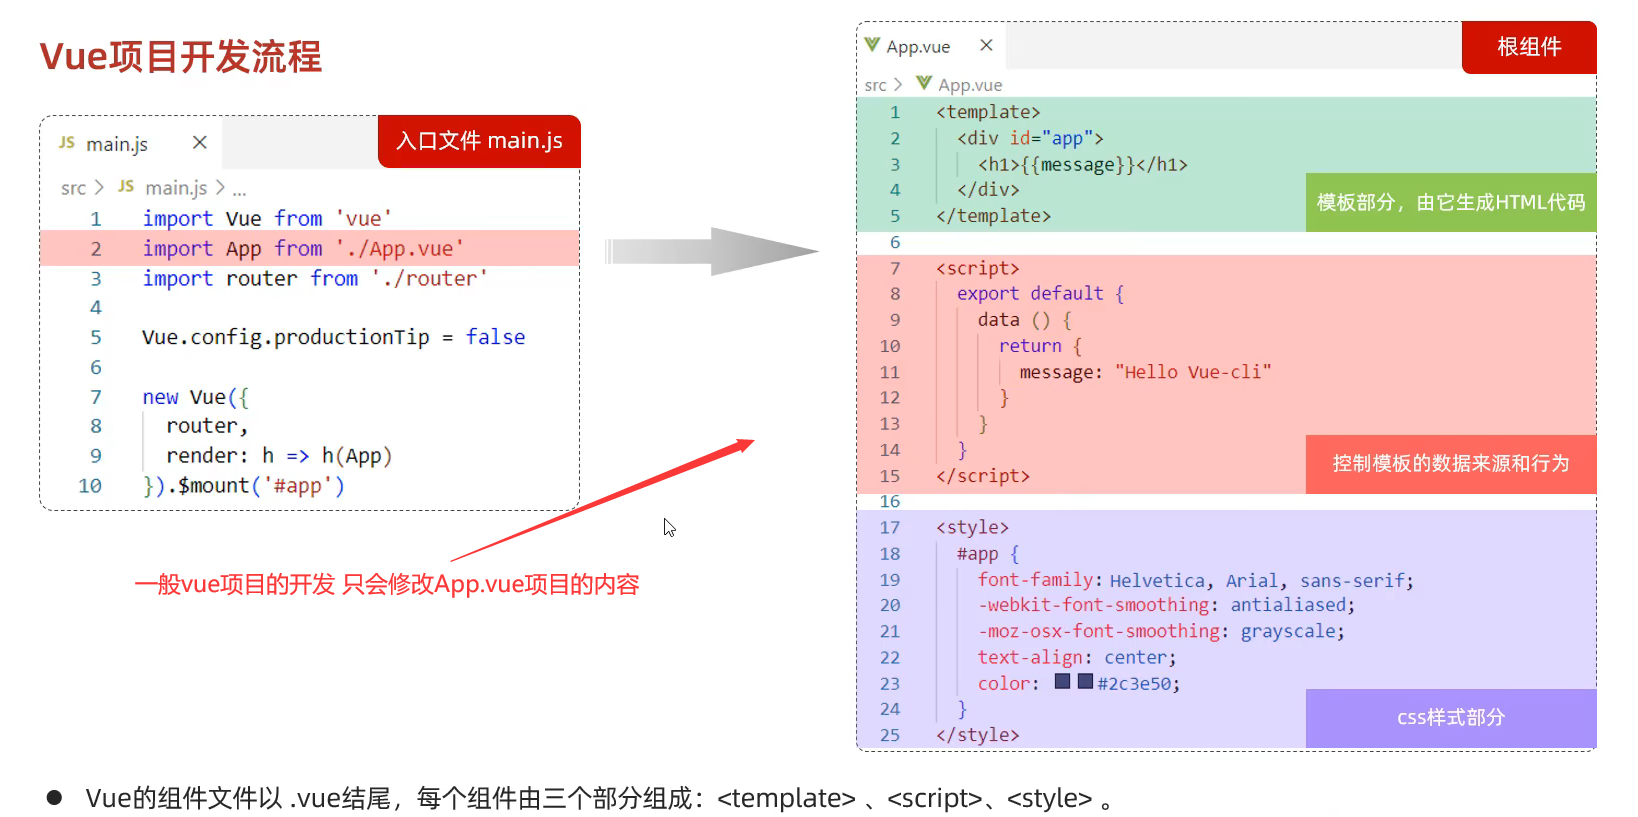
40.Vue项目的开发
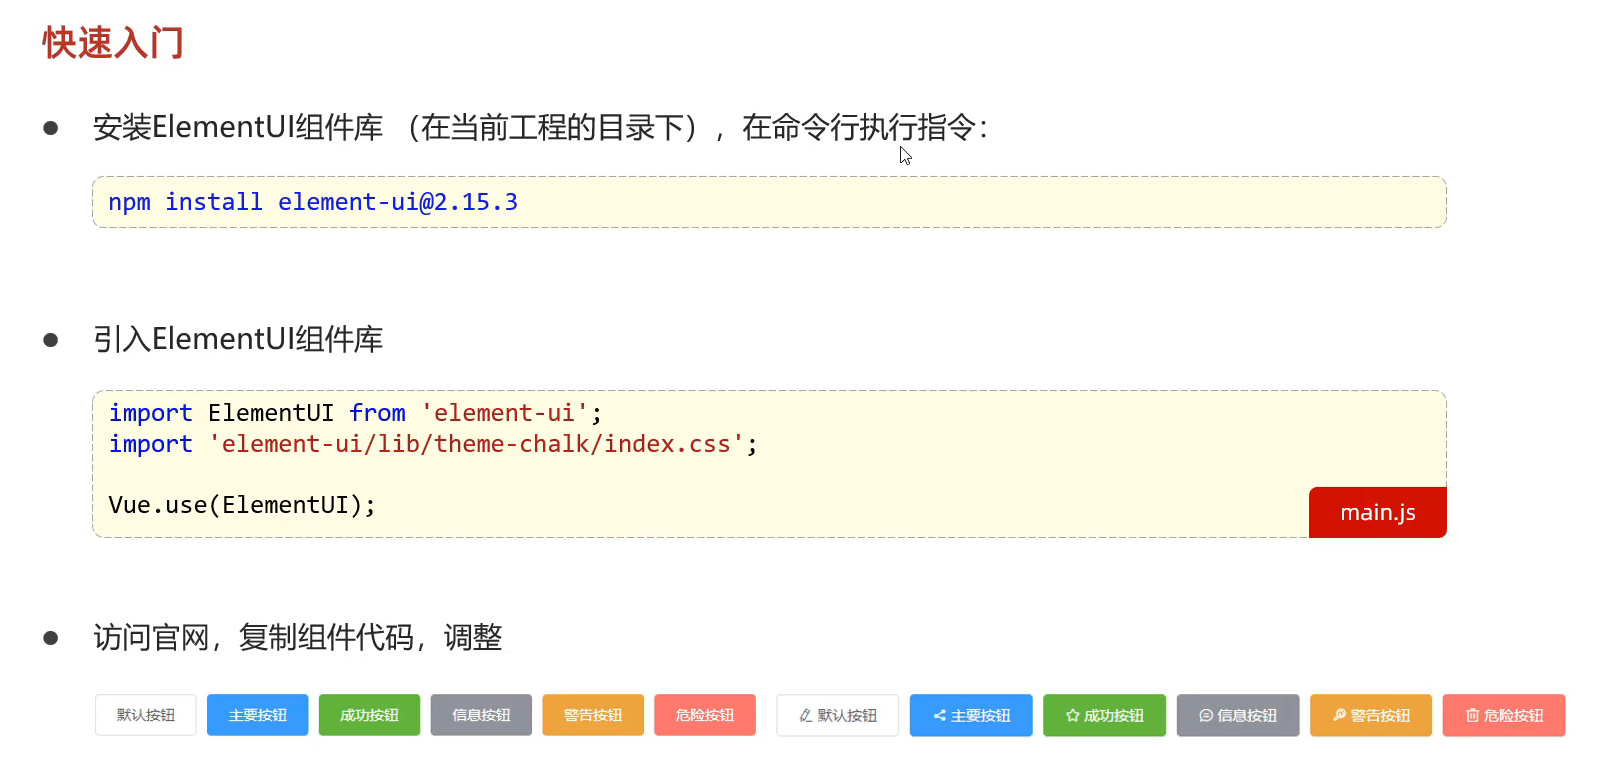
41.Vue的Element组件库 参考文档:https://element.eleme.cn/#/zh-CNListener
主要就是为了美化各种组件,图形等
①安装组件
②在main.js中引入ElementUi组件库
③创建一个ElementView.vue的文件 里面存放的是官网中的组件代码
1 2 3 4 5 6 7 8 9 10 11 12 13 14 15 16 17 18 19 20 21 22 23 <template > <div > <el-row > <el-button > 默认按钮</el-button > <el-button type ="primary" > 主要按钮</el-button > <el-button type ="success" > 成功按钮</el-button > <el-button type ="info" > 信息按钮</el-button > <el-button type ="warning" > 警告按钮</el-button > <el-button type ="danger" > 危险按钮</el-button > </el-row > </div > </template > <script > export default {} </script > <style > </style >
④在App.vue中导入我的ElementView.vue文件
1 2 3 4 5 6 7 8 9 10 11 12 13 14 15 16 17 18 19 20 21 22 23 24 25 26 27 <template > <div > <element-view > </element-view > </div > </template > <script > import ElementView from './views/element/ElementView.vue' export default { components :{ElementView }, data ( return { message :"Hello World" } }, methods :{ } } </script > <style > </style >
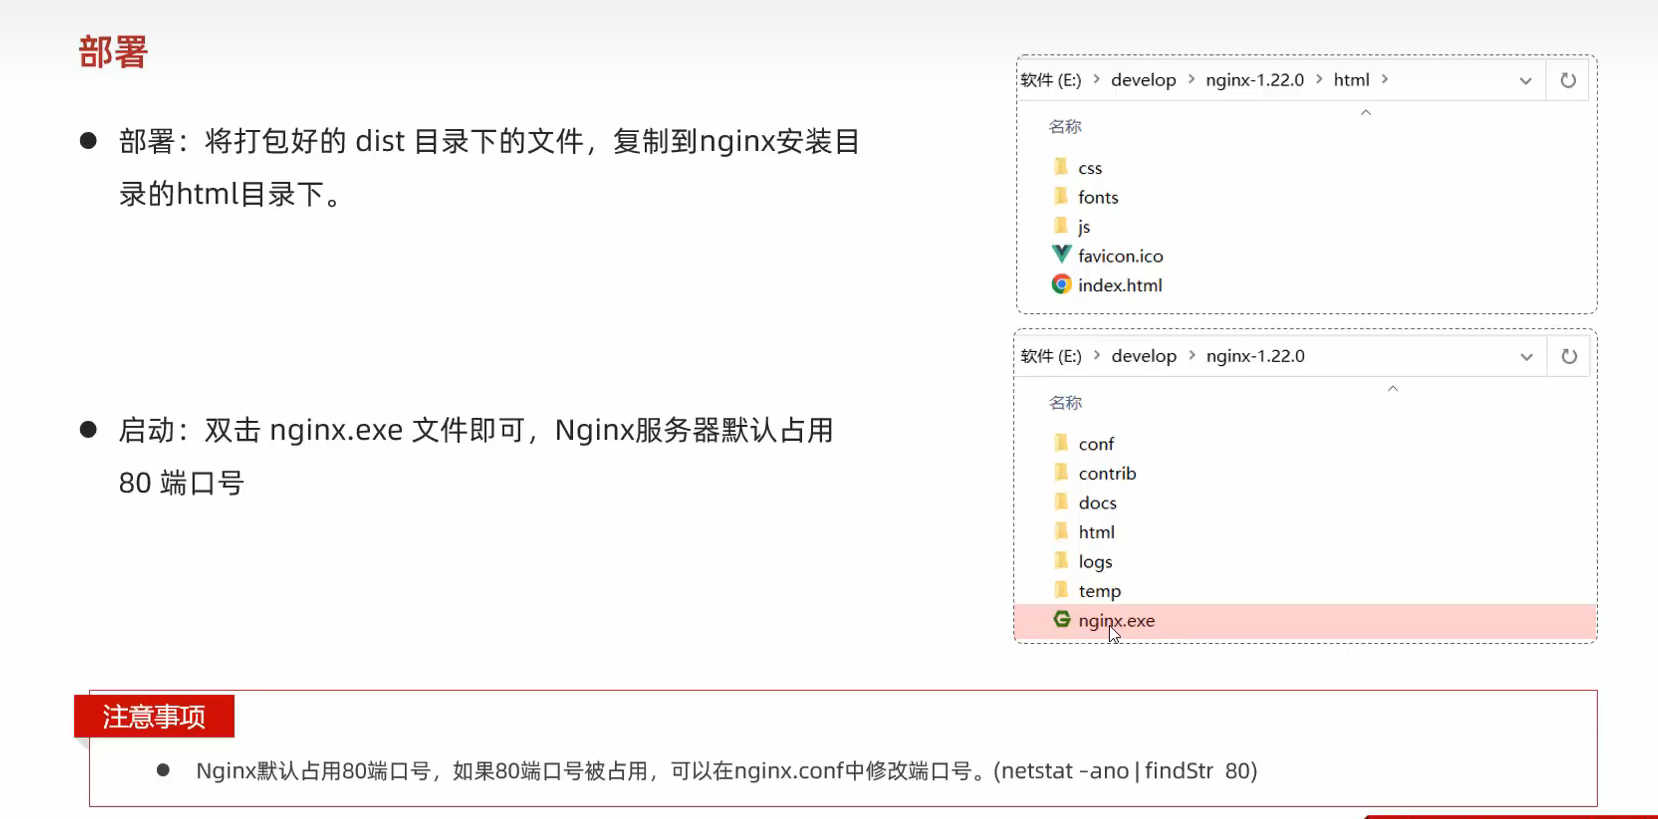
42.Vue项目的部署
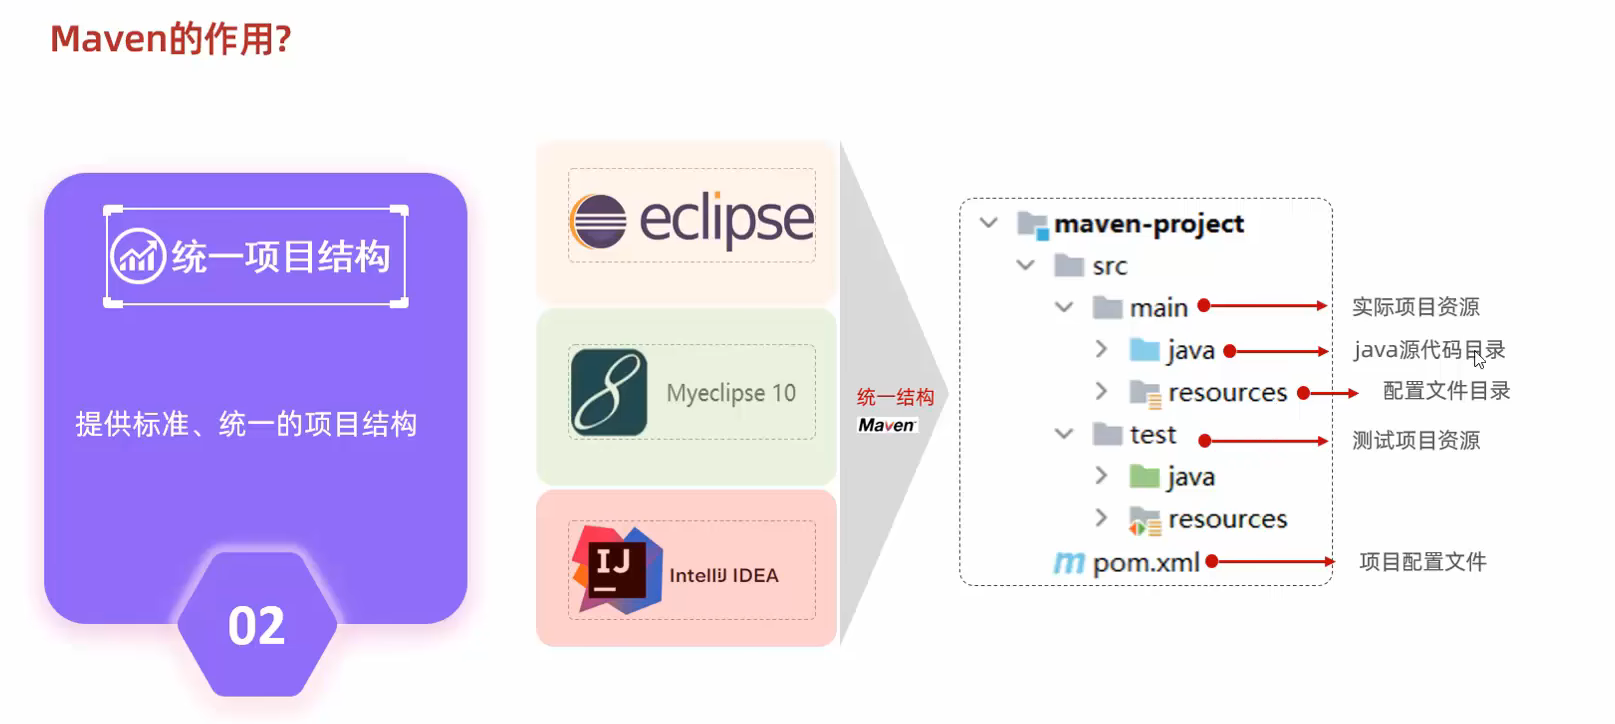
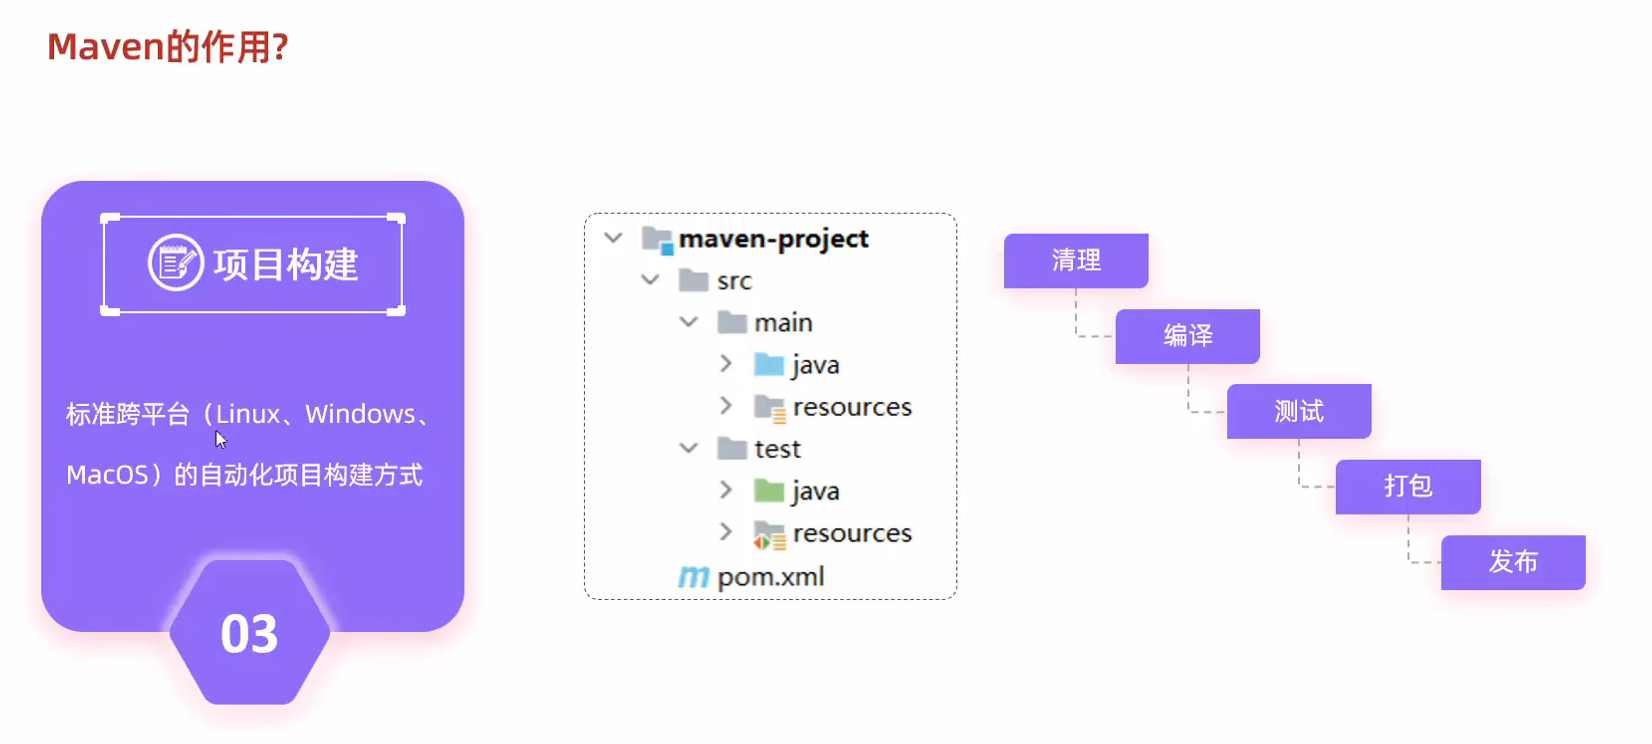
43.Maven学习(Maven就是管理和构建java项目的工具)
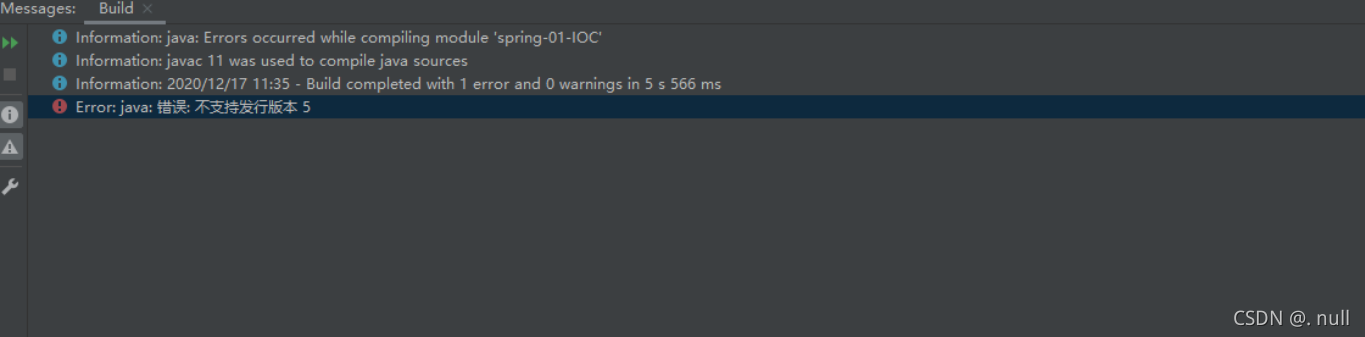
44.创建Maven项目的时候出现问题解决办法
只需要再pom.xml文件加入下面的代码即可
1 2 3 4 5 6 7 <properties > <project.build.sourceEncoding > UTF-8</project.build.sourceEncoding > <maven.compiler.encoding > UTF-8</maven.compiler.encoding > <java.version > 11</java.version > <maven.compiler.source > 11</maven.compiler.source > <maven.compiler.target > 11</maven.compiler.target > </properties >
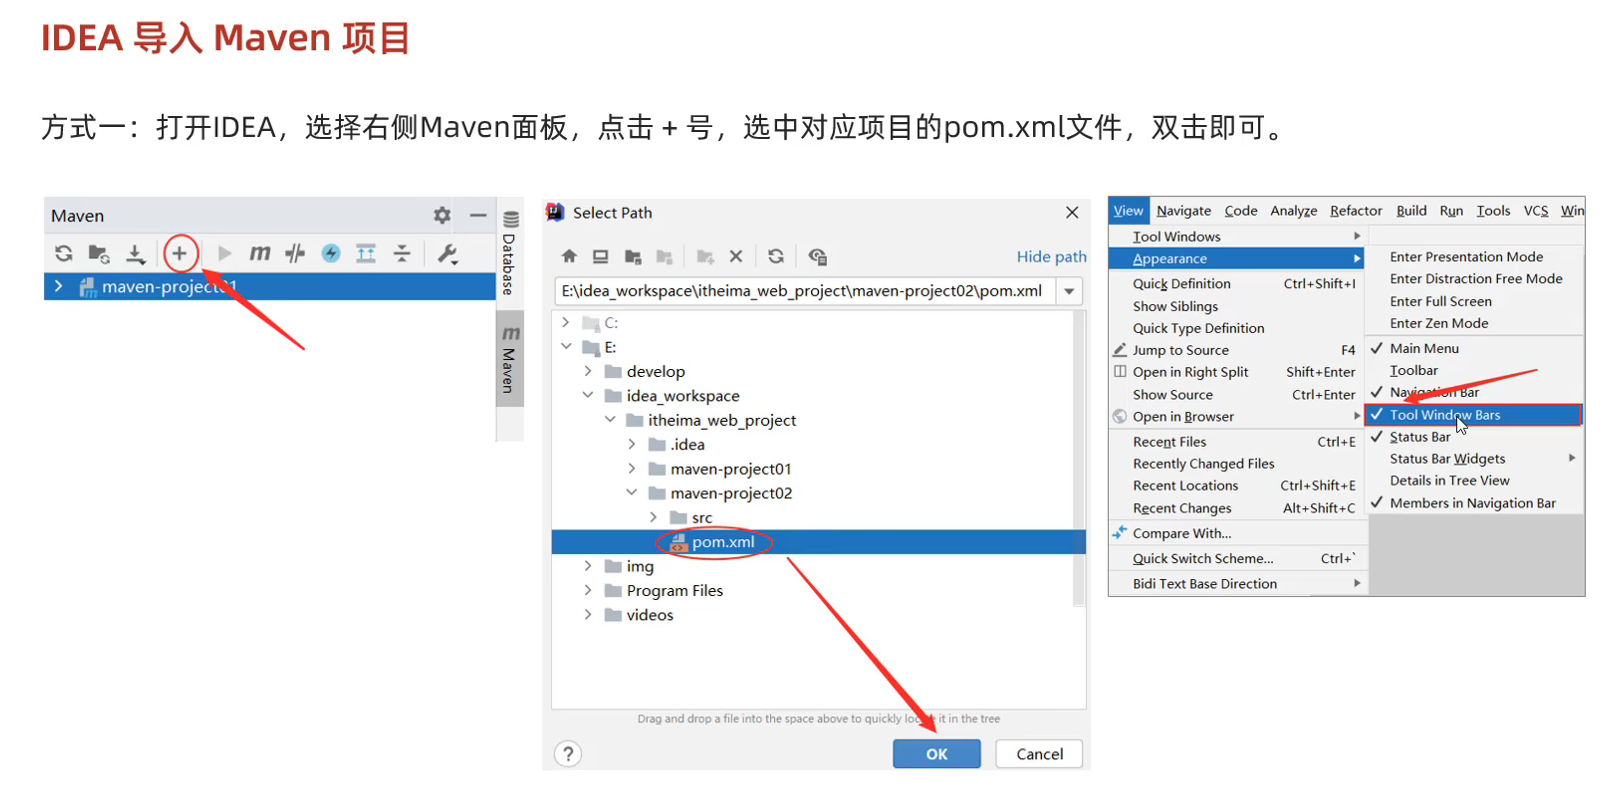
45.导入Maven文件 只需要导入pox.xml文件即可
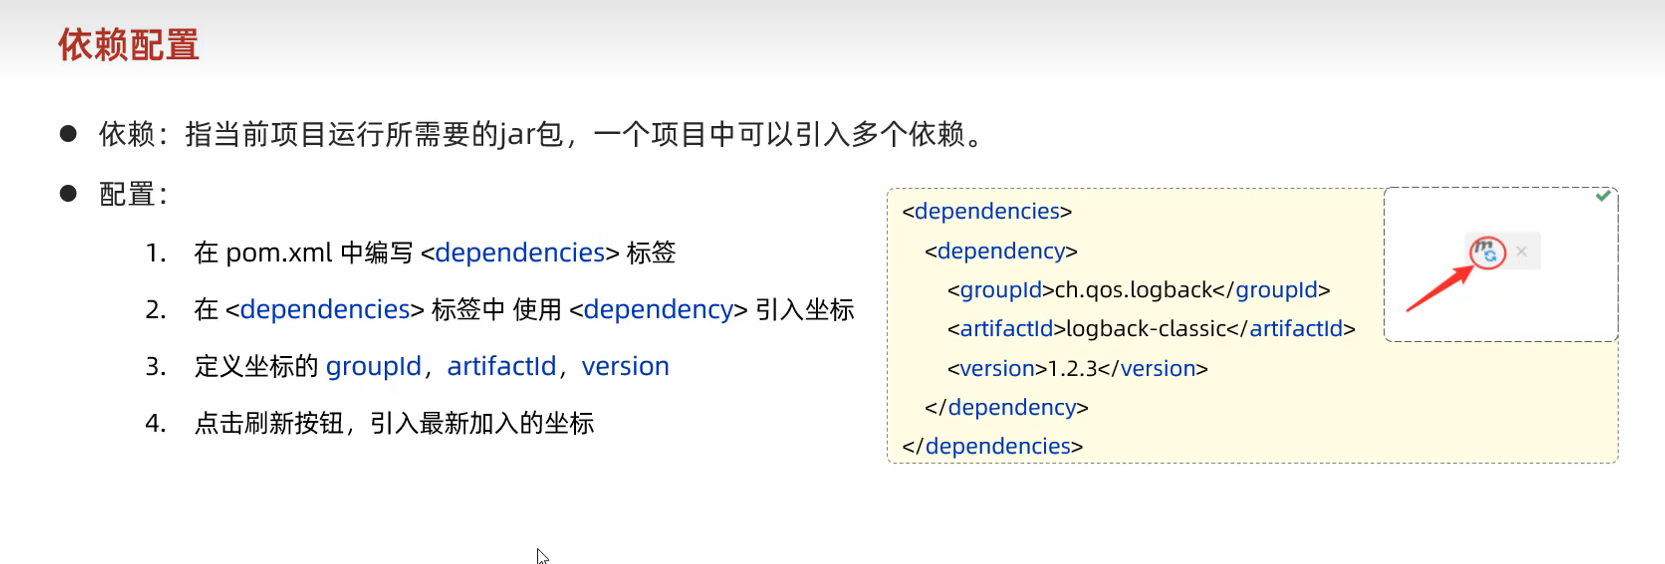
46.依赖配置 依赖的参考链接为:mvnrepository.com
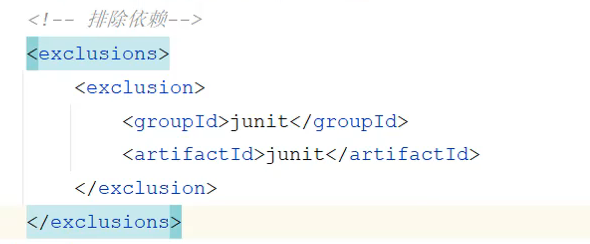
依赖具有传递性 配置一个依赖的时候 会顺便导入父项的依赖
排除依赖的语法
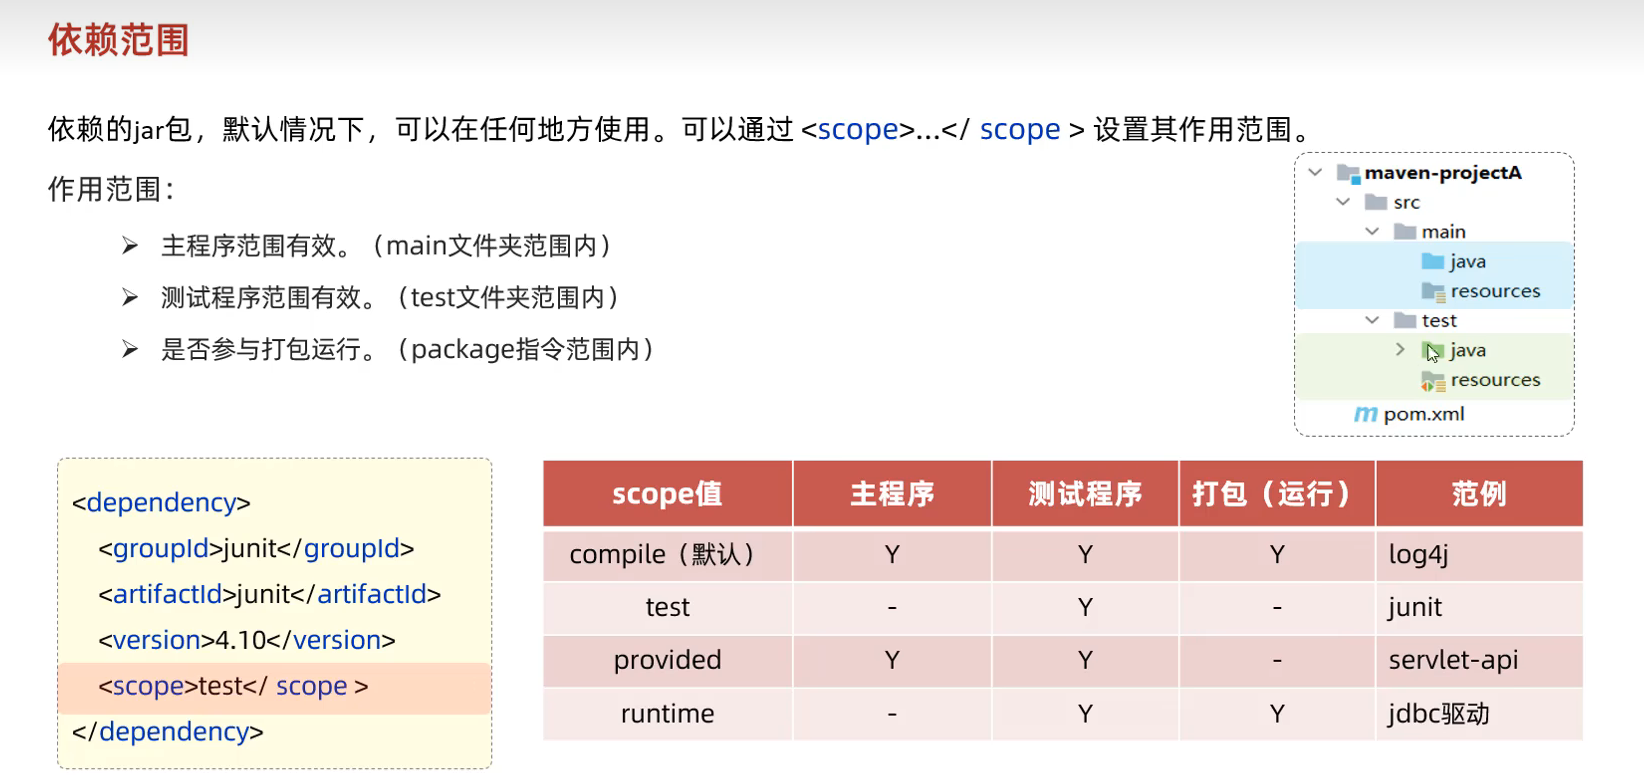
47.依赖范围
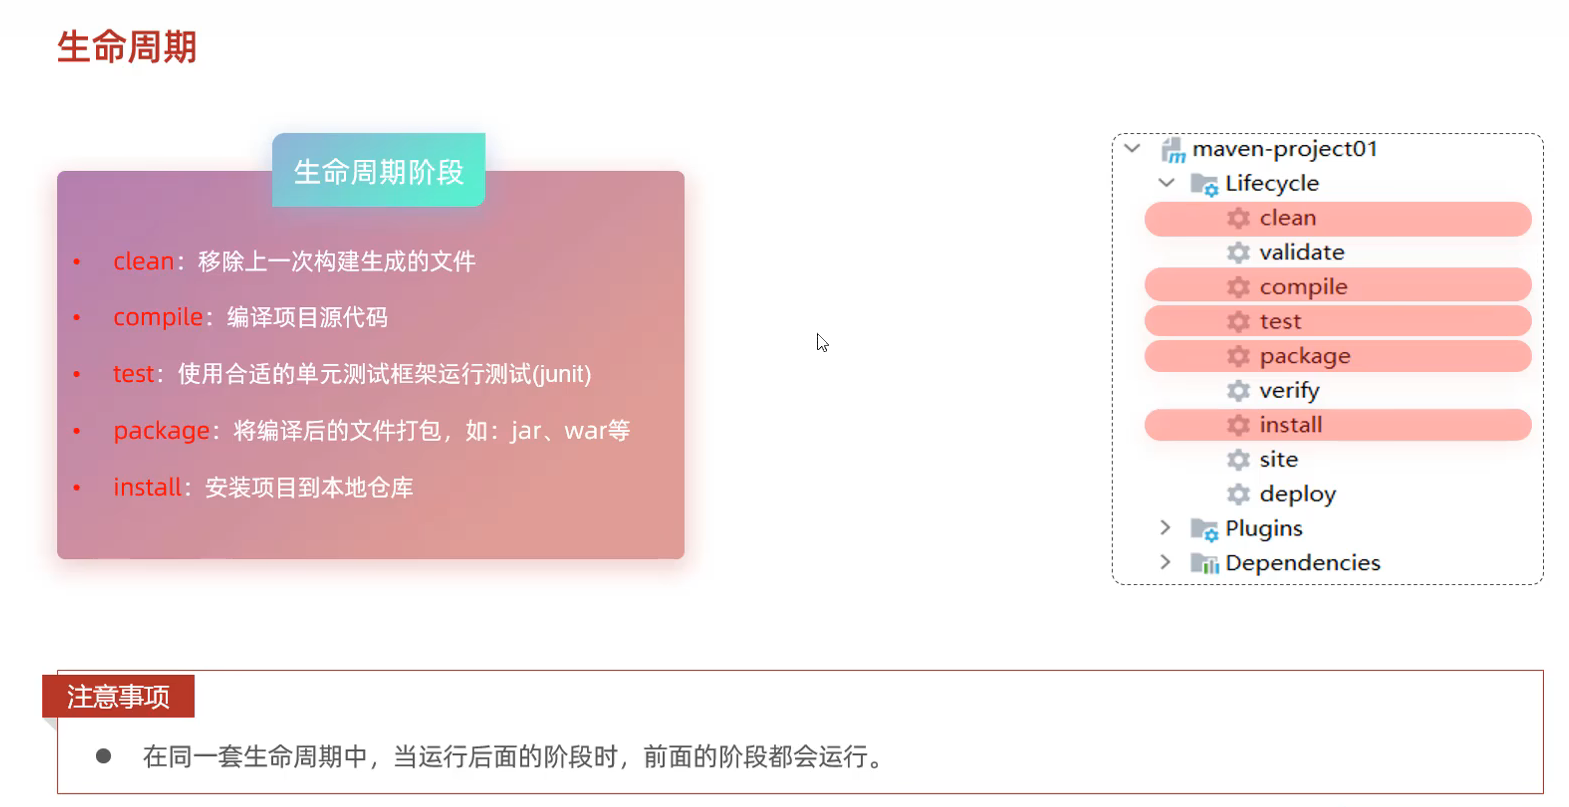
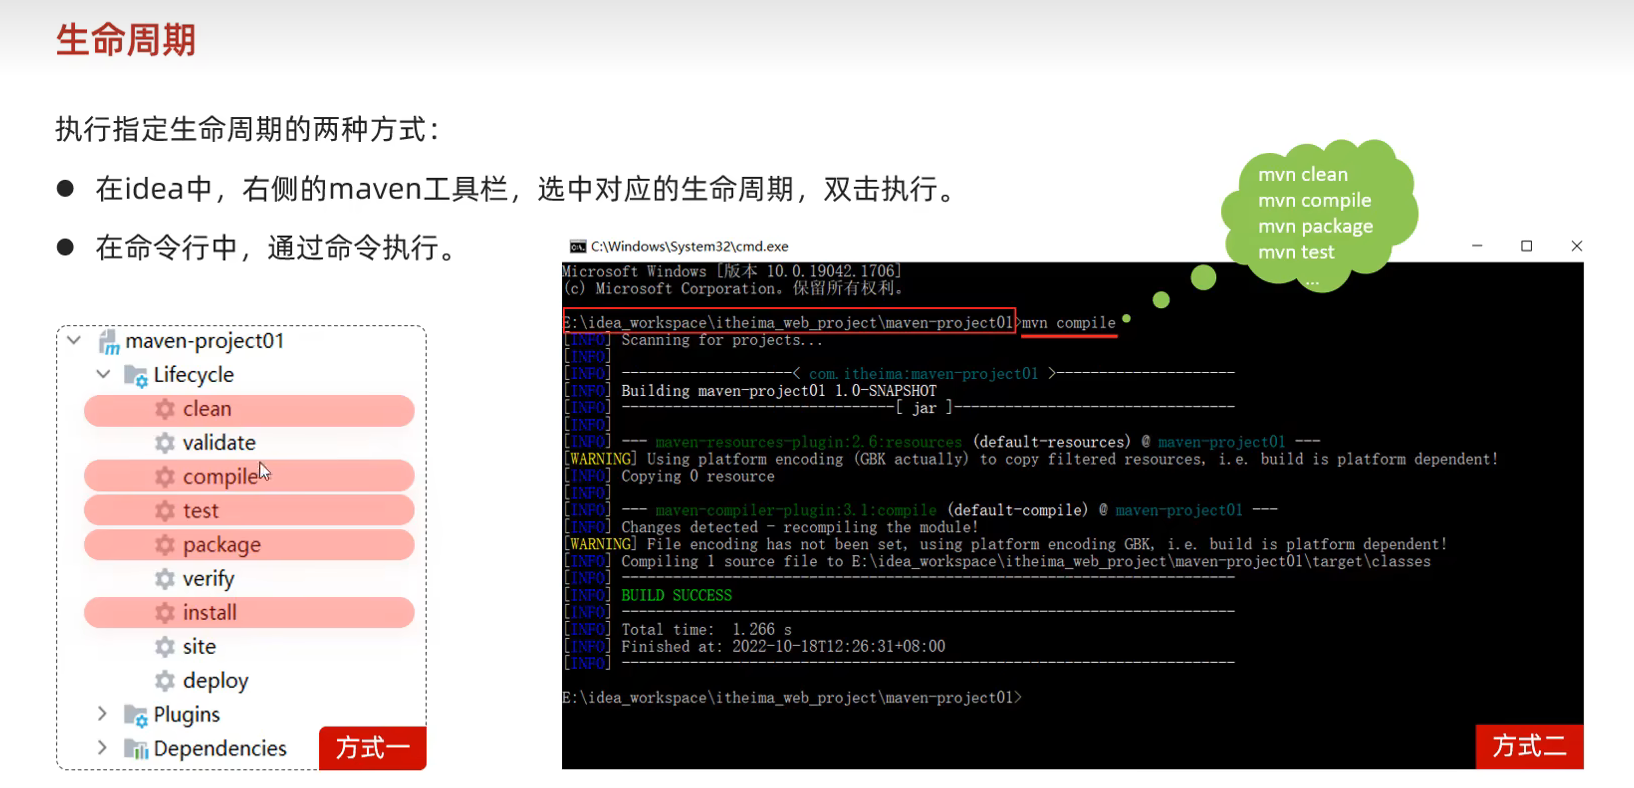
48.Maven生命周期
Spring是一个强大的Java开发框架,而Spring Boot是在Spring框架基础上构建的简化开发的工具
Spring提供了很多模块,用于处理不同的方面,如数据访问、Web开发、安全性等。开发者可以根据自己的需求选择合适的模块来构建应用程序。Spring框架也很受欢迎,因为它具有广泛的社区支持和丰富的文档资源。
Spring Boot则是在Spring框架基础上构建的一种简化开发的框架。它旨在减少开发者在构建应用程序时需要进行的繁琐配置和集成工作。Spring Boot通过自动配置和约定大于配置的原则,让开发者能够快速启动和运行应用程序,而无需太多的手动配置。
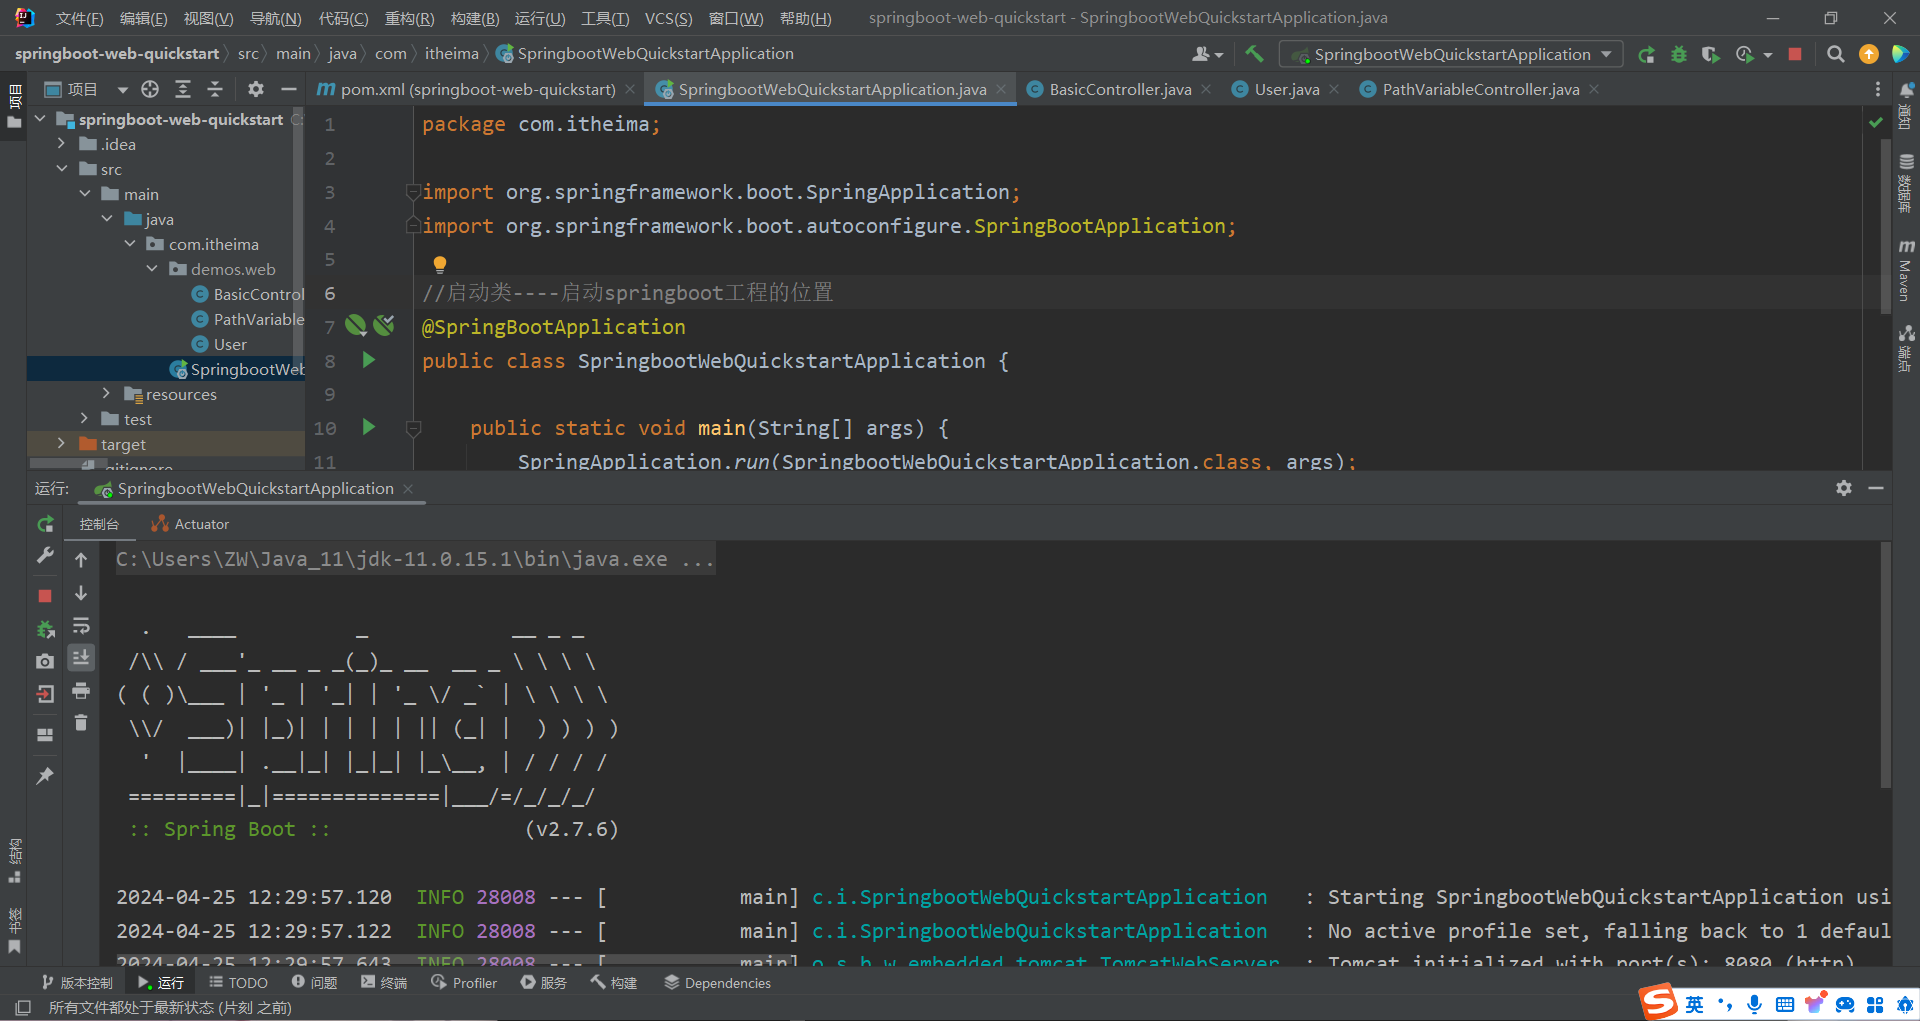
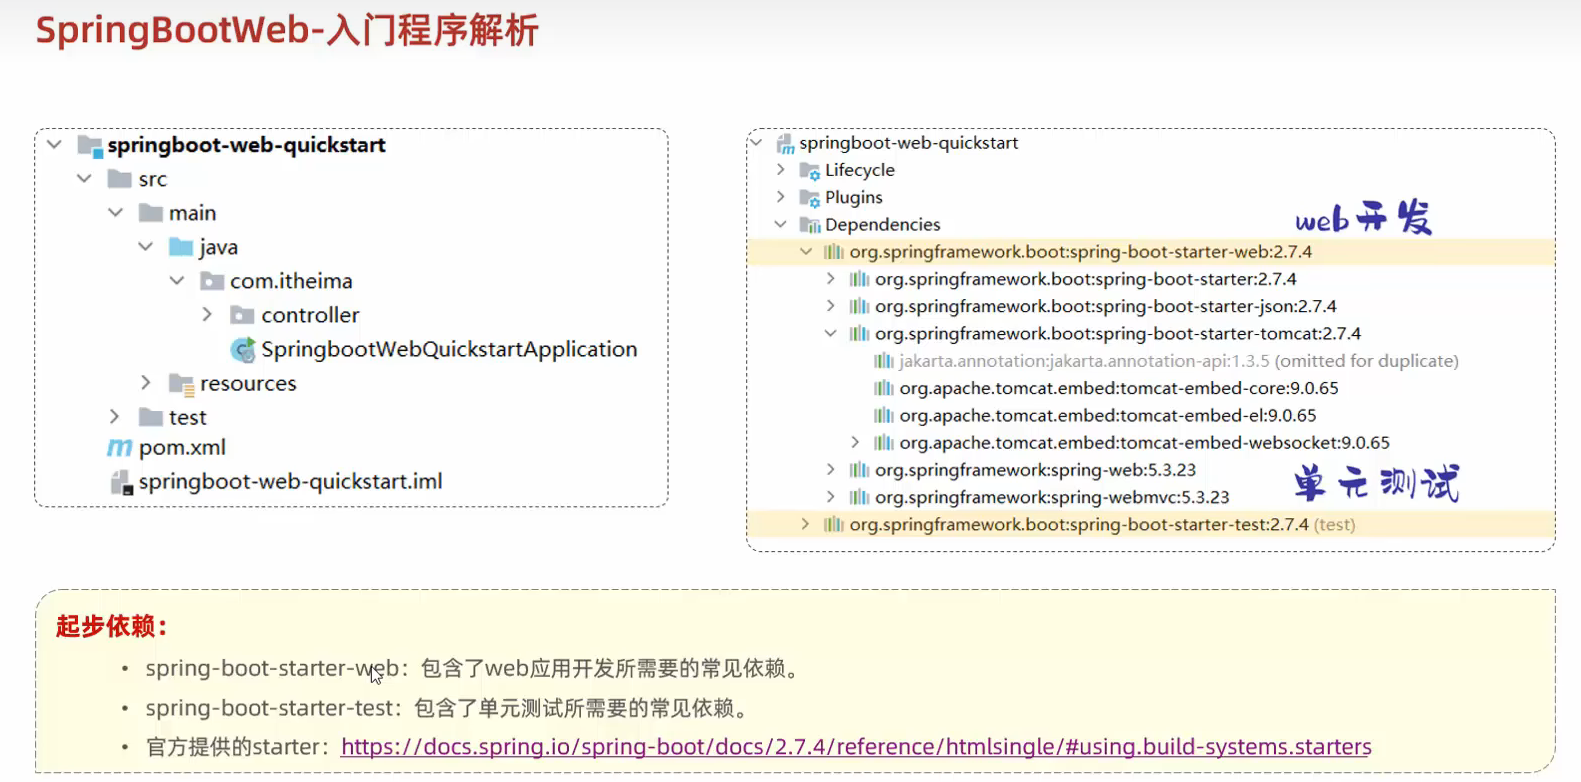
50.SpringBootWeb入门 Springboot的url选择阿里云的镜像网站可选java11(https://start.aliyun.com)
注意:
在idea2023中 创建springboot后 编译器自动创建了BasicController 如果再重复创建会报错
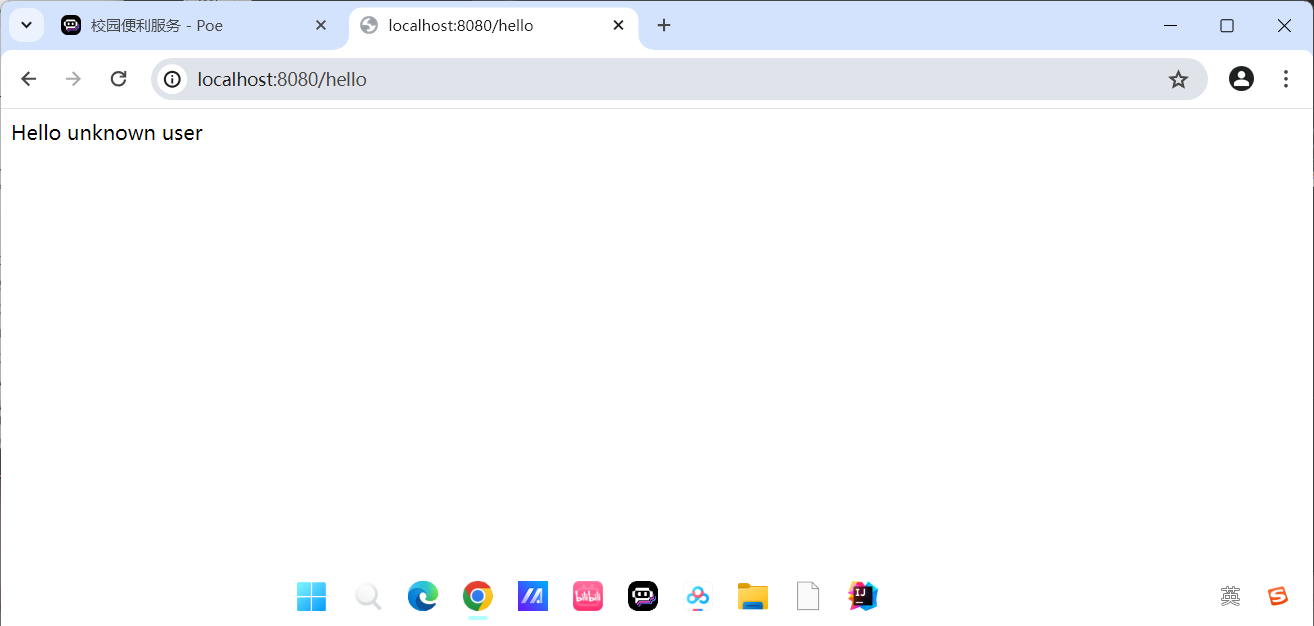
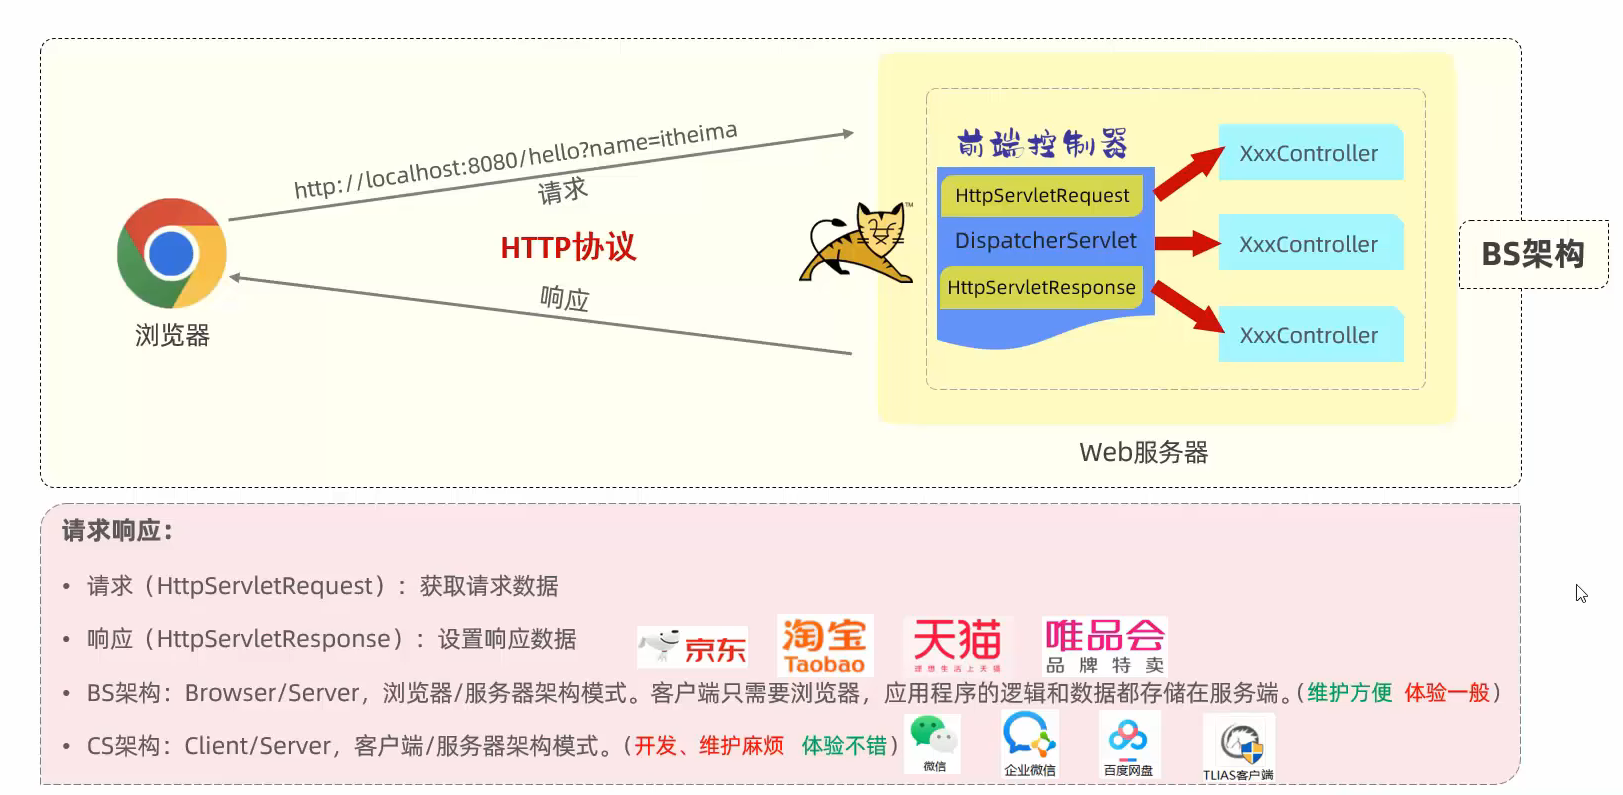
通过(localhost:8080/hello)来调用 同时可以(http://127.0.0.1:8080/hello?name=lisi)问号后面是参数
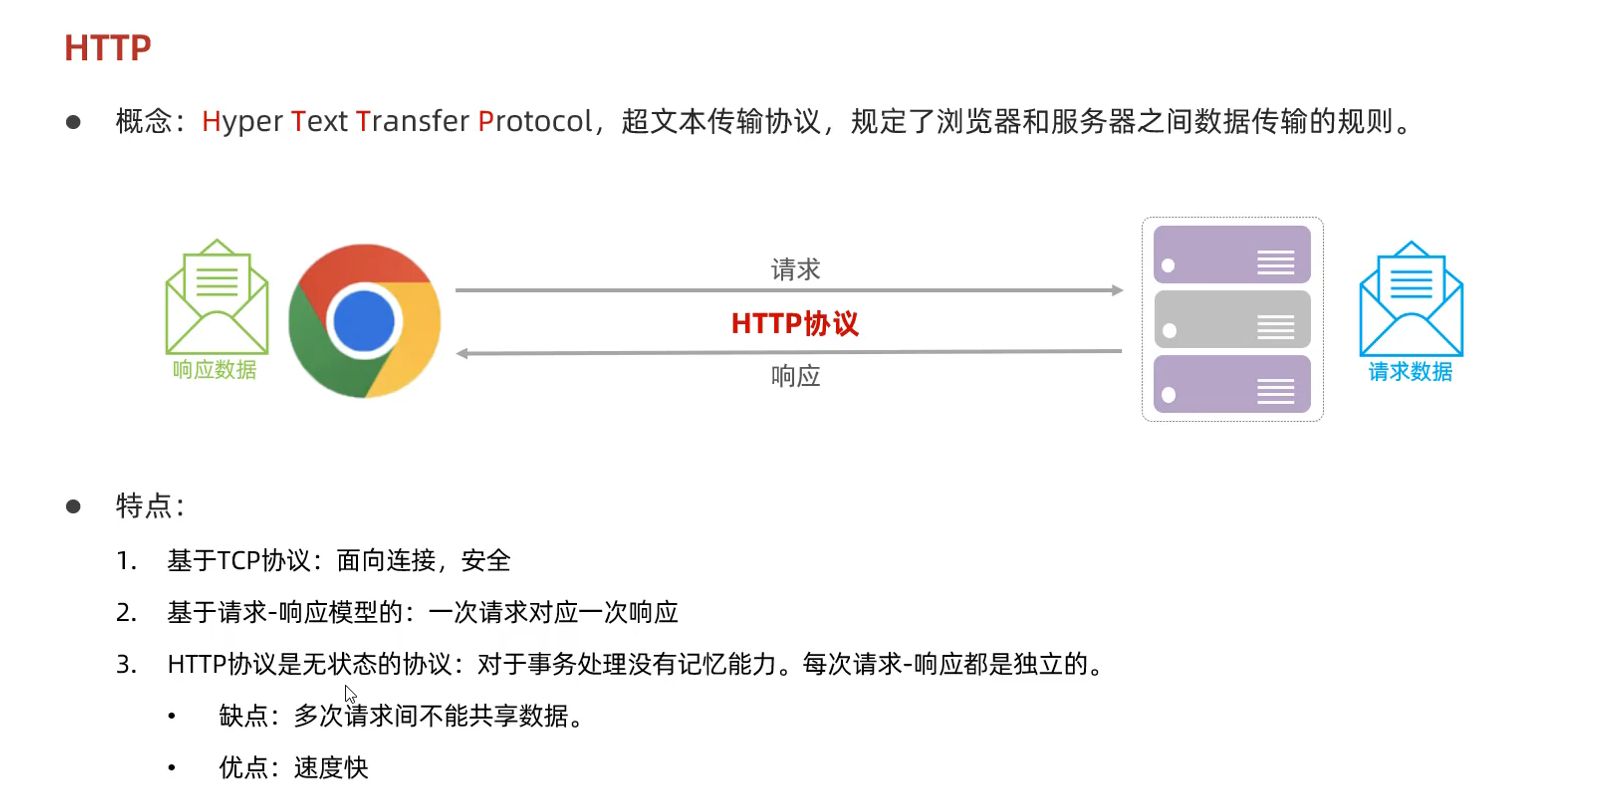
51.HTTP协议
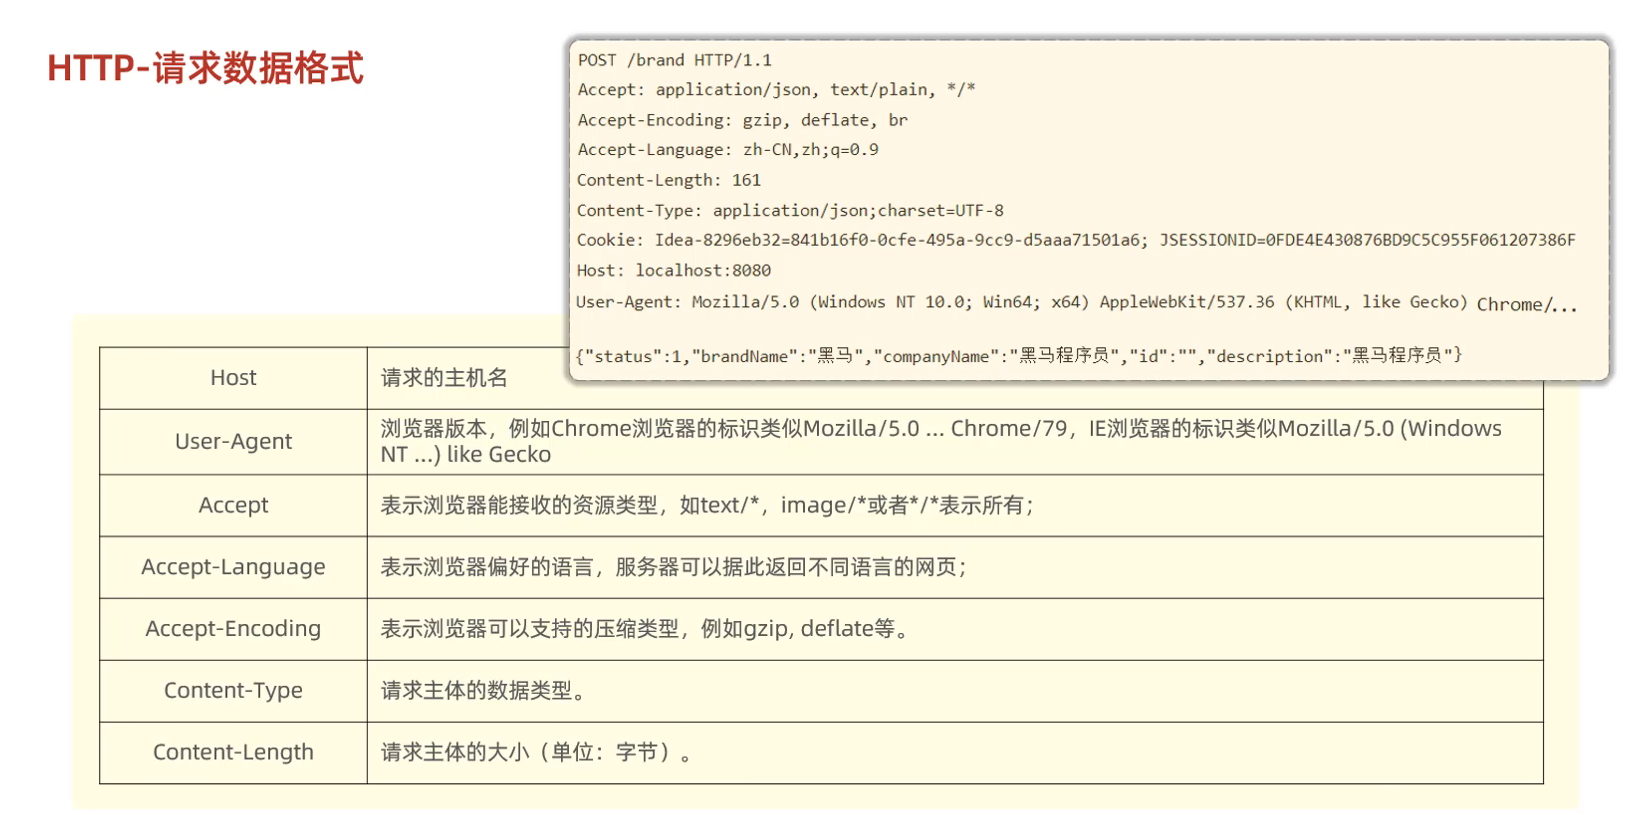
①HTTP请求协议
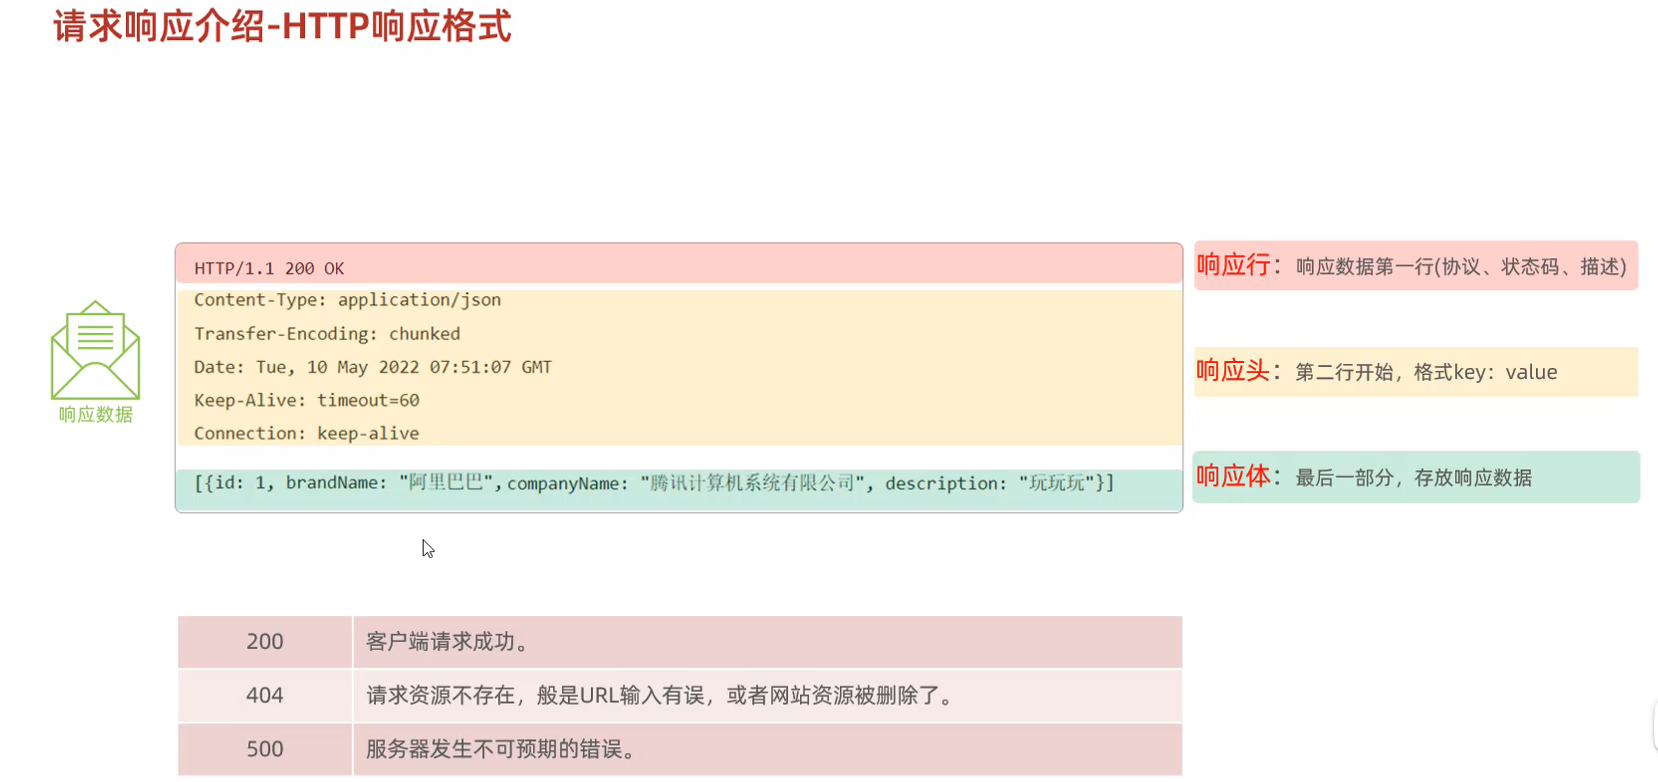
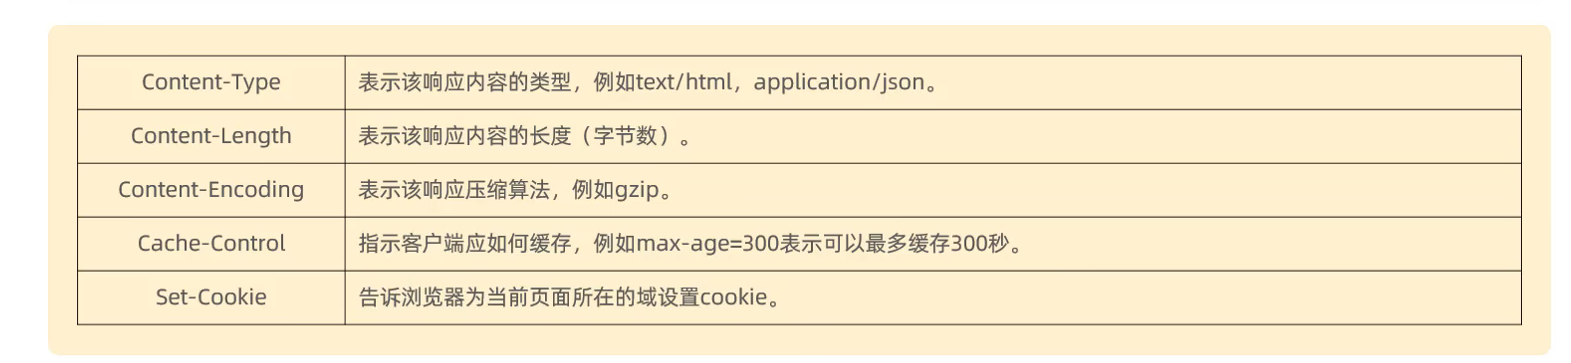
②HTTP响应协议
响应头
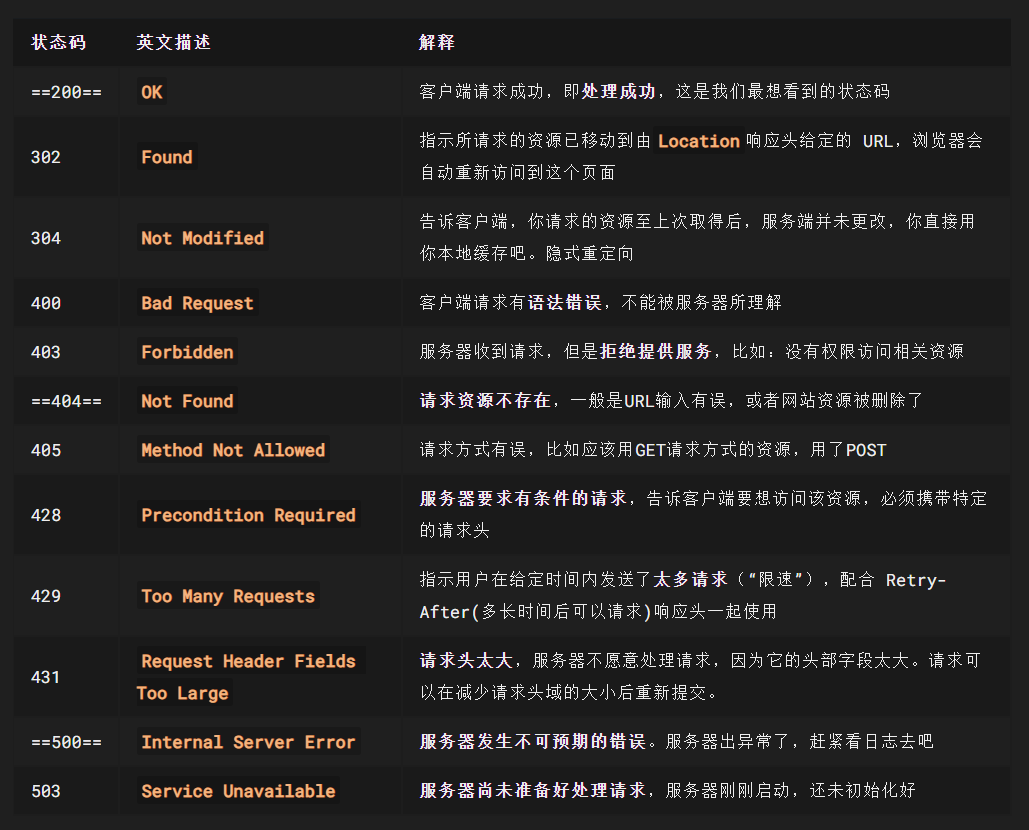
响应行的状态码
状态码大全:https://cloud.tencent.com/developer/chapter/13553
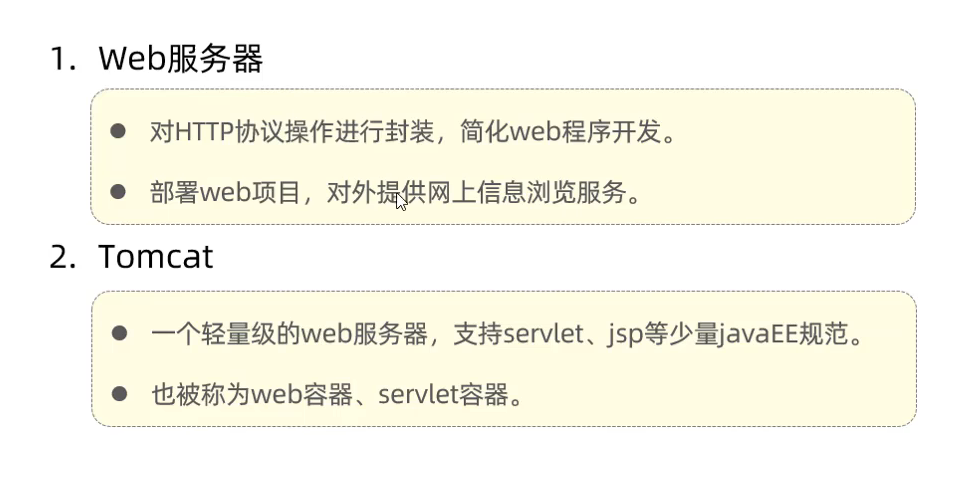
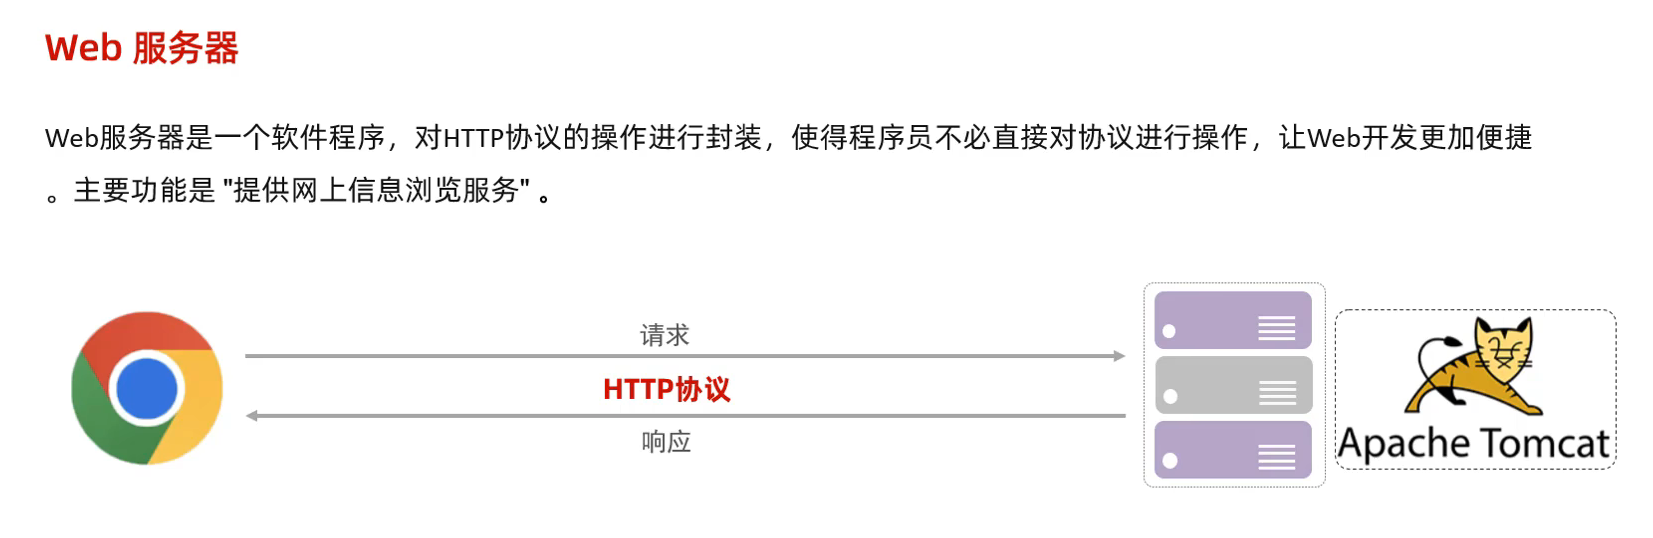
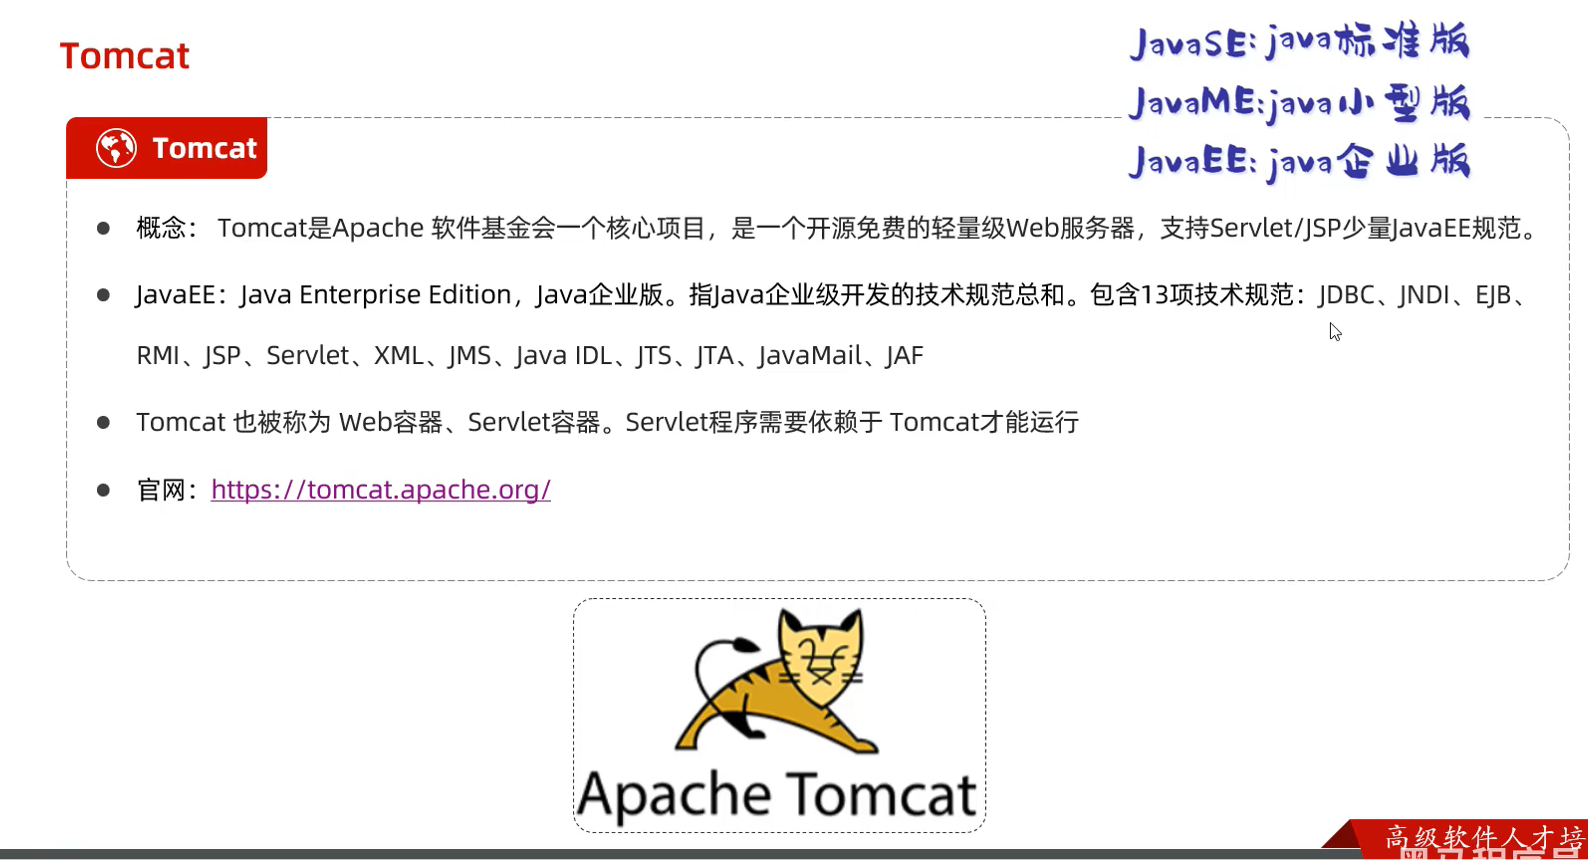
52.Web服务器(Tomcat)
由于程序员自己书写服务端和客户端的代码量极大 所以出现了已经封装好的web服务器
只需要将程序的代码部署到web服务器上即可 程序员就只需要关注当前的业务逻辑
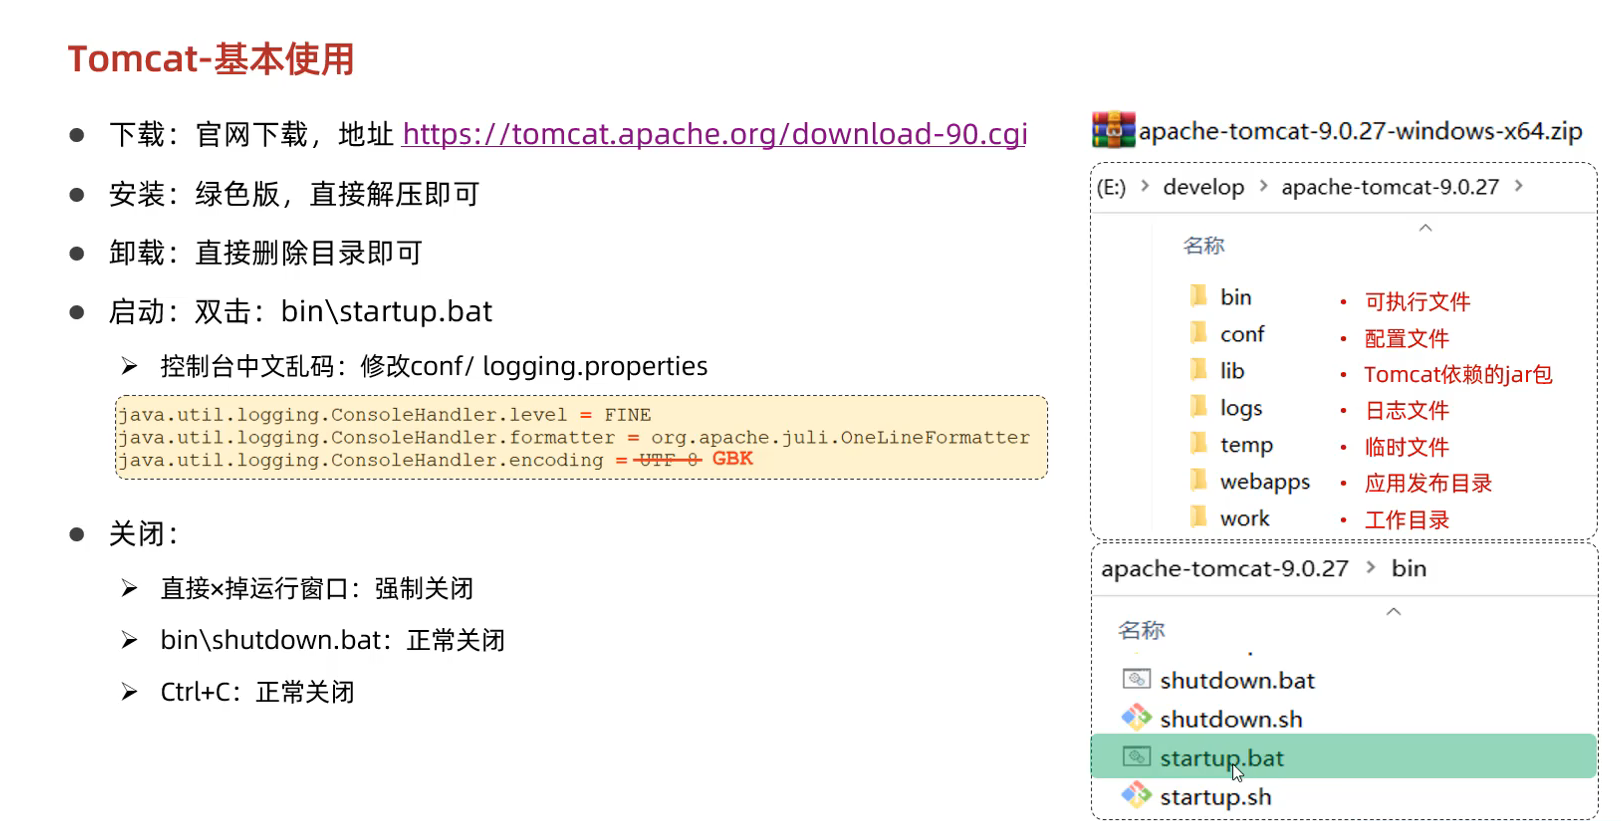
53.Tomcat基本使用
如果端口号冲突
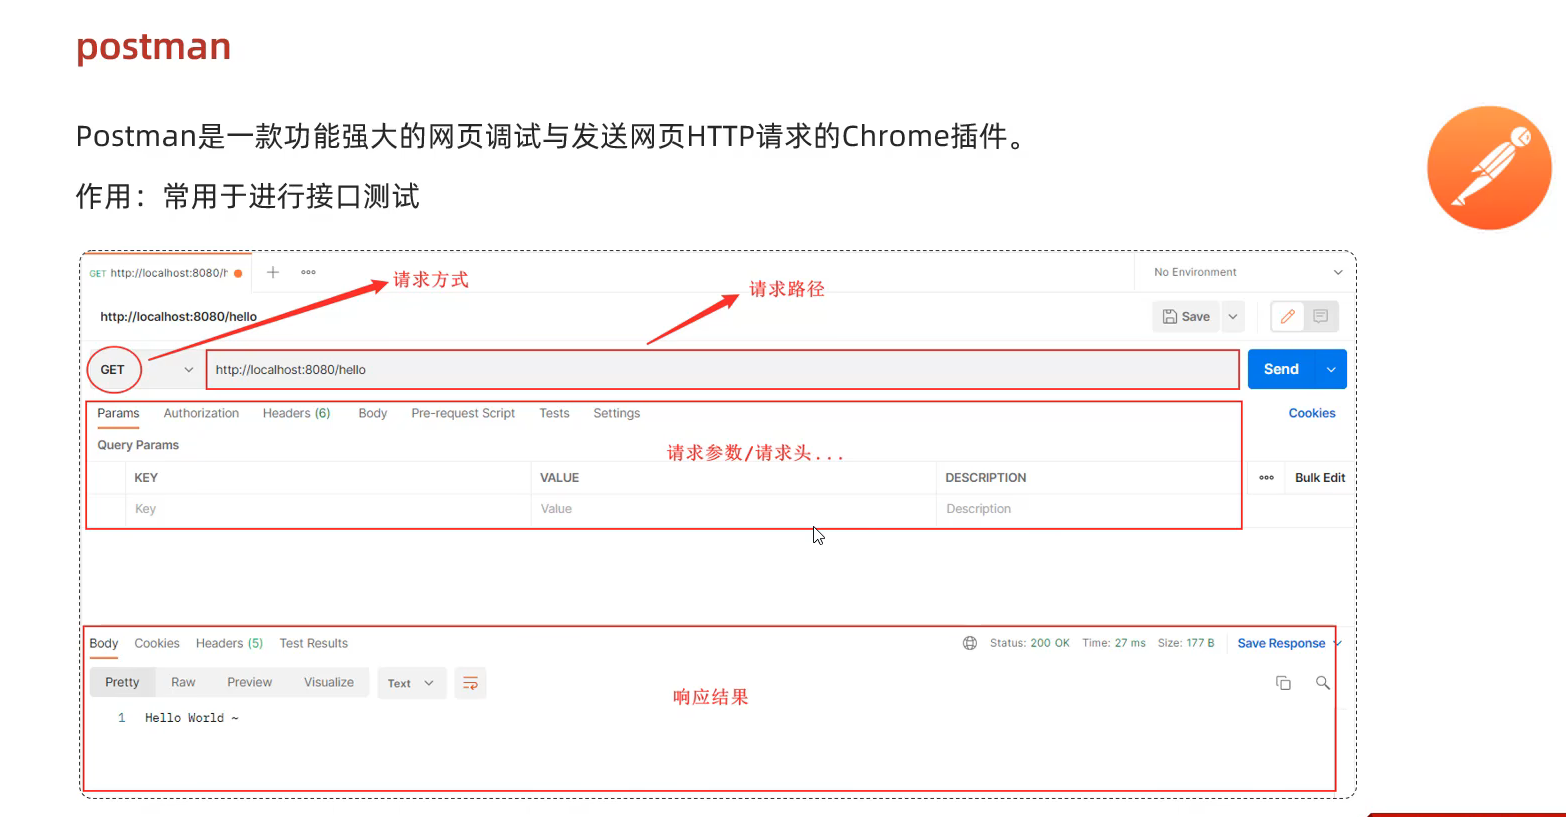
54.请求响应
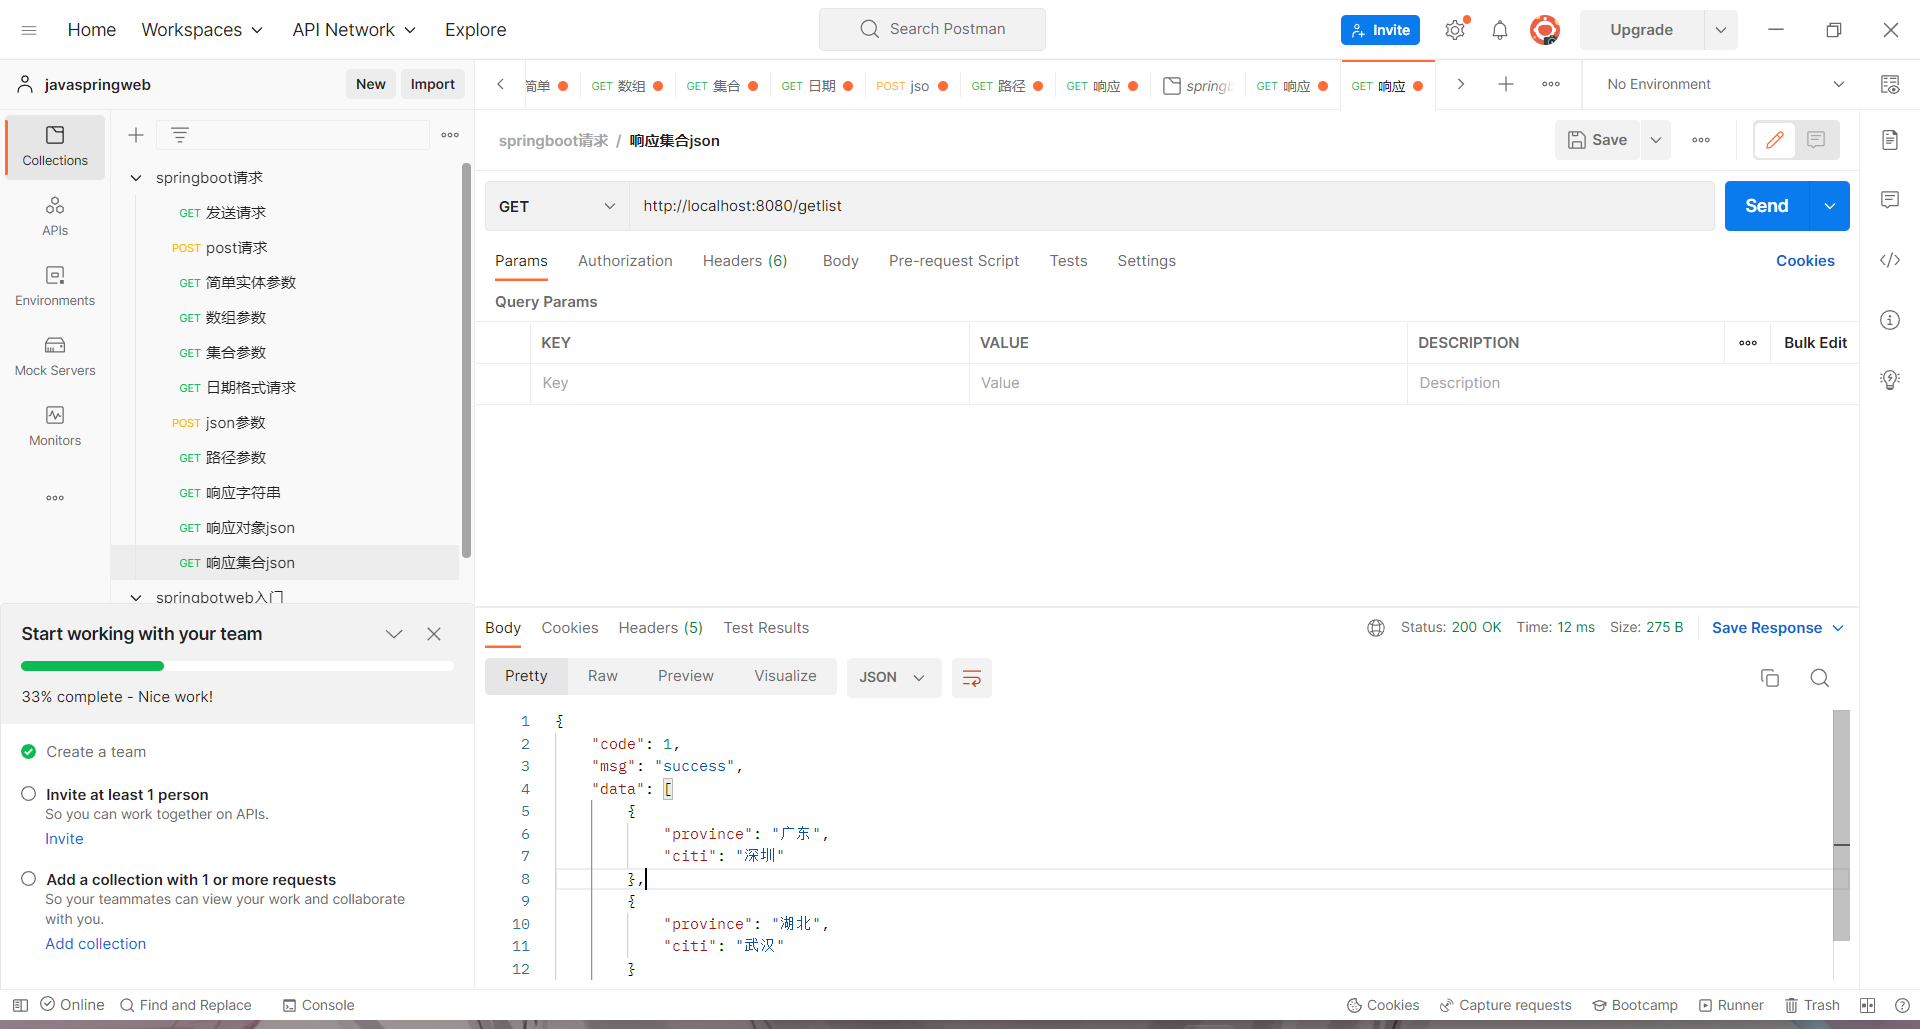
postman的使用
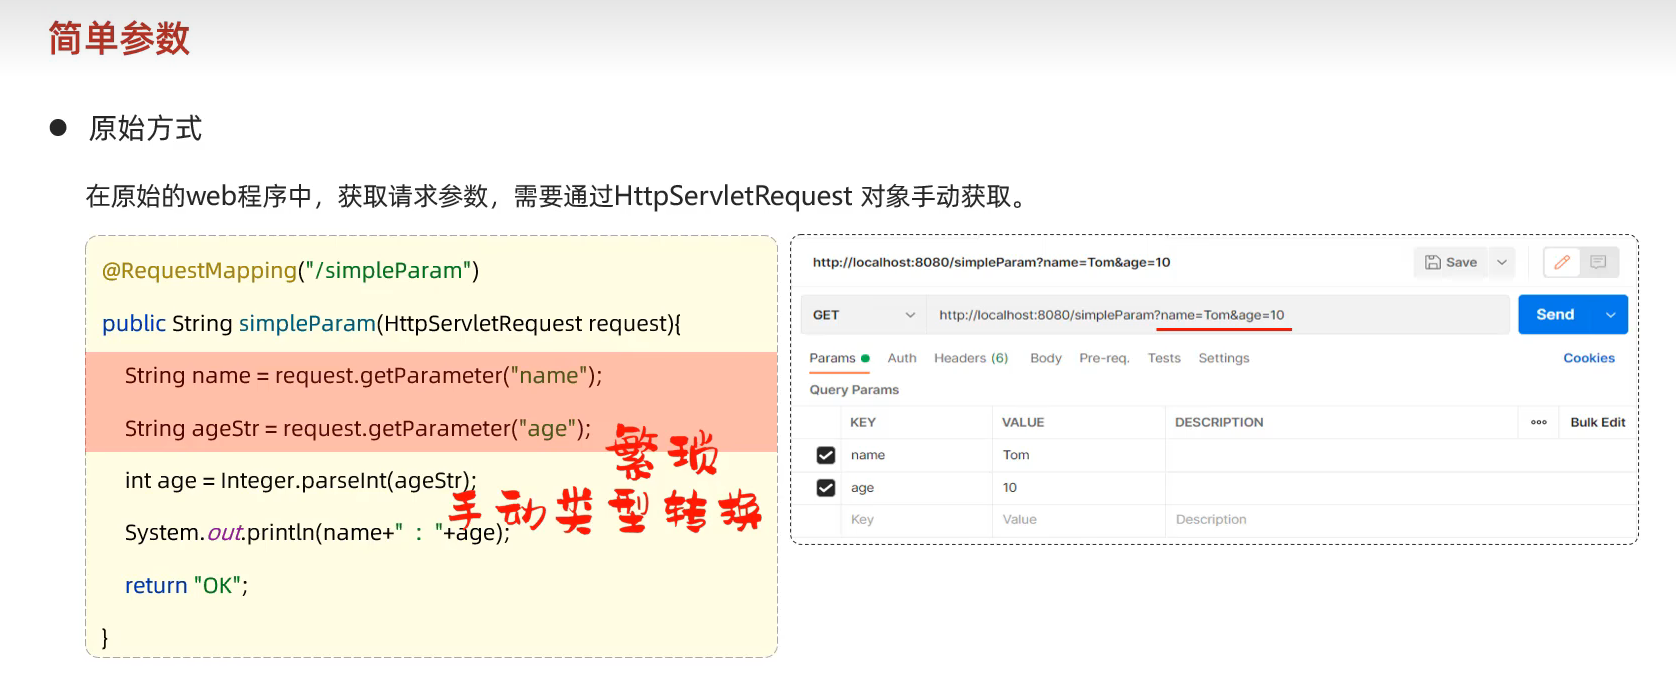
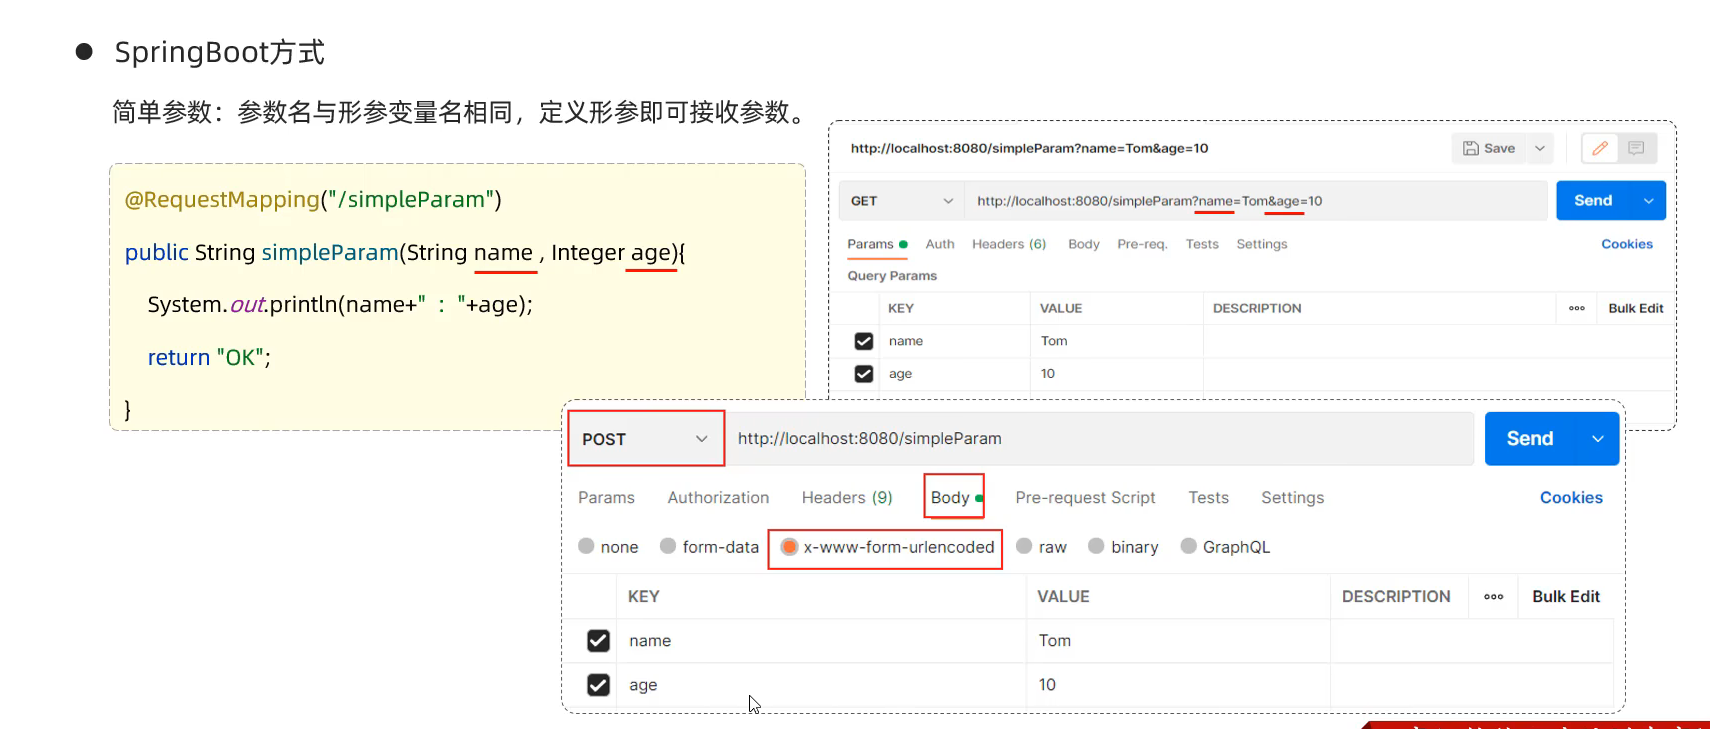
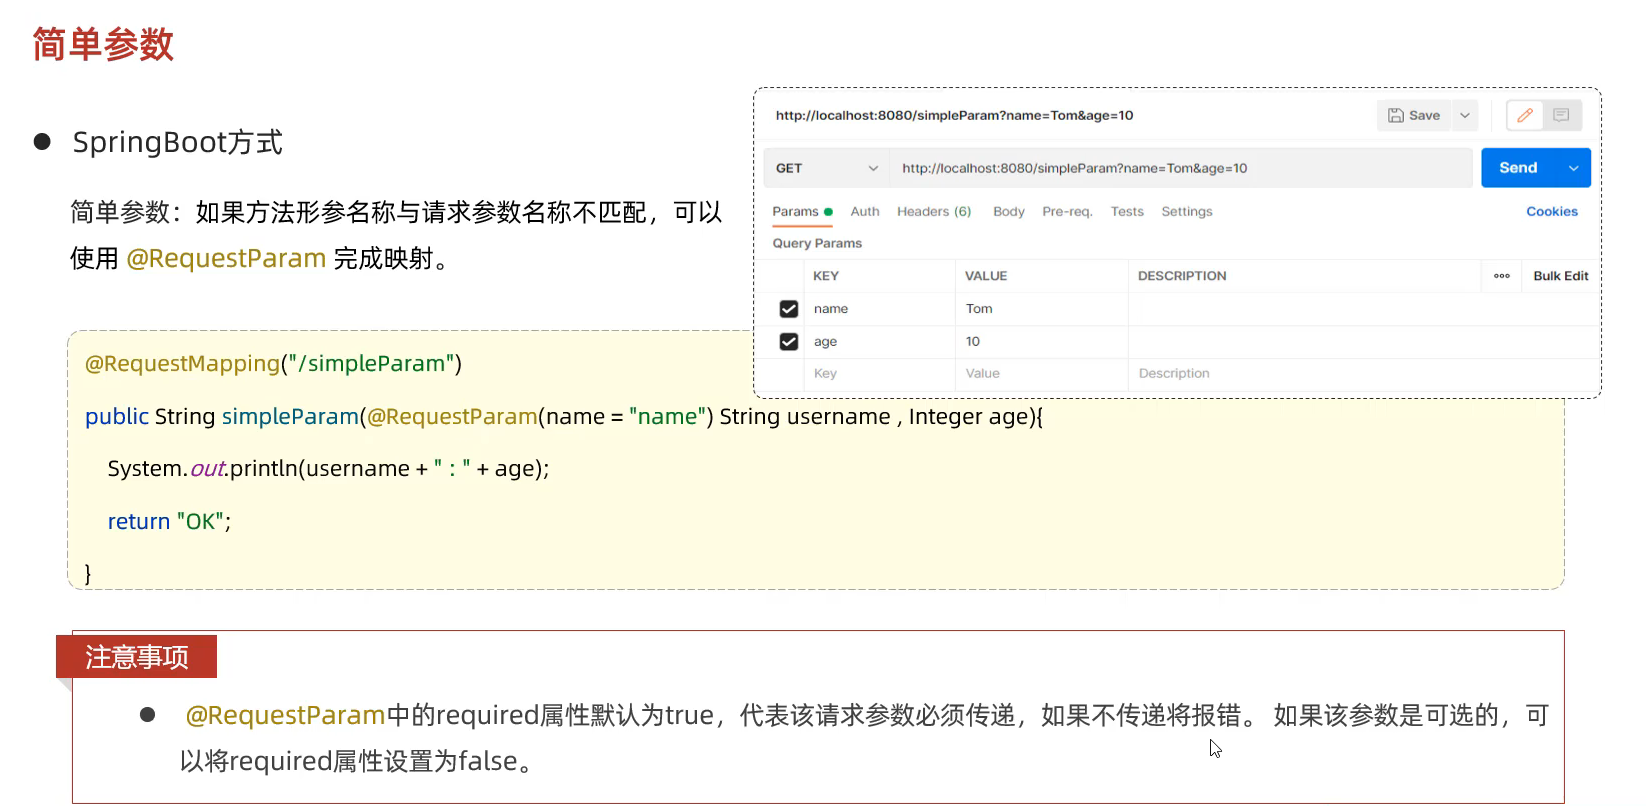
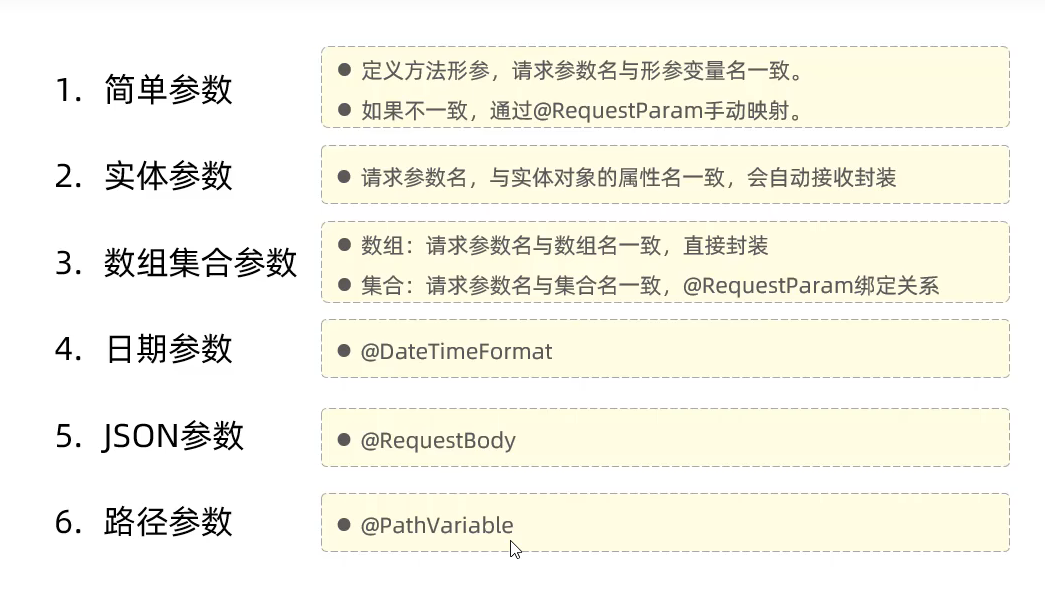
55.简单参数(原始方式和SpringBoot方式)
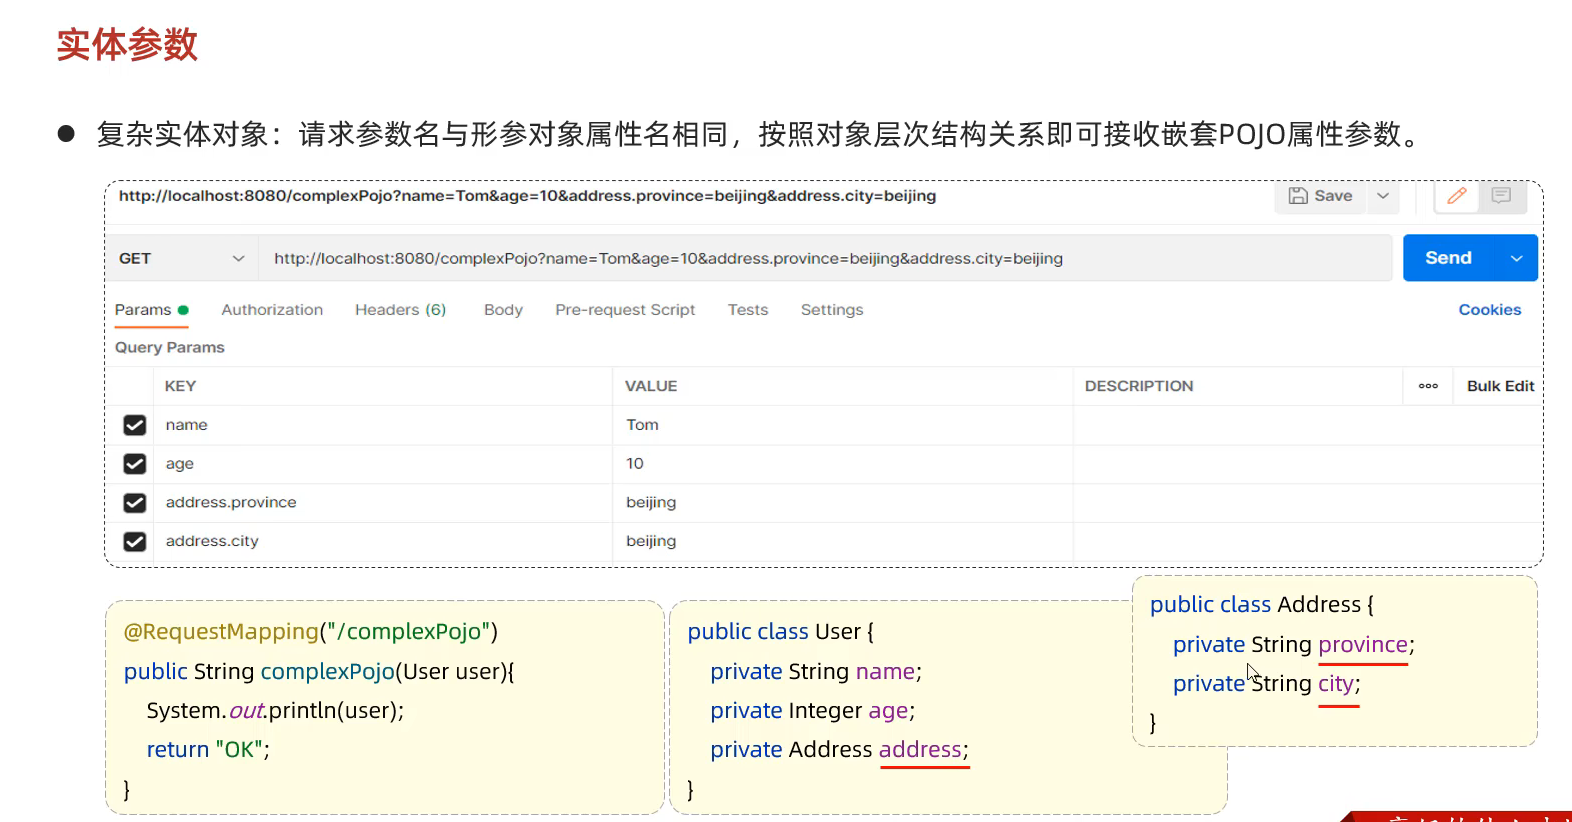
56.实体参数 只需要名称对应即可
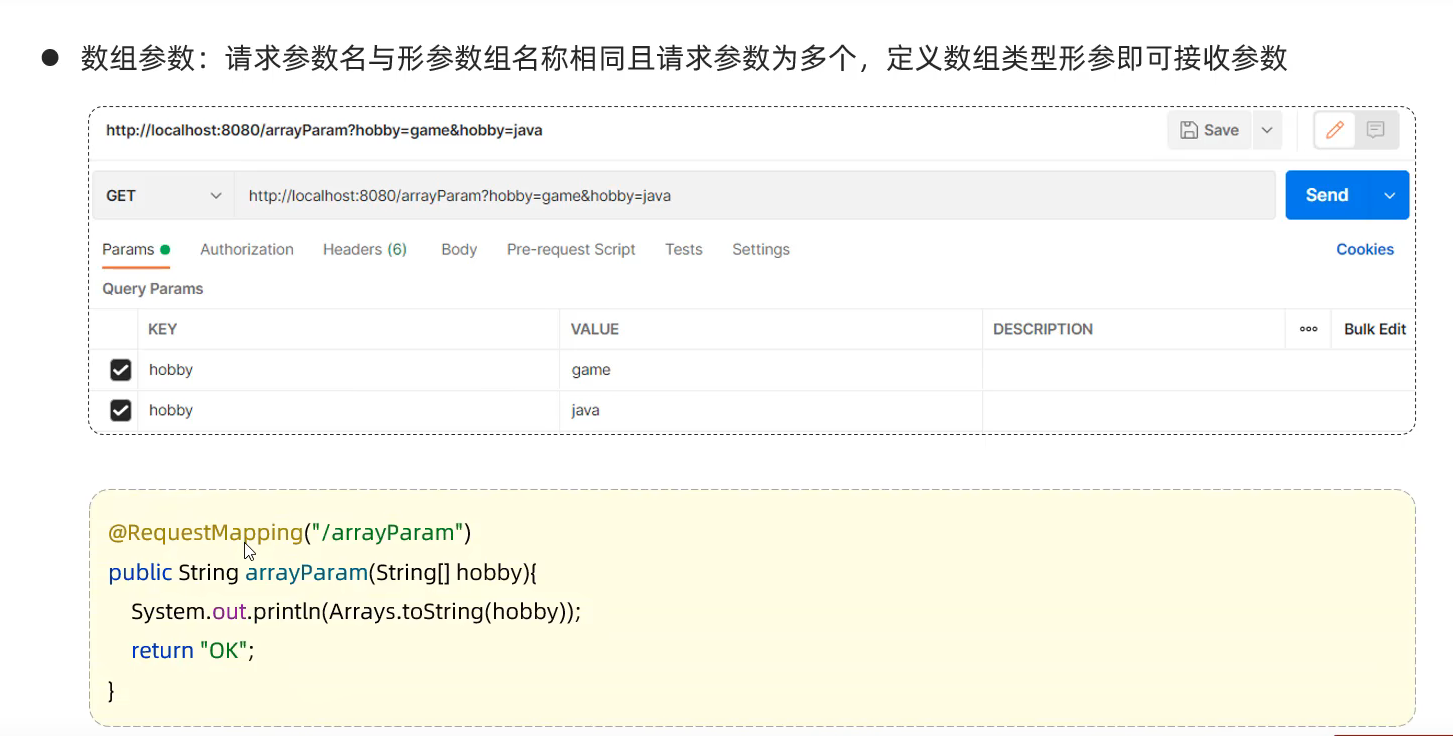
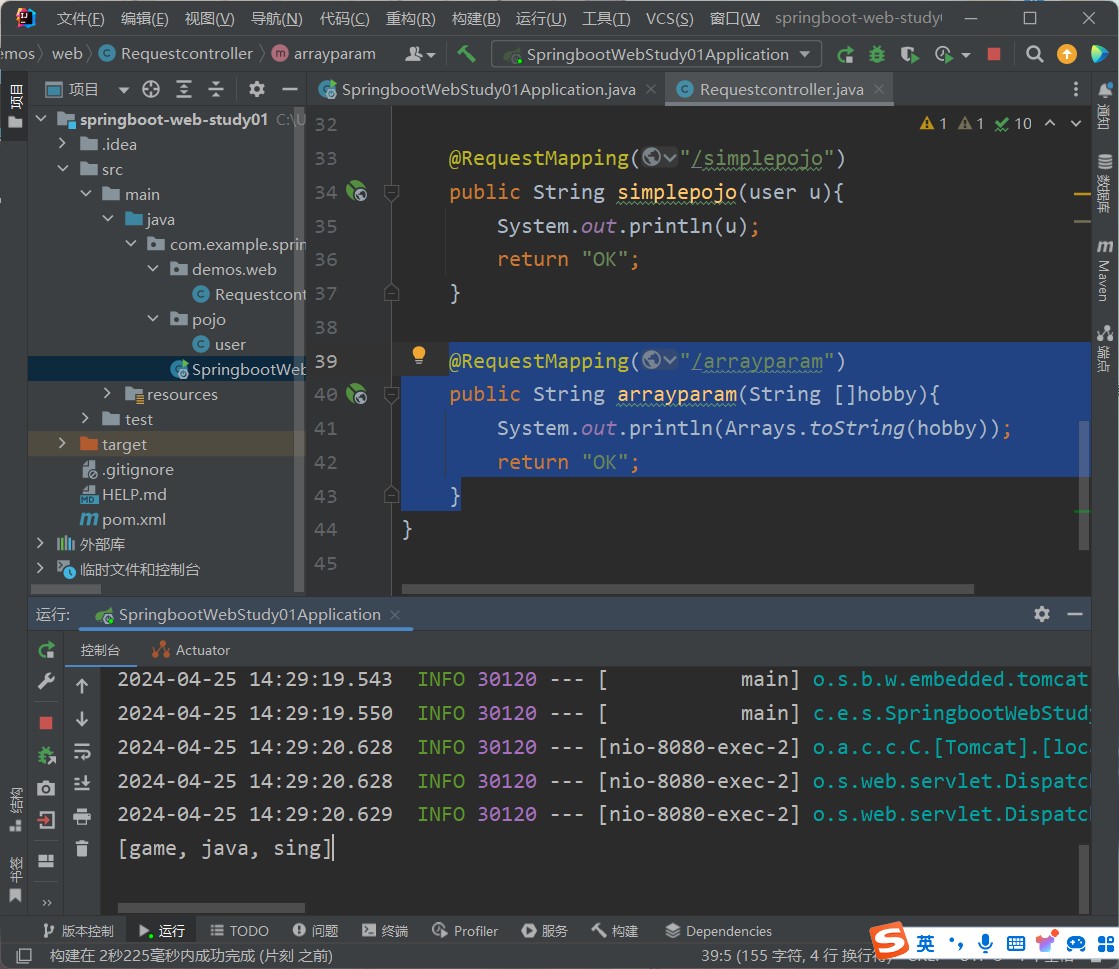
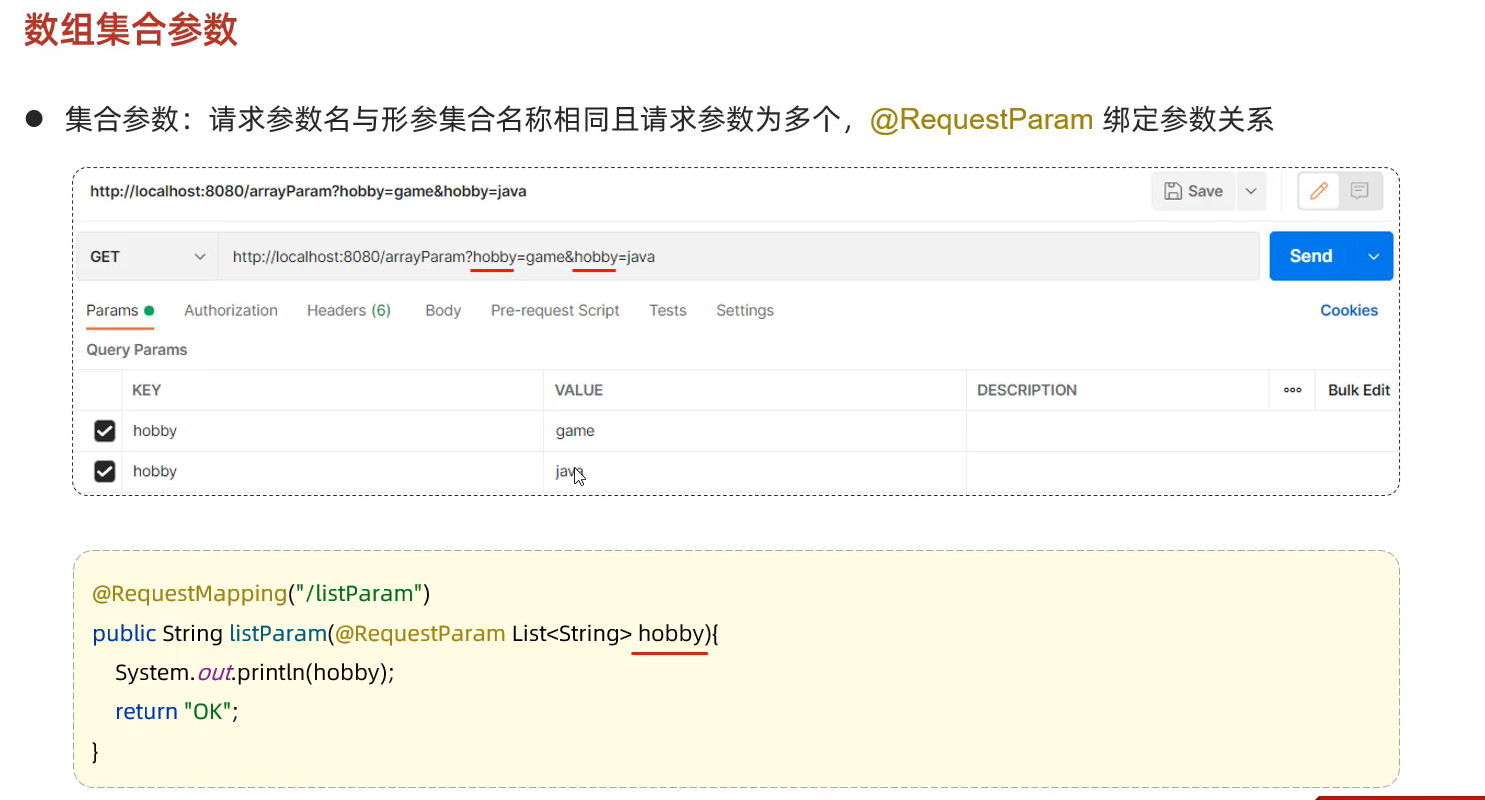
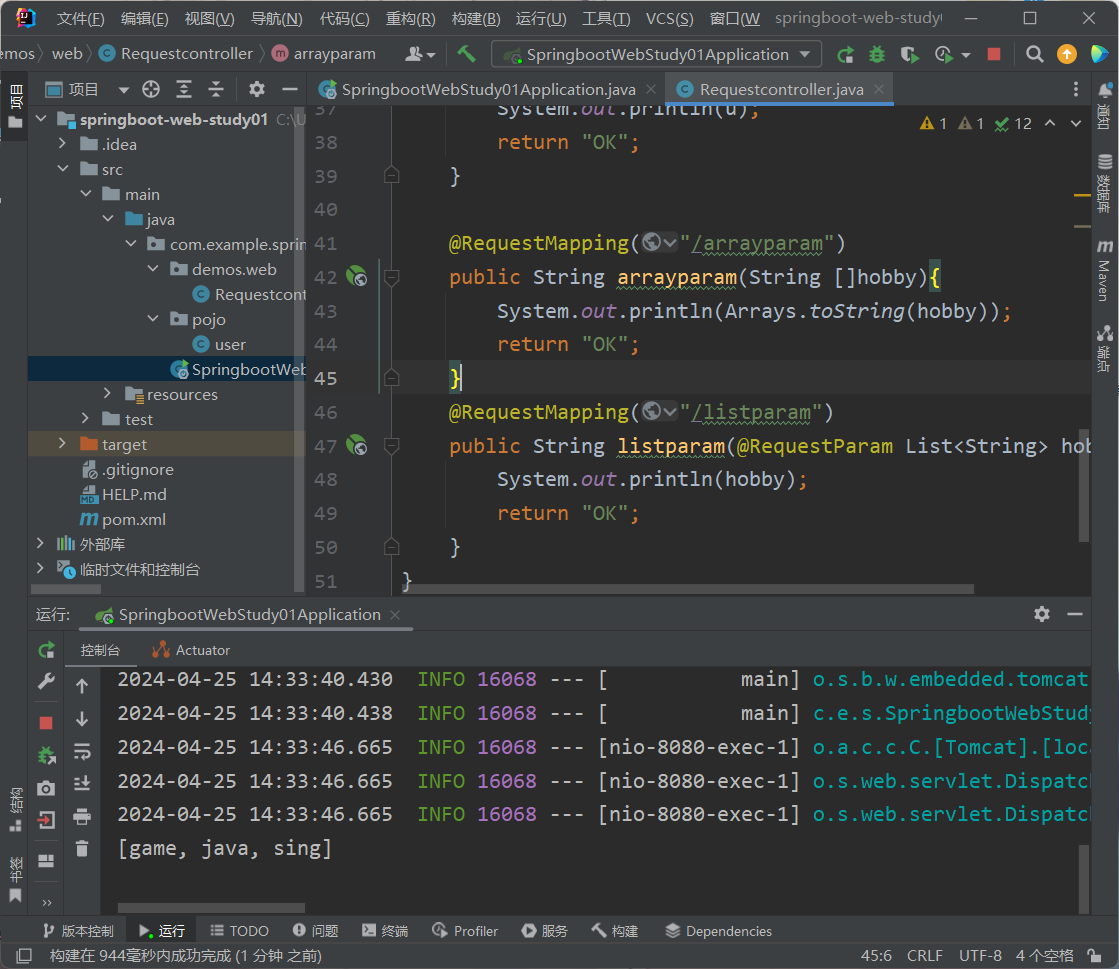
57.数组集合参数 数组参数
1 2 3 4 5 @RequestMapping("/arrayparam") public String arrayparam (String []hobby) { System.out.println(Arrays.toString(hobby)); return "OK" ; }
集合参数
1 2 3 4 @RequestMapping("/listparam") public String listparam (@RequestParam List<String> hobby) { System.out.println(hobby); return "OK" ;
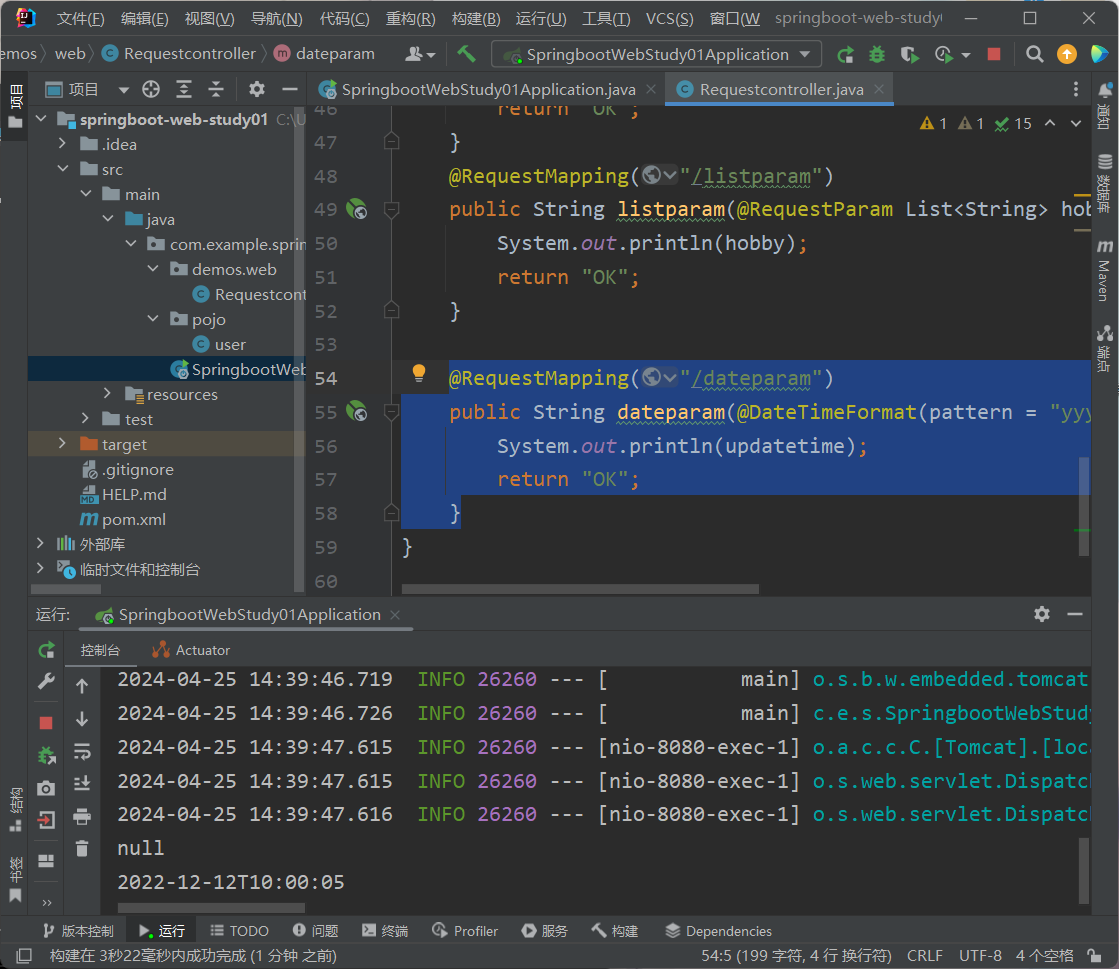
58.日期参数
1 2 3 4 5 @RequestMapping("/dateparam") public String dateparam (@DateTimeFormat(pattern = "yyyy-MM-dd HH:mm:ss") LocalDateTime updatetime) { System.out.println(updatetime); return "OK" ; }
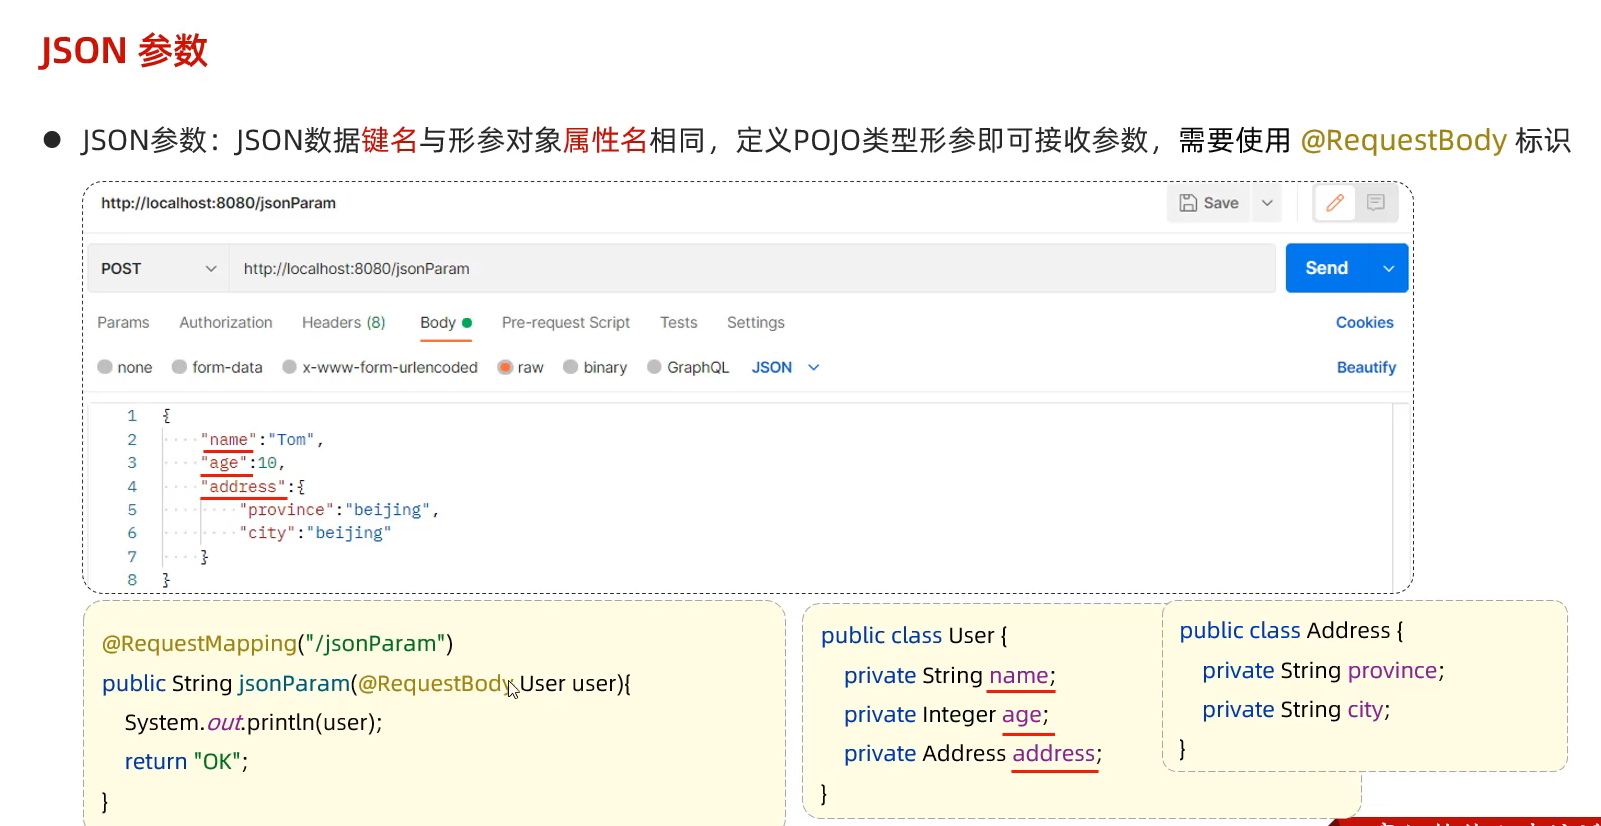
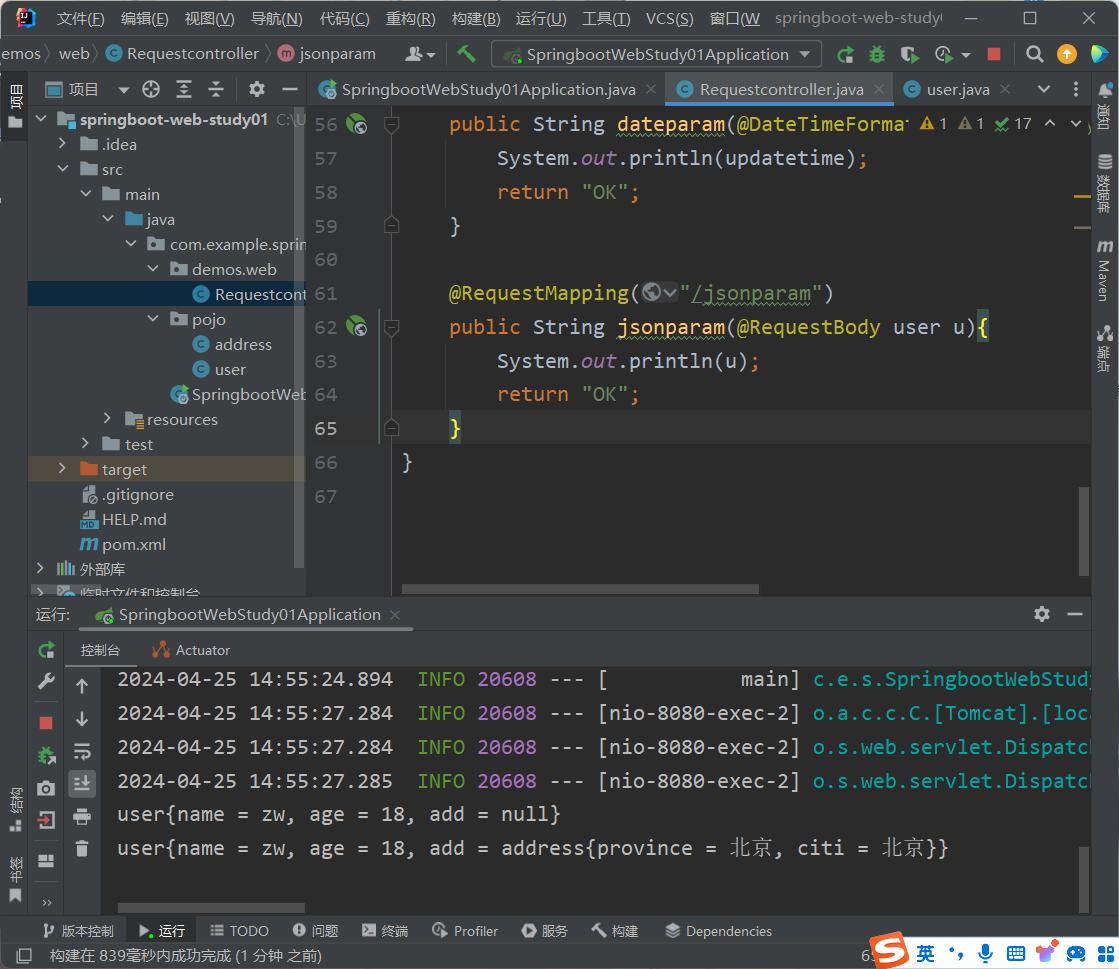
59.Json格式参数
1 2 3 4 5 @RequestMapping("/jsonparam") public String jsonparam (@RequestBody user u) { System.out.println(u); return "OK" ; }
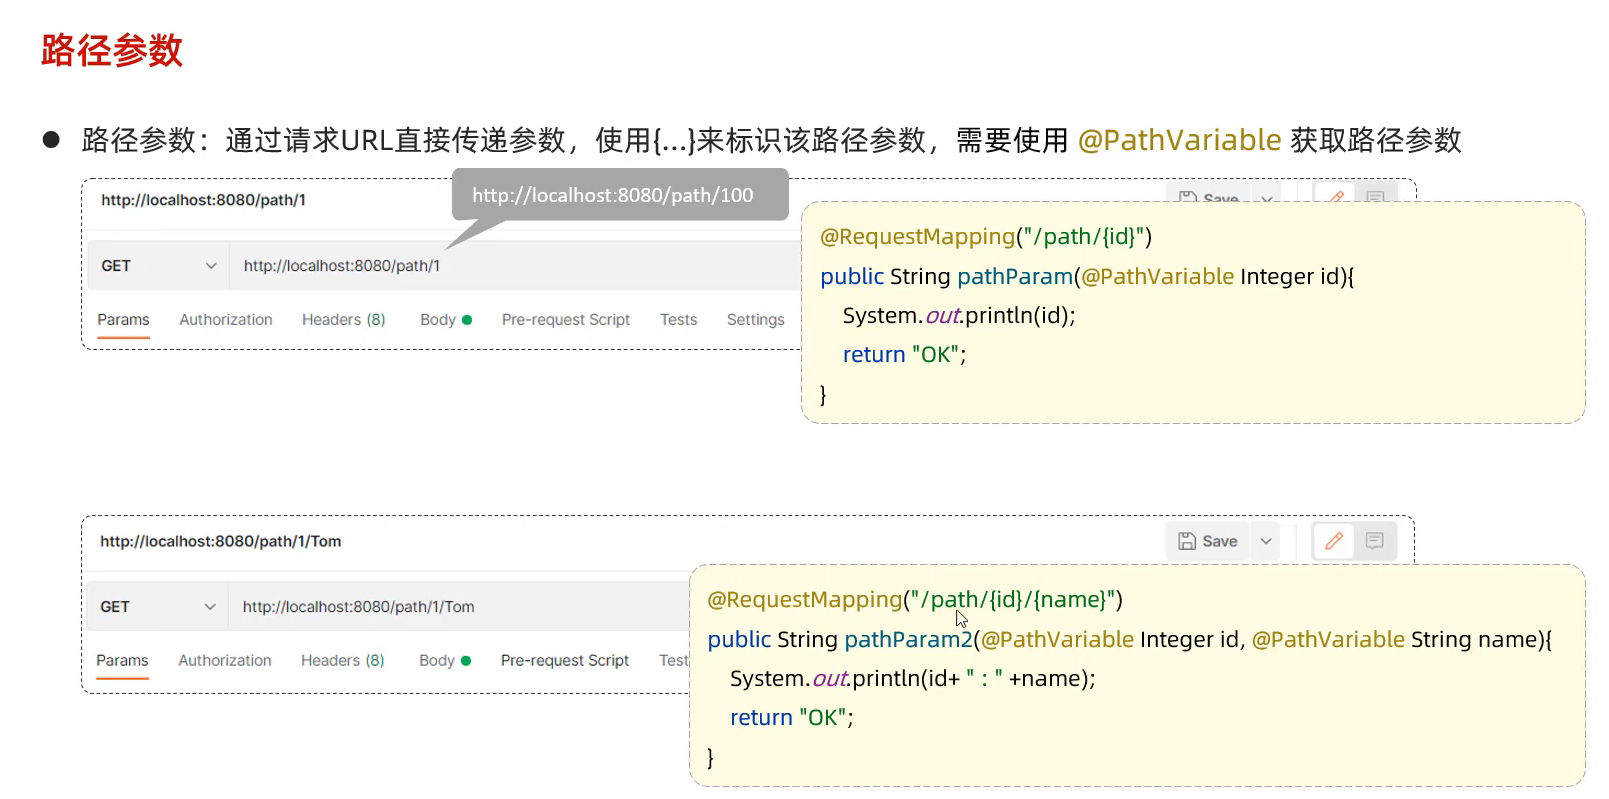
60.路径参数
1 2 3 4 @RequestMapping("/path/{id}") public String pathparam (@PathVariable Integer id) { System.out.println(id); return "OK" ;
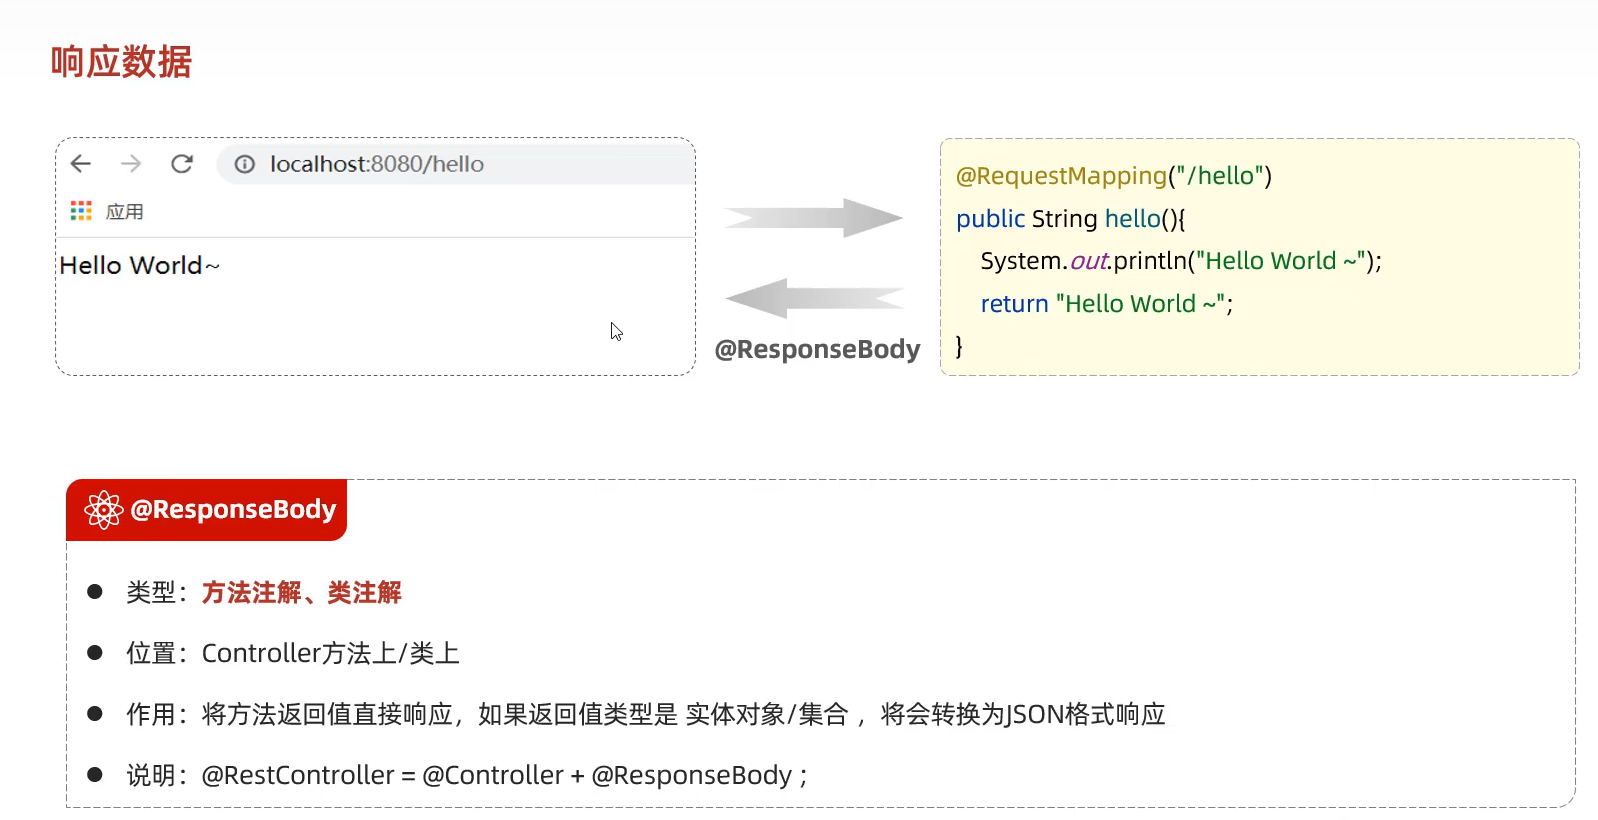
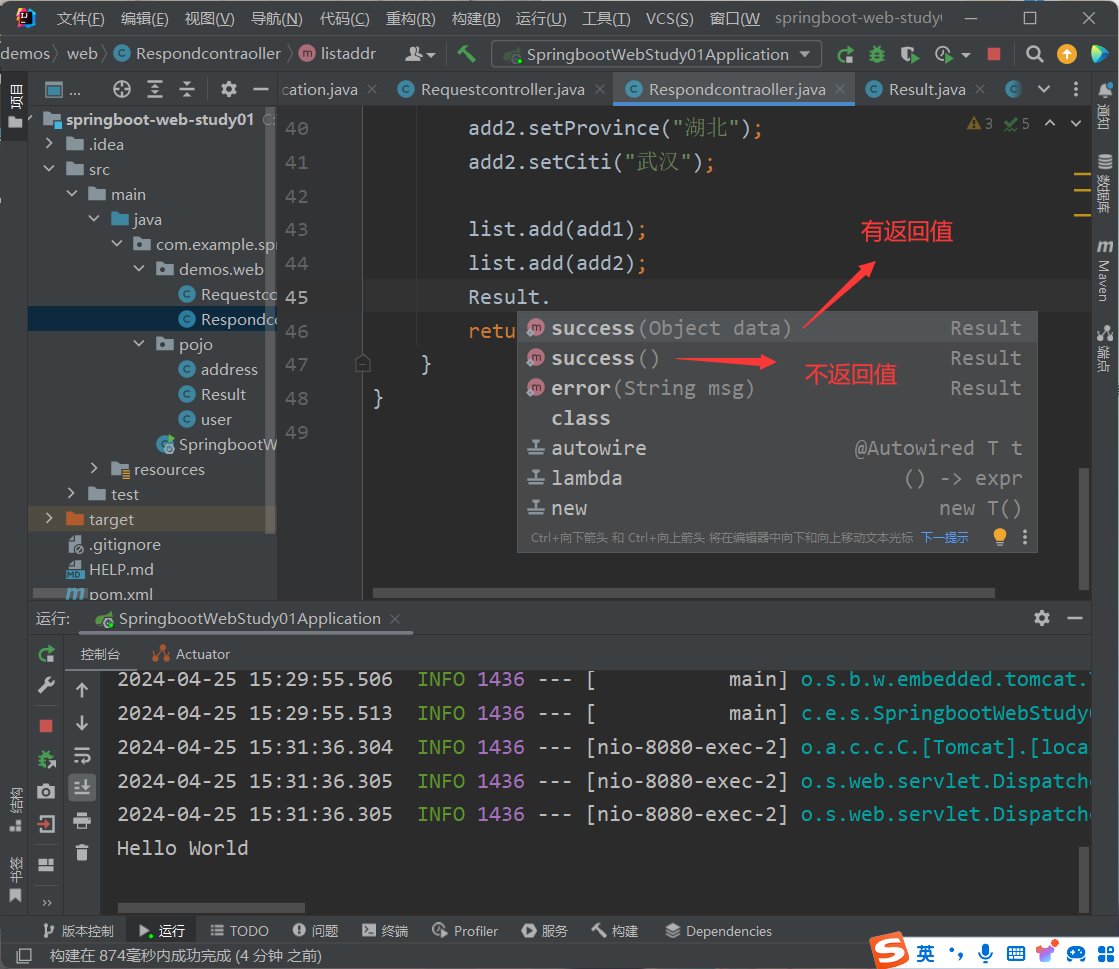
61.响应数据 代码中一般使用@RestController
@RestController=@Contorller+@RespondBody
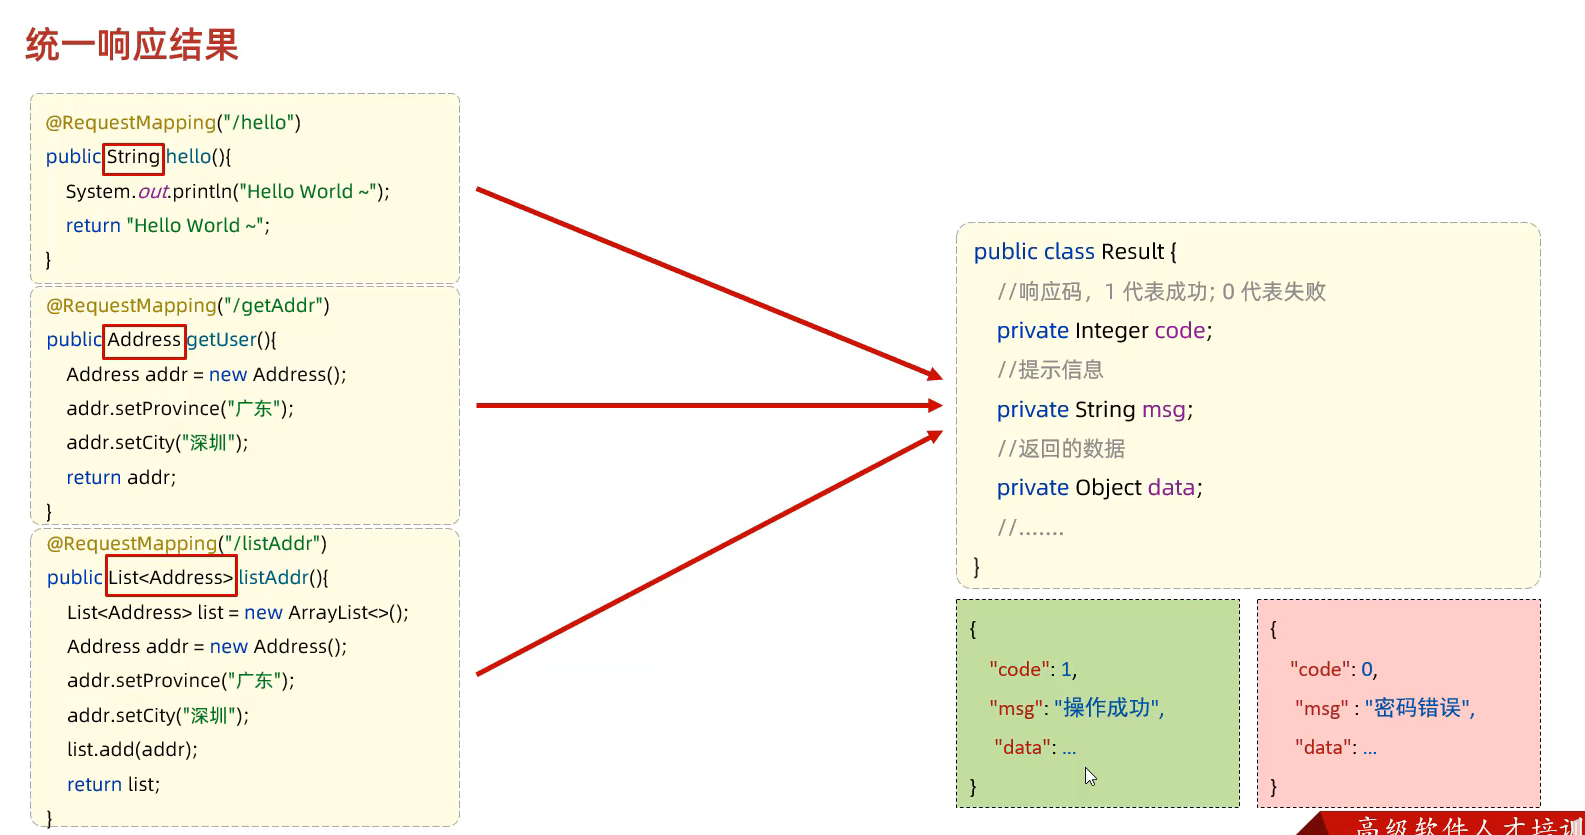
统一响应结果
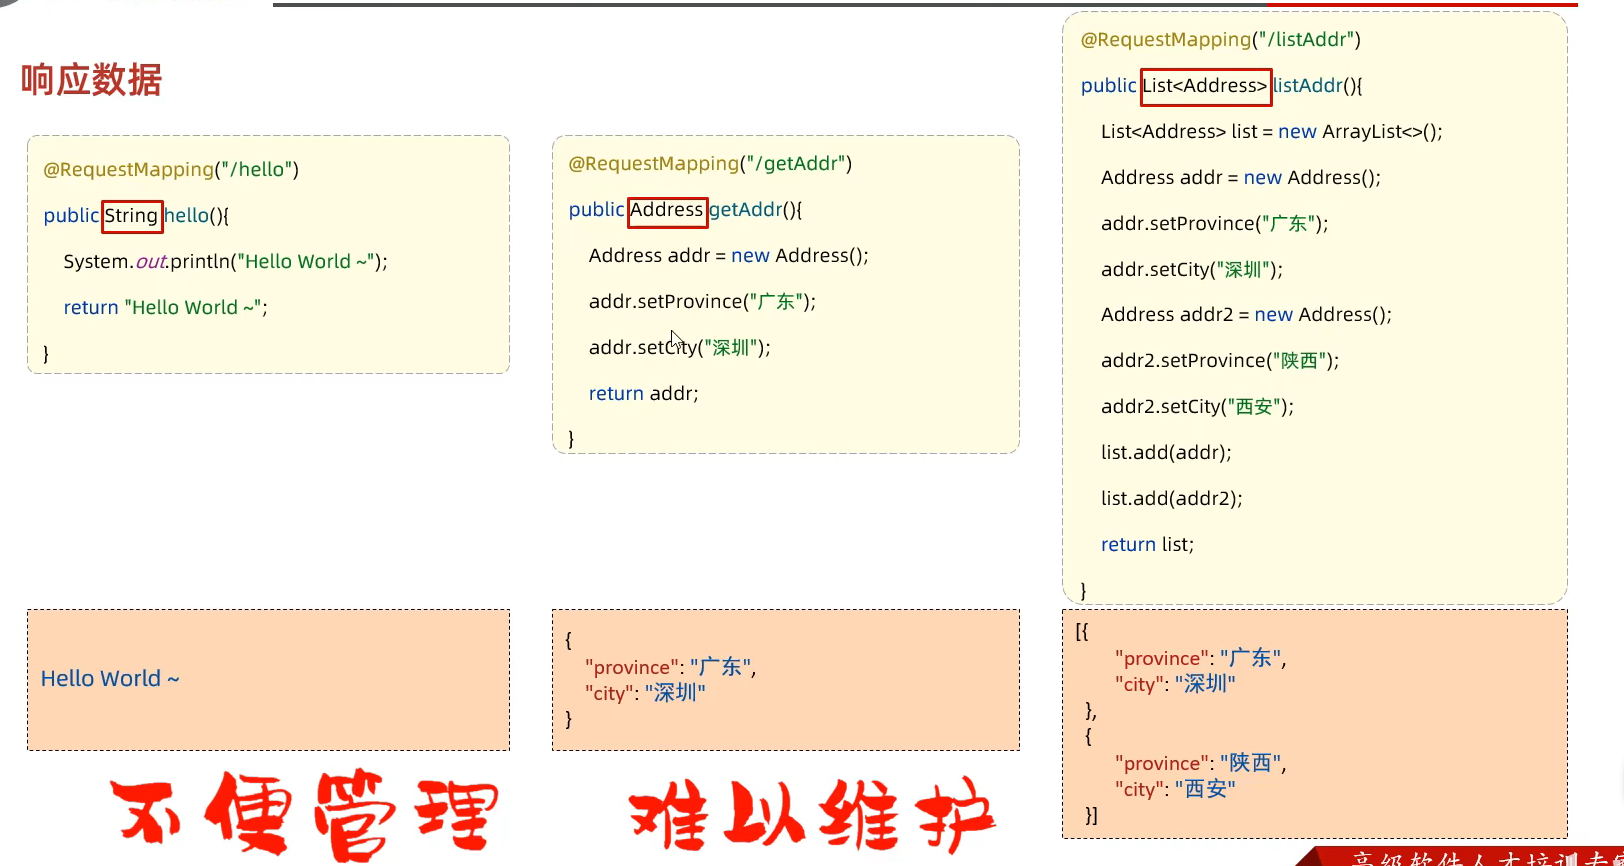
由于数据的响应不唯一 所以定义一个统一的Result类 来统一返回的值
1 2 3 4 5 6 7 8 9 10 11 12 13 14 15 16 17 18 19 20 21 22 23 24 25 26 27 28 29 30 31 32 33 34 35 36 37 38 39 40 41 42 43 44 45 46 47 48 49 50 51 52 53 54 55 56 57 58 59 60 61 62 63 64 65 package com.example.springbootwebstudy01.pojo;public class Result { private Integer code; private String msg; private Object data; public Result () { } public Result (Integer code, String msg, Object data) { this .code = code; this .msg = msg; this .data = data; } public Integer getCode () { return code; } public void setCode (Integer code) { this .code = code; } public String getMsg () { return msg; } public void setMsg (String msg) { this .msg = msg; } public Object getData () { return data; } public void setData (Object data) { this .data = data; } public static Result success (Object data) { return new Result (1 , "success" , data); } public static Result success () { return new Result (1 , "success" , null ); } public static Result error (String msg) { return new Result (0 , msg, null ); } @Override public String toString () { return "Result{" + "code=" + code + ", msg='" + msg + '\'' + ", data=" + data + '}' ; } }
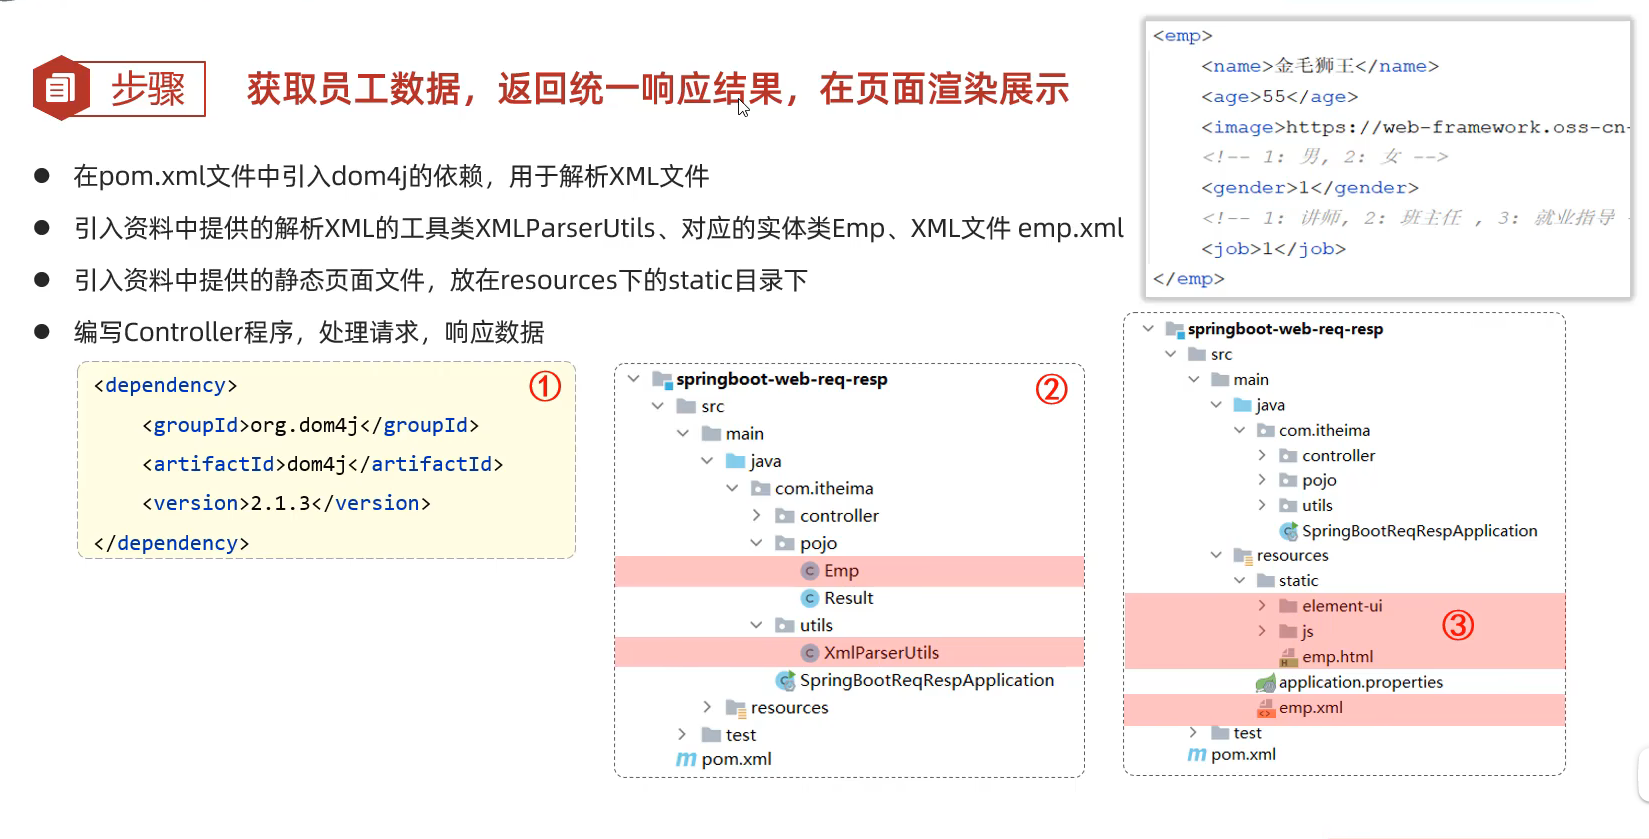
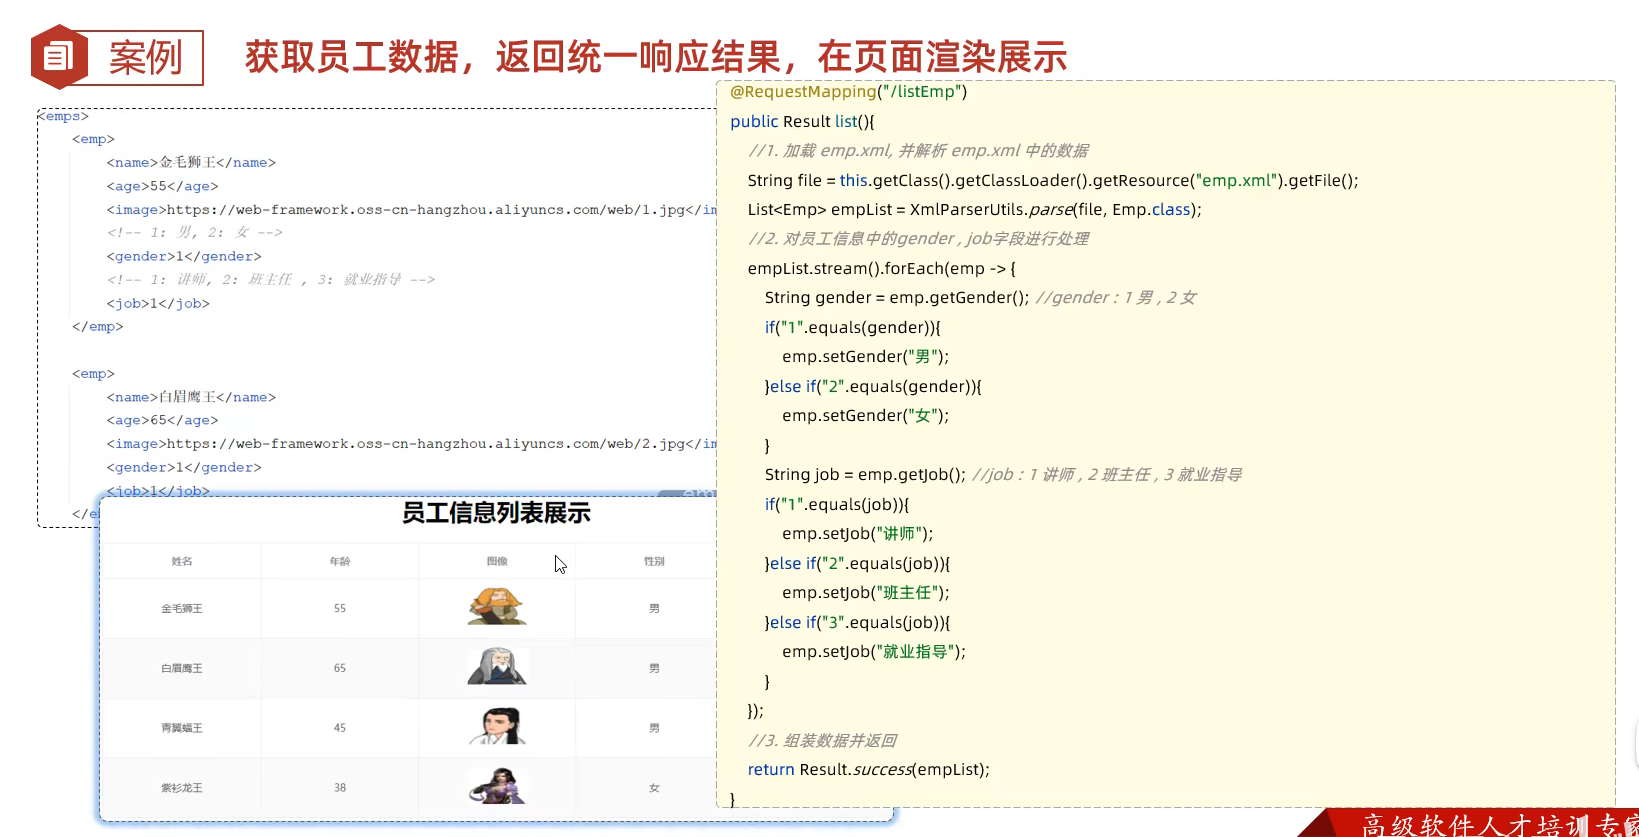
62.请求响应实例
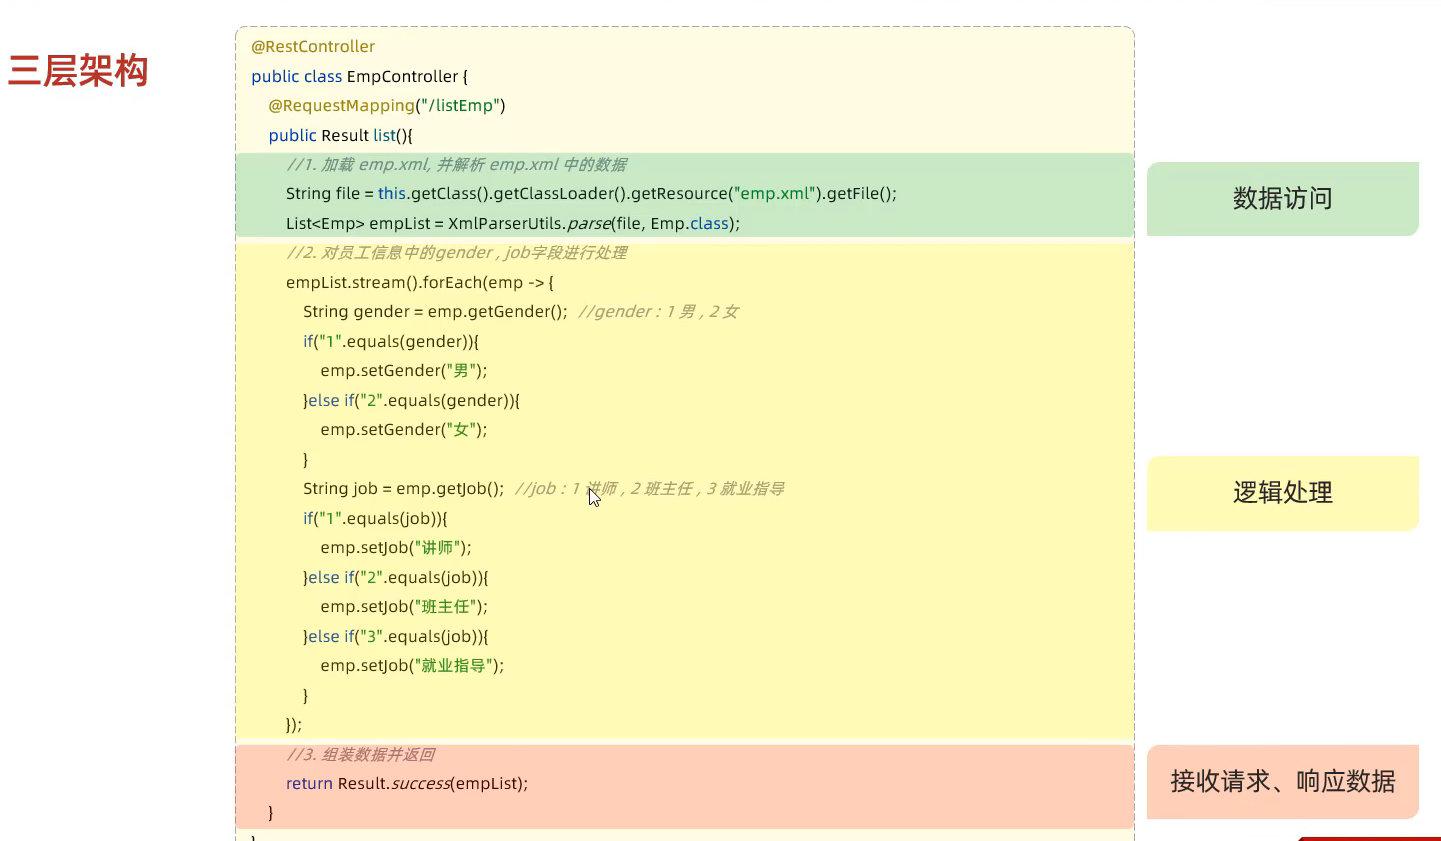
1 2 3 4 5 6 7 8 9 10 11 12 13 14 15 16 17 18 19 20 21 22 23 24 25 26 27 28 29 30 31 32 33 34 35 36 37 38 39 40 41 42 43 44 45 46 47 48 49 50 51 52 53 54 55 package com.example.springbootwebstudy01.demos.web;import com.example.springbootwebstudy01.pojo.Emp;import com.example.springbootwebstudy01.pojo.Result;import com.example.springbootwebstudy01.utils.XmlParserUtils;import org.springframework.web.bind.annotation.RequestMapping;import org.springframework.web.bind.annotation.RestController;import java.util.List;@RestController public class Empcontroller { @RequestMapping("/listEmp") public Result list () { String file = this .getClass().getClassLoader().getResource("emp.xml" ).getFile(); List<Emp> empList = XmlParserUtils.parse(file, Emp.class); empList.stream().forEach(emp -> { String gender = emp.getGender(); if (gender.equals("1" )) { emp.setGender("男" ); } else if (gender.equals("2" )) { emp.setGender("女" ); } String job = emp.getGender(); if (job.equals("1" )) { emp.setJob("讲师" ); } else if (job.equals("2" )) { emp.setJob("班主任" ); } else if (job.equals("3" )) { emp.setJob("就业指导" ); } }); return Result.success(empList); } }
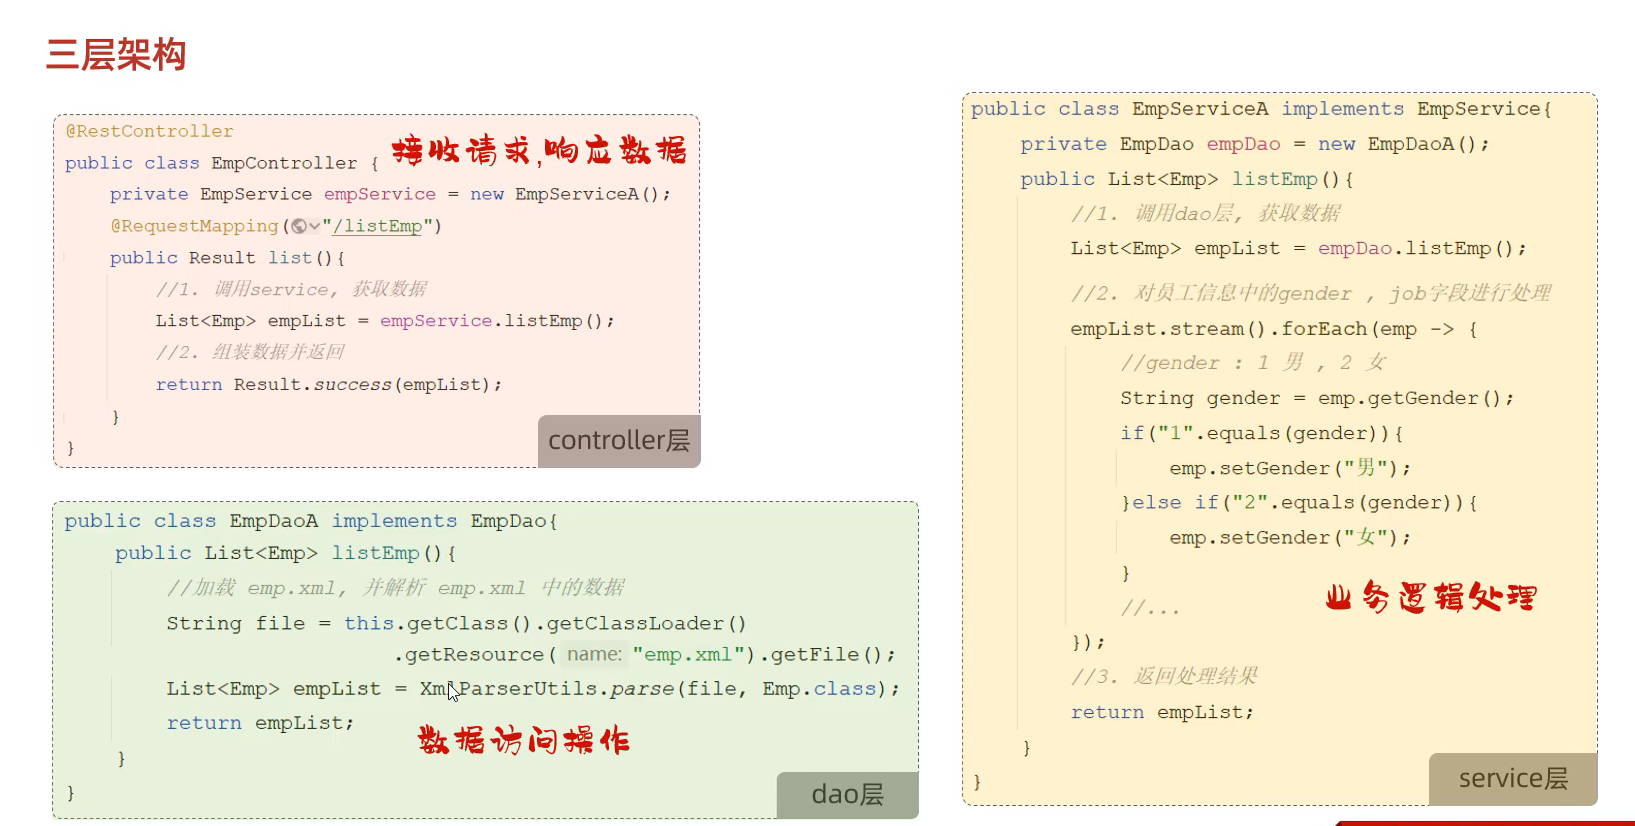
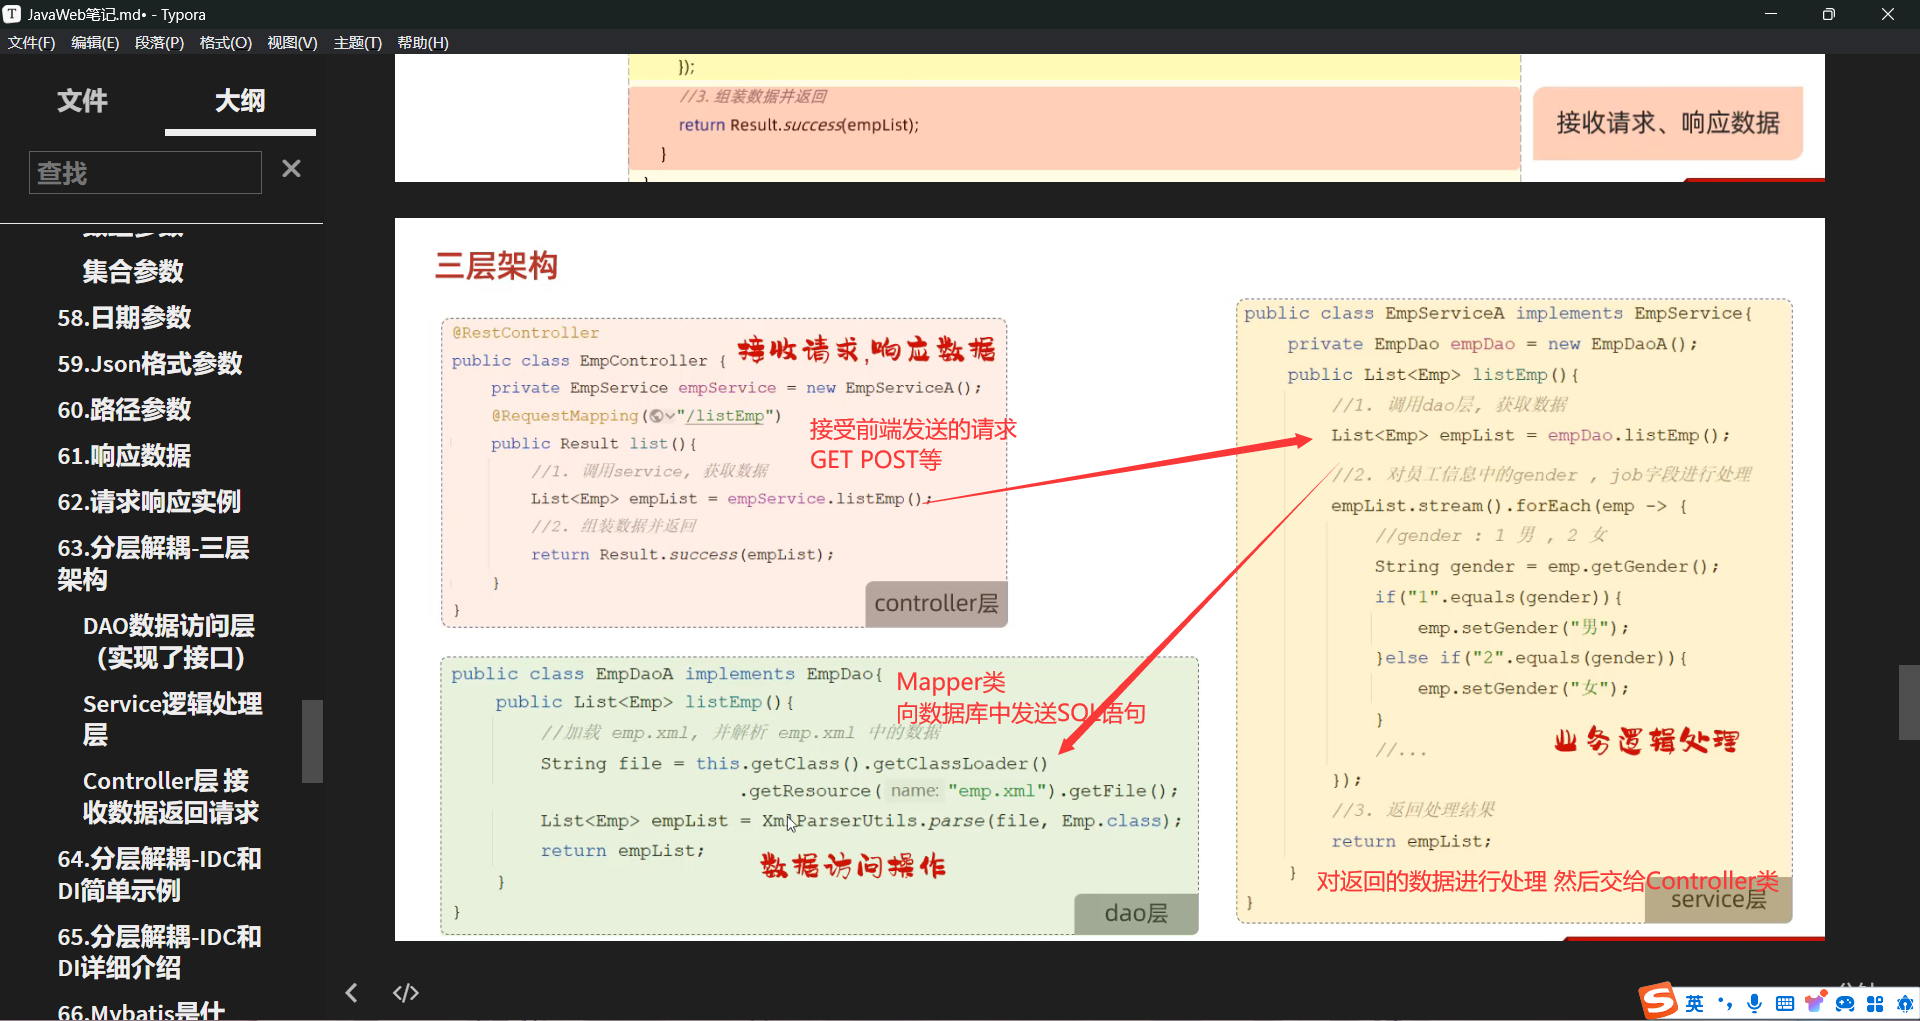
63.分层解耦-三层架构
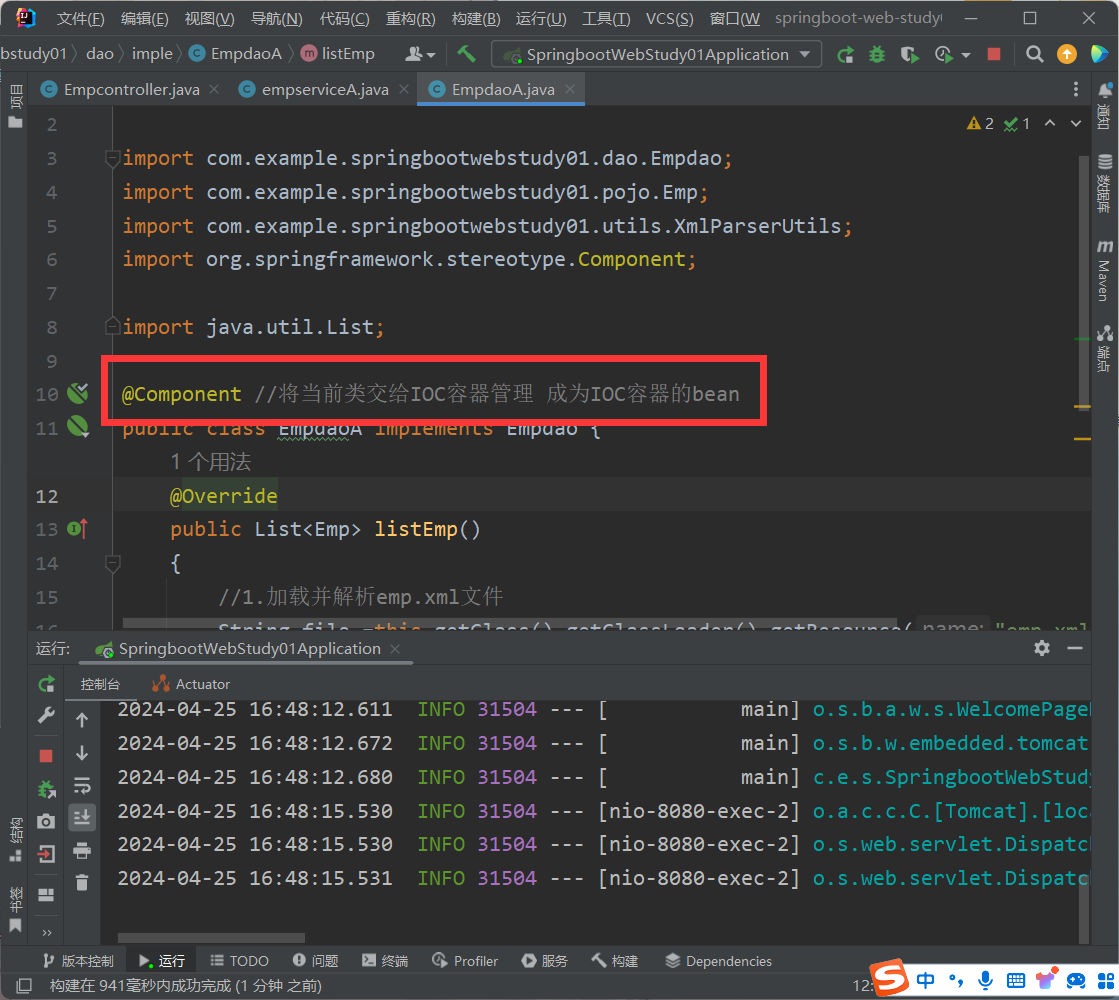
DAO数据访问层(实现了接口) 1 2 3 4 5 6 7 8 9 10 11 12 13 14 15 16 17 18 19 20 21 package com.example.springbootwebstudy01.dao.imple;import com.example.springbootwebstudy01.dao.Empdao;import com.example.springbootwebstudy01.pojo.Emp;import com.example.springbootwebstudy01.utils.XmlParserUtils;import java.util.List;public class EmpdaoA implements Empdao { @Override public List<Emp> listEmp () { String file = this .getClass().getClassLoader().getResource("emp.xml" ).getFile(); List<Emp> empList = XmlParserUtils.parse(file, Emp.class); return empList; } }
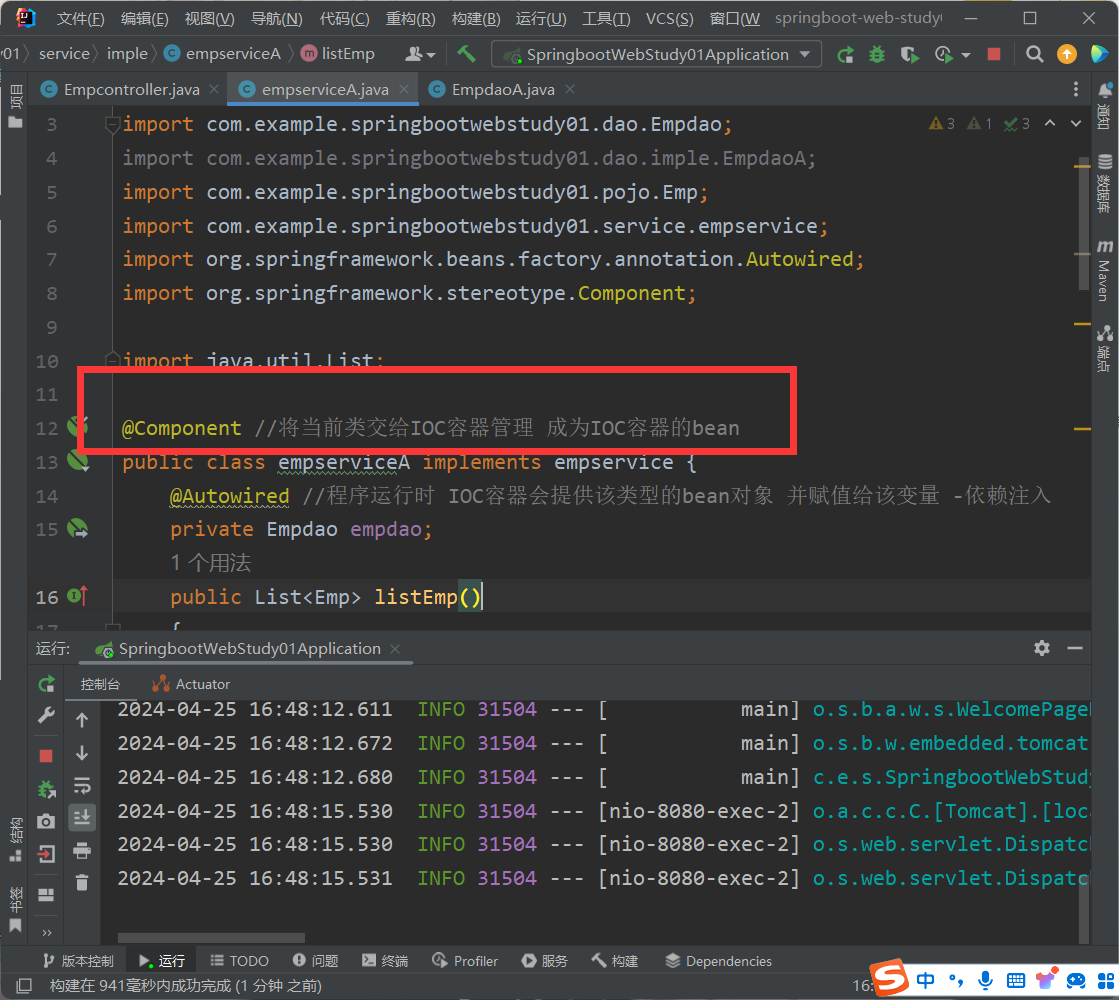
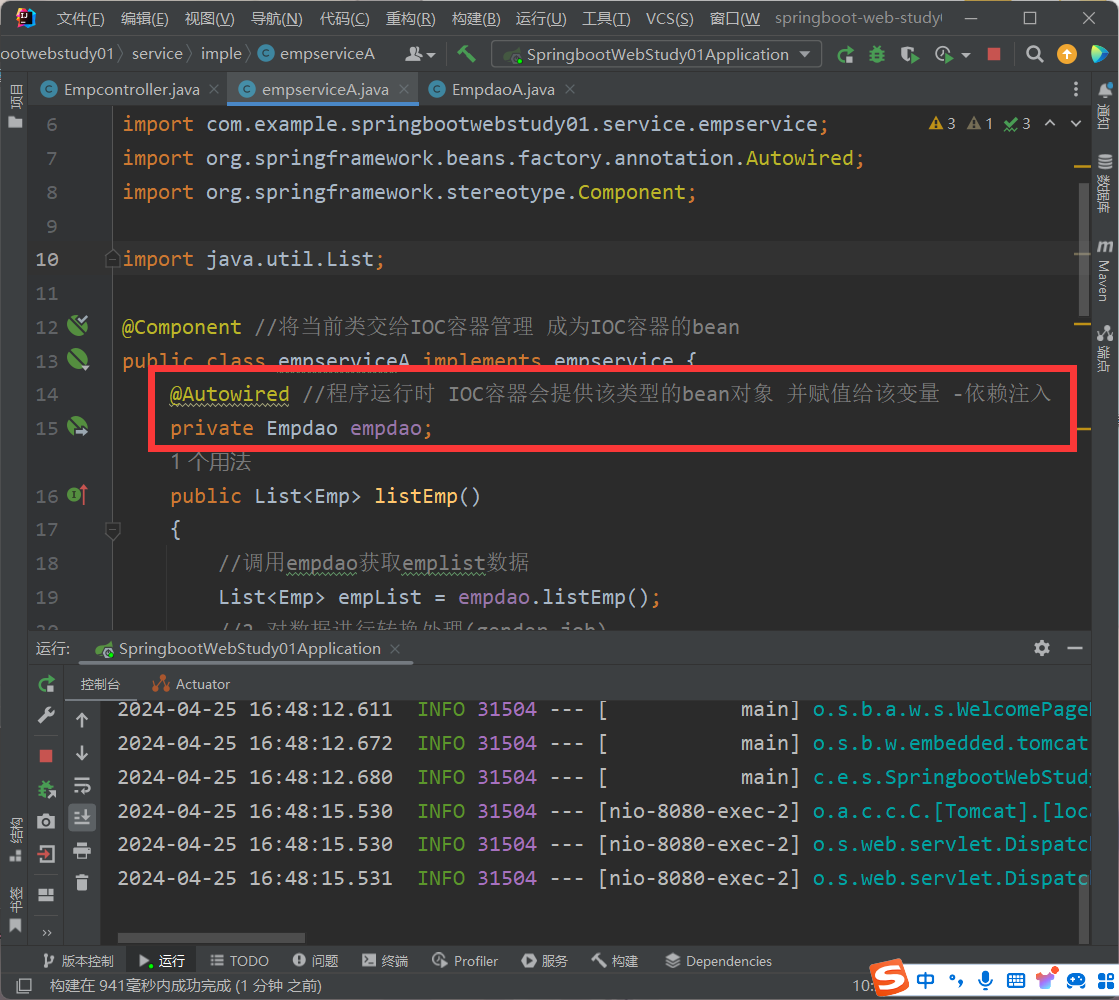
Service逻辑处理层 1 2 3 4 5 6 7 8 9 10 11 12 13 14 15 16 17 18 19 20 21 22 23 24 25 26 27 28 29 30 31 32 33 34 35 36 37 38 39 40 41 42 43 44 45 46 47 package com.example.springbootwebstudy01.service.imple;import com.example.springbootwebstudy01.dao.Empdao;import com.example.springbootwebstudy01.dao.imple.EmpdaoA;import com.example.springbootwebstudy01.pojo.Emp;import com.example.springbootwebstudy01.service.empservice;import java.util.List;public class empserviceA implements empservice { private Empdao empdao = new EmpdaoA (); public List<Emp> listEmp () { List<Emp> empList = empdao.listEmp(); empList.stream().forEach(emp -> { String gender = emp.getGender(); if (gender.equals("1" )) { emp.setGender("男" ); } else if (gender.equals("2" )) { emp.setGender("女" ); } String job = emp.getGender(); if (job.equals("1" )) { emp.setJob("讲师" ); } else if (job.equals("2" )) { emp.setJob("班主任" ); } else if (job.equals("3" )) { emp.setJob("就业指导" ); } }); return empList; } }
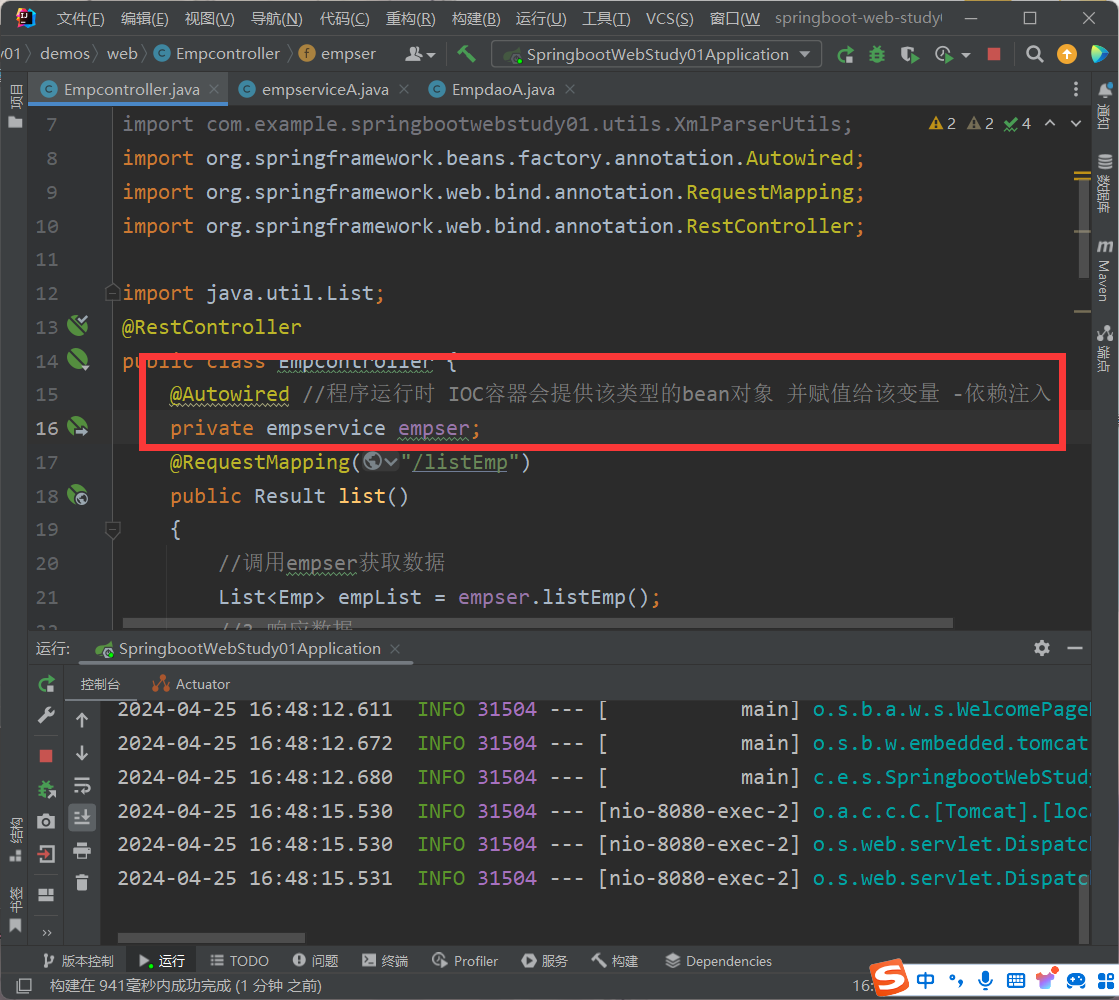
Controller层 接收数据返回请求 1 2 3 4 5 6 7 8 9 10 11 12 13 14 15 16 17 18 19 20 21 22 23 24 package com.example.springbootwebstudy01.demos.web;import com.example.springbootwebstudy01.pojo.Emp;import com.example.springbootwebstudy01.pojo.Result;import com.example.springbootwebstudy01.service.empservice;import com.example.springbootwebstudy01.service.imple.empserviceA;import com.example.springbootwebstudy01.utils.XmlParserUtils;import org.springframework.web.bind.annotation.RequestMapping;import org.springframework.web.bind.annotation.RestController;import java.util.List;@RestController public class Empcontroller { private empservice empser = new empserviceA (); @RequestMapping("/listEmp") public Result list () { List<Emp> empList = empser.listEmp(); return Result.success(empList); } }
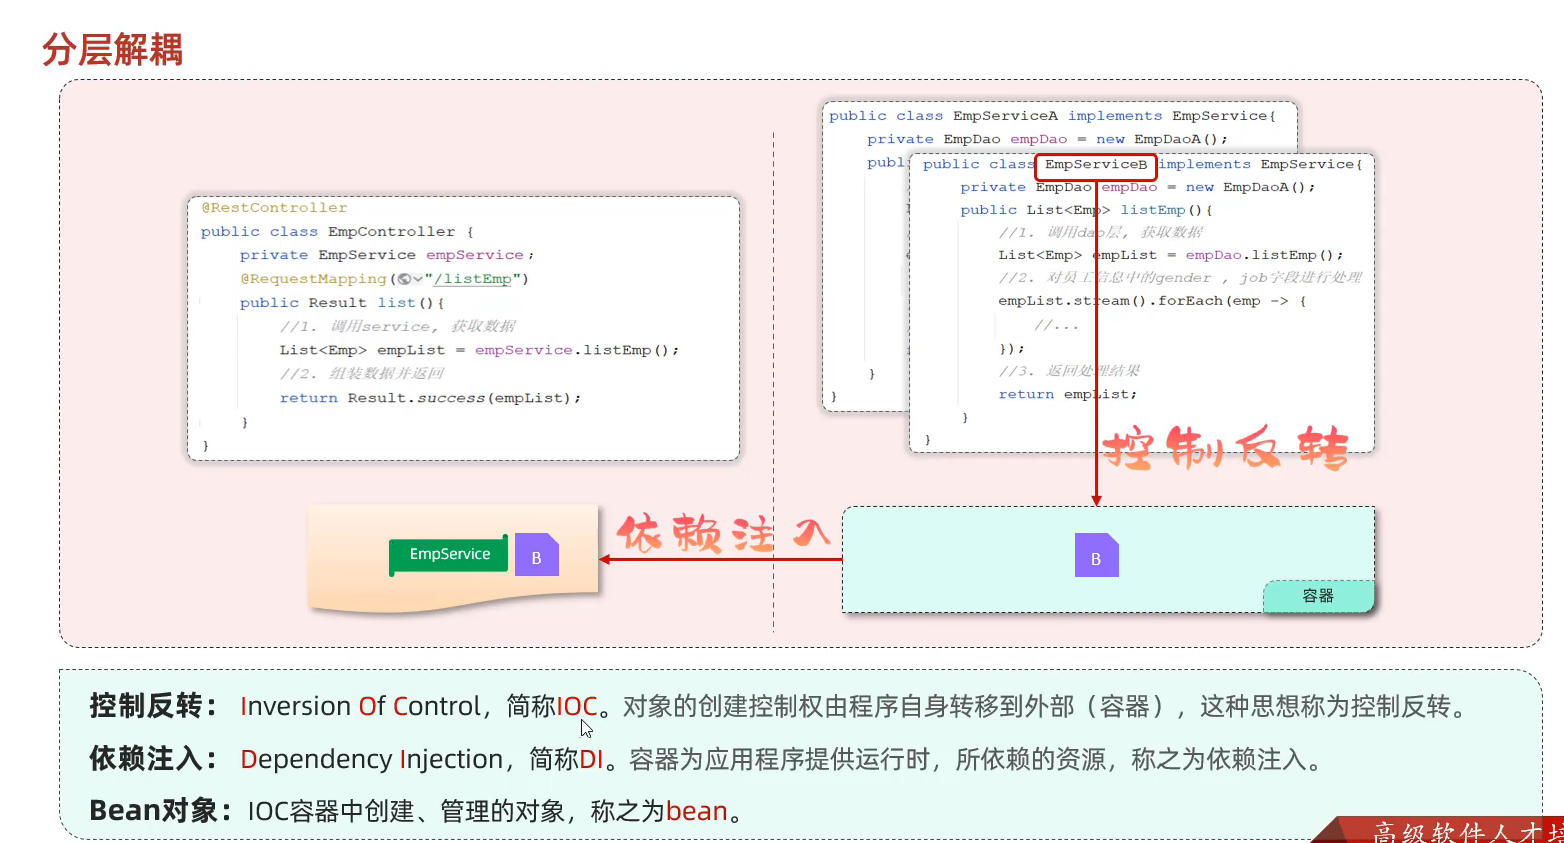
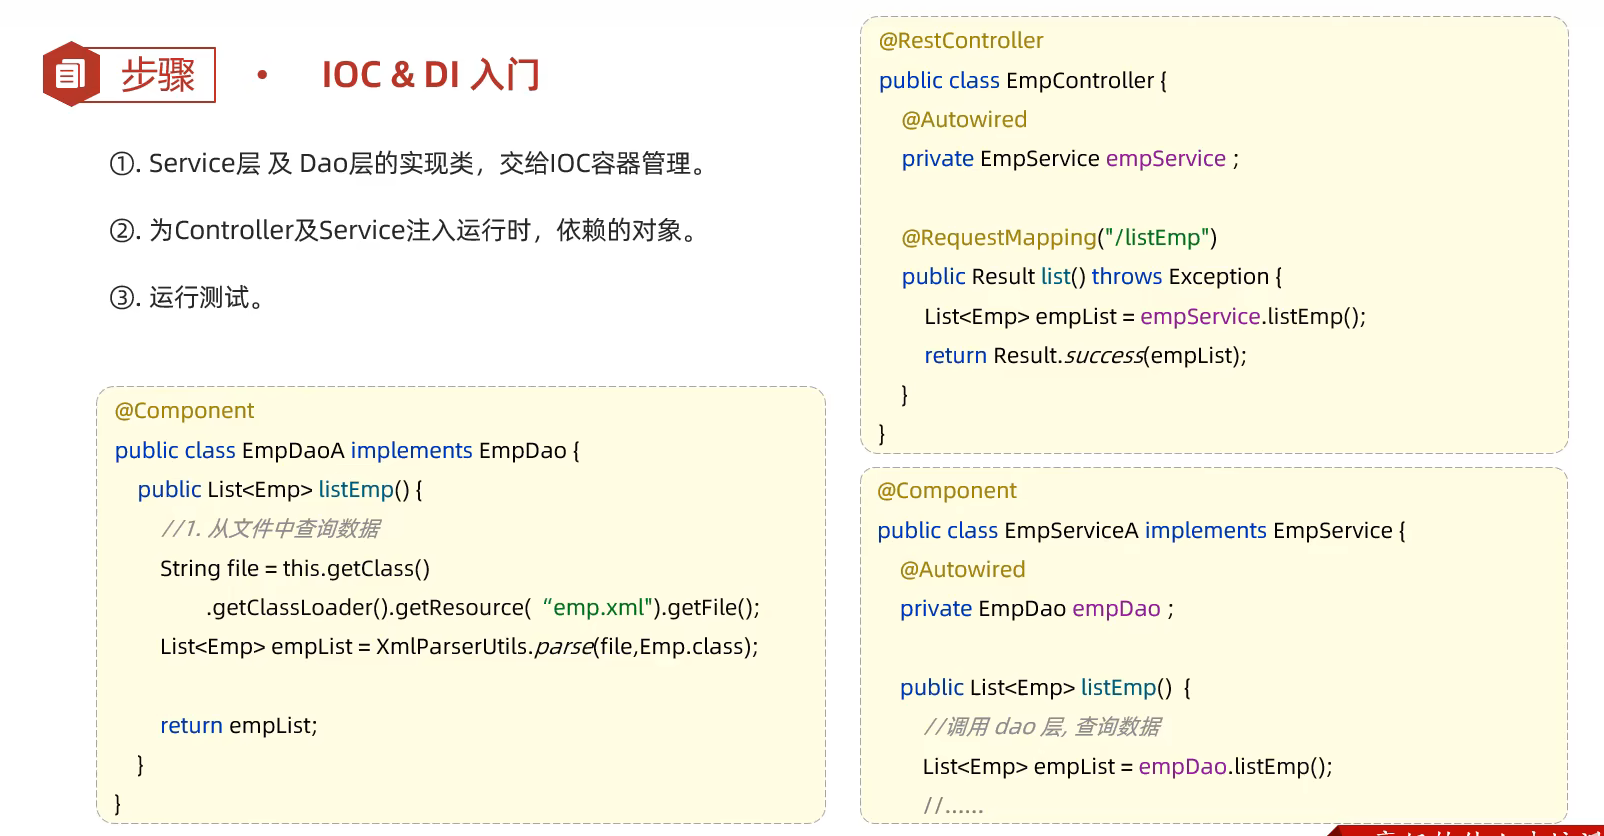
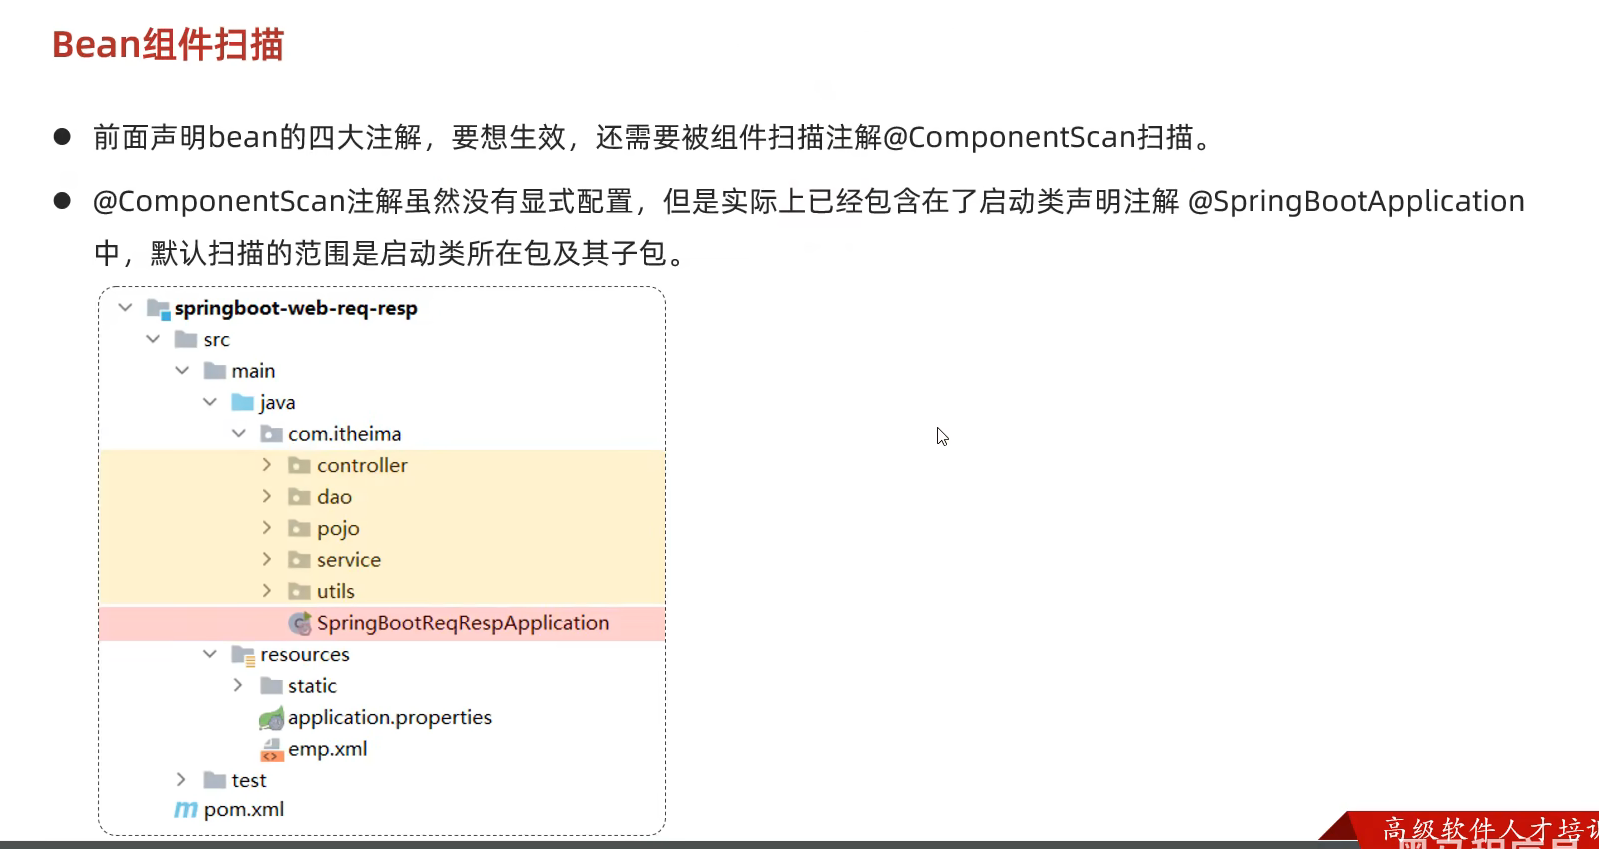
64.分层解耦-IDC和DI简单示例
这样修改之后 当修改某个类的代码的时候 其它层就不需要动了
只需要将修改前的类不交给容器管理 把修改后的类交给容器管理(也就是加上@Component)
65.分层解耦-IDC和DI详细介绍
bean的名称默认是—类名首字母小写—-
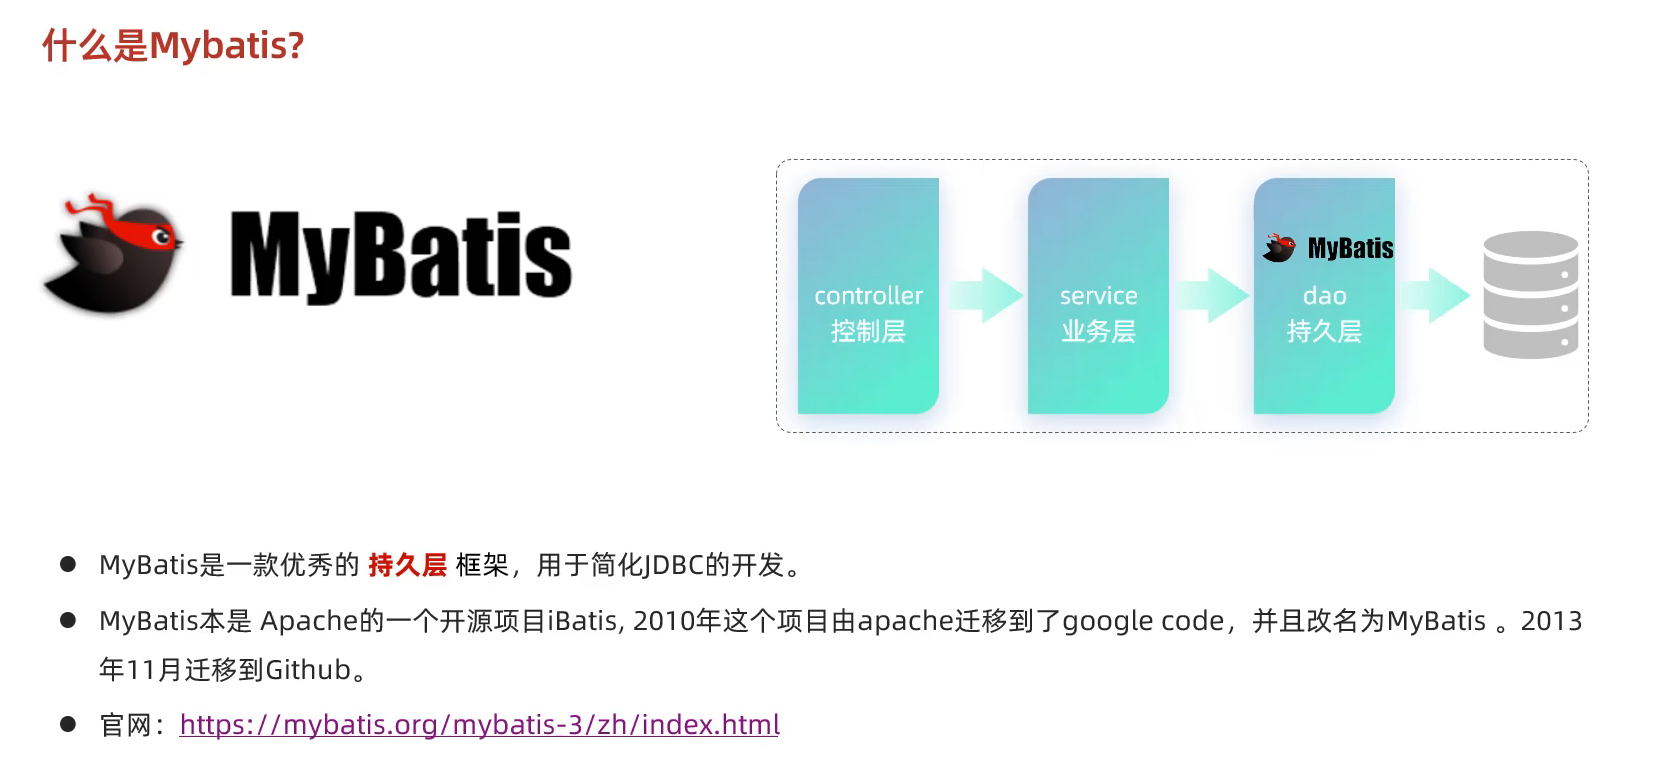
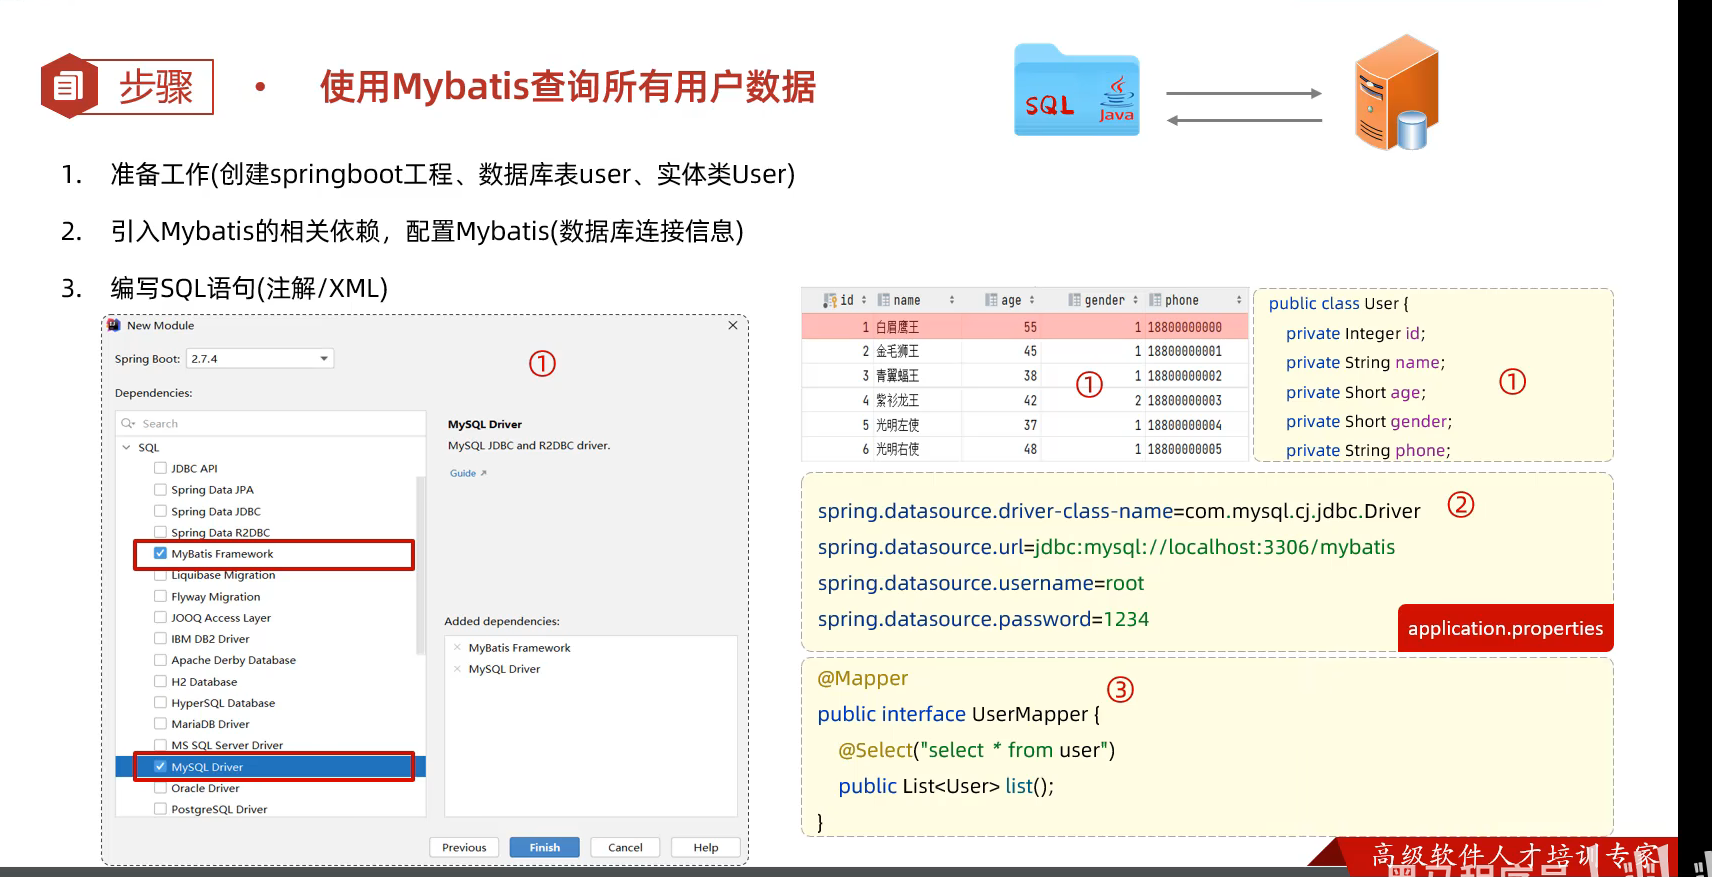
66.Mybatis是什么? 我们做为后端程序开发人员,通常会使用Java程序来完成对数据库的操作。
Java程序操作数据库,现在主流的方式是:Mybatis。
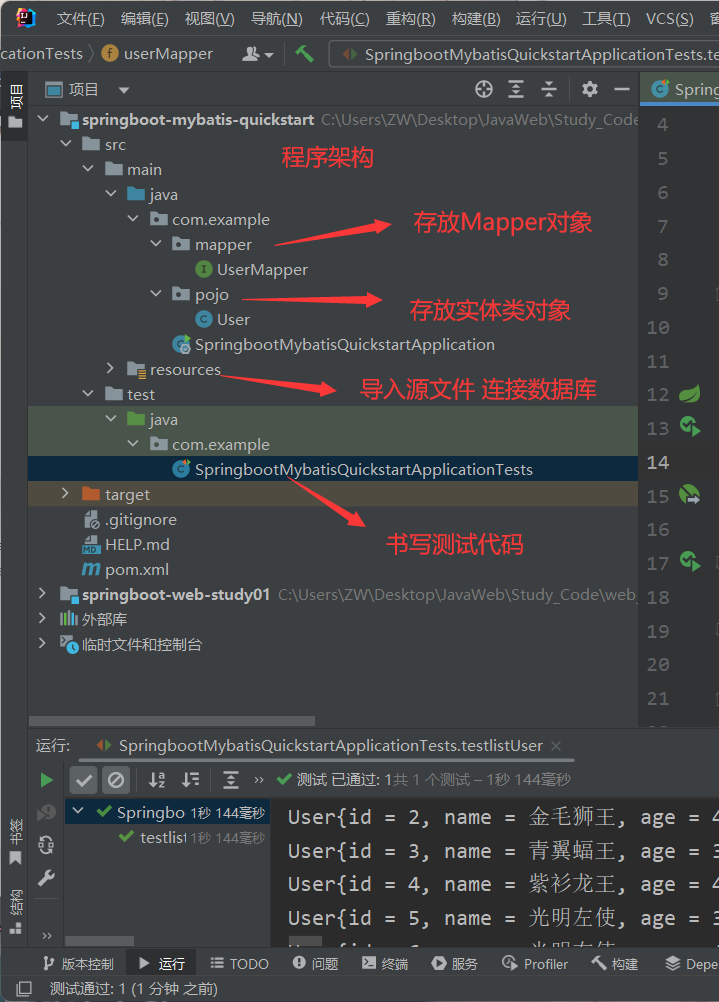
67.Mybatis快速入门(代码实例)
测试类的代码 1 2 3 4 5 6 7 8 9 10 11 12 13 14 15 16 17 18 19 20 21 22 23 24 25 package com.example;import com.example.mapper.UserMapper;import com.example.pojo.User;import org.junit.jupiter.api.Test;import org.springframework.beans.factory.annotation.Autowired;import org.springframework.boot.test.context.SpringBootTest;import java.util.List;@SpringBootTest class SpringbootMybatisQuickstartApplicationTests { @Autowired private UserMapper userMapper; @Test public void testlistUser () { List<User> userList = userMapper.list(); userList.stream().forEach(user->{ System.out.println(user); }); } }
UserMapper对象 1 2 3 4 5 6 7 8 9 10 11 12 13 14 15 16 17 package com.example.mapper;import com.example.pojo.User;import org.apache.ibatis.annotations.Mapper;import org.apache.ibatis.annotations.Select;import java.util.List;@Mapper public interface UserMapper { @Select("select * from User") public List<User> list () ; }
Recourser类中连接数据库 1 2 3 4 5 6 7 8 #驱动类名称 spring.datasource.driver-class-name=com.mysql.cj.jdbc.Driver #数据库连接的url spring.datasource.url=jdbc:mysql: #连接数据库的用户名 spring.datasource.username=root #连接数据库的密码 spring.datasource.password=123456
User类 1 2 3 4 5 6 7 8 9 10 11 12 13 14 15 16 17 18 19 20 21 22 23 24 25 26 27 28 29 30 31 32 33 34 35 36 37 38 39 40 41 42 43 44 45 46 47 48 49 50 51 52 53 54 55 56 57 58 59 60 61 62 63 64 65 66 67 68 69 70 71 72 73 74 75 76 77 78 79 80 81 82 83 84 85 86 87 88 89 90 91 92 93 94 95 96 97 98 99 100 101 102 103 104 105 106 107 108 109 110 111 112 113 114 115 116 117 118 package com.example.pojo;import javax.sound.sampled.Port;public class User { private Integer id; private String name; private Short age; private Short gender; private String phone; public User () { } public User (Integer id, String name, Short age, Short gender, String phone) { this .id = id; this .name = name; this .age = age; this .gender = gender; this .phone = phone; } public Integer getId () { return id; } public void setId (Integer id) { this .id = id; } public String getName () { return name; } public void setName (String name) { this .name = name; } public Short getAge () { return age; } public void setAge (Short age) { this .age = age; } public Short getGender () { return gender; } public void setGender (Short gender) { this .gender = gender; } public String getPhone () { return phone; } public void setPhone (String phone) { this .phone = phone; } public String toString () { return "User{id = " + id + ", name = " + name + ", age = " + age + ", gender = " + gender + ", phone = " + phone + "}" ; } }
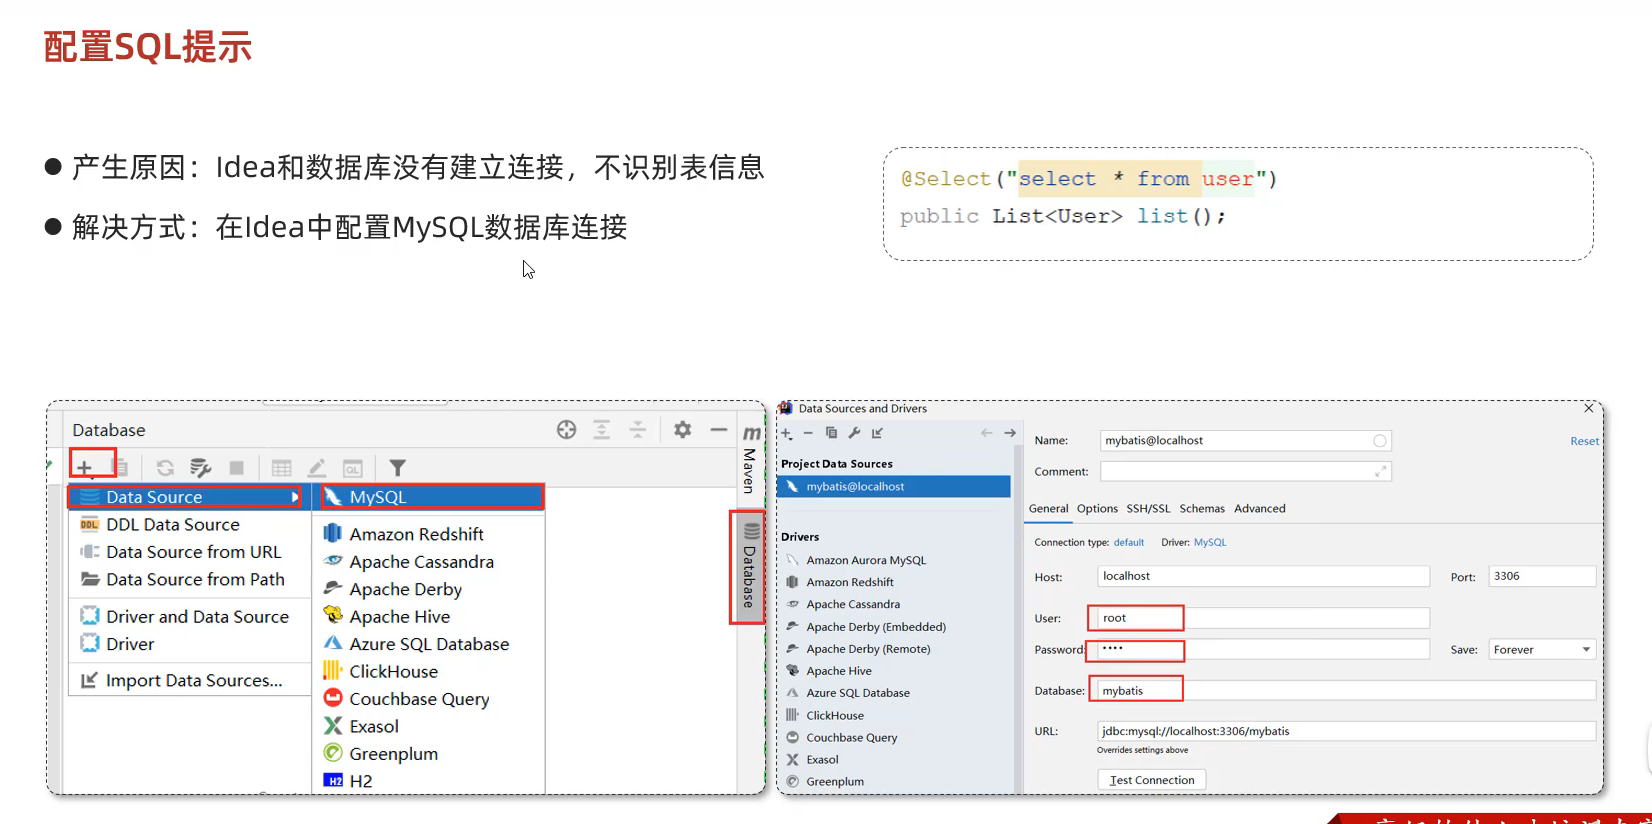
配置SQL的提示
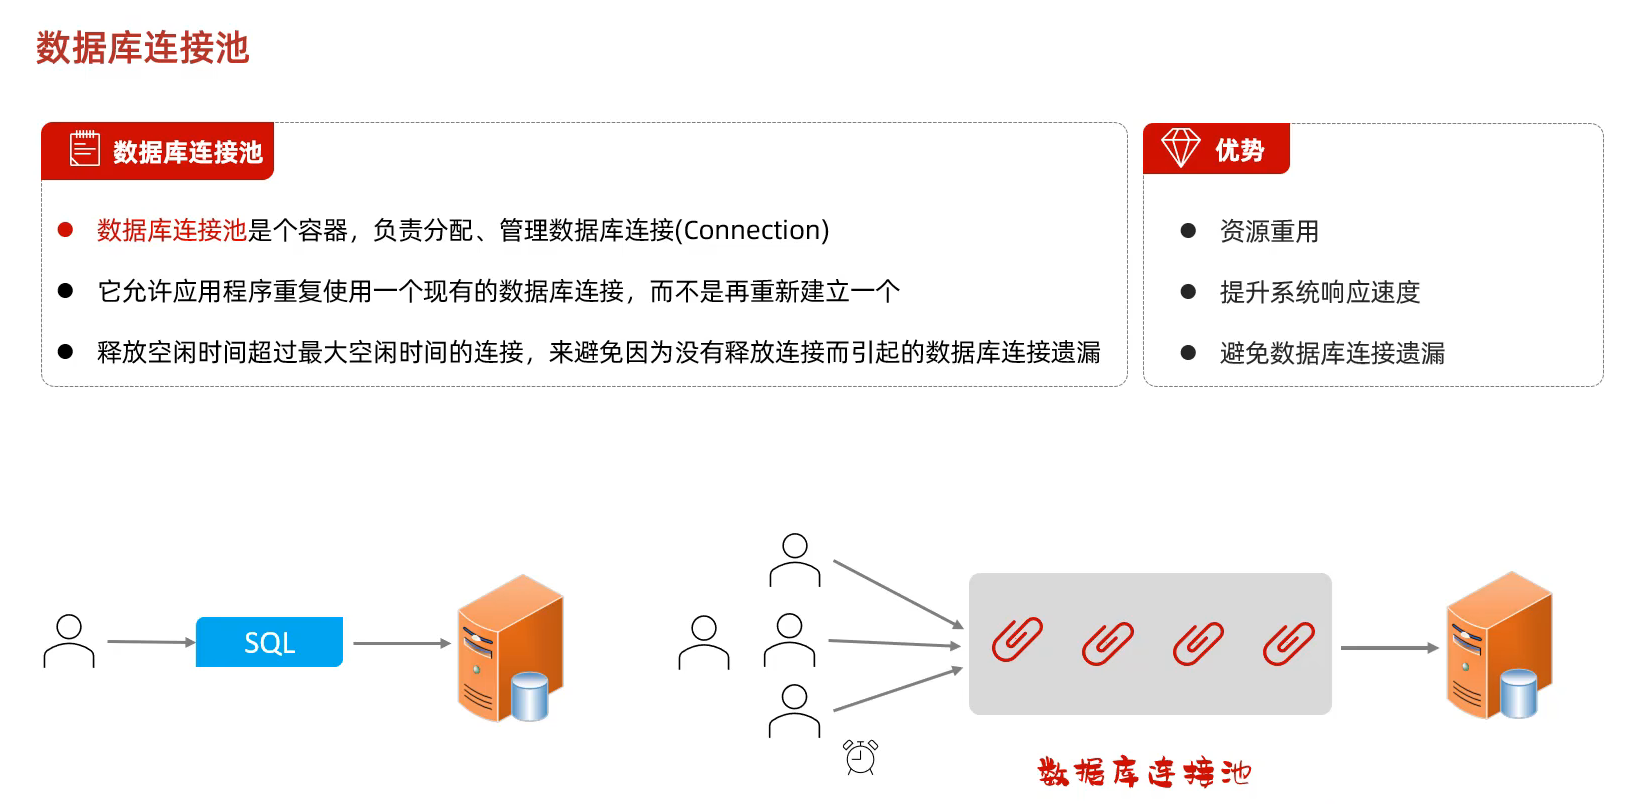
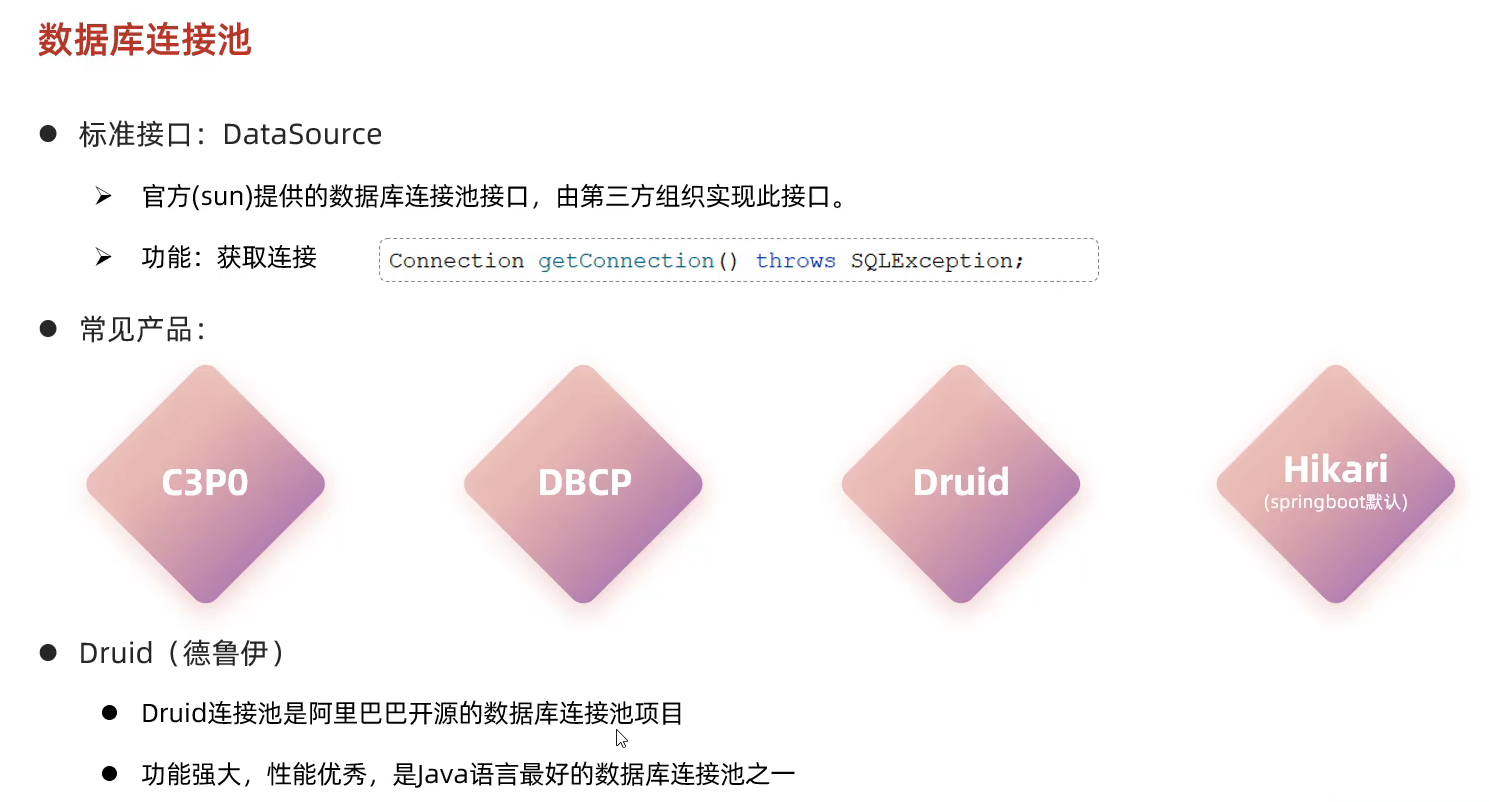
68.数据库连接池
切换连接池的操作
Druid数据库连接池的依赖 1 2 3 4 5 <dependency > <groupId > com.alibaba</groupId > <artifactId > druid-spring-boot-starter</artifactId > <version > 1.2.8</version > </dependency >
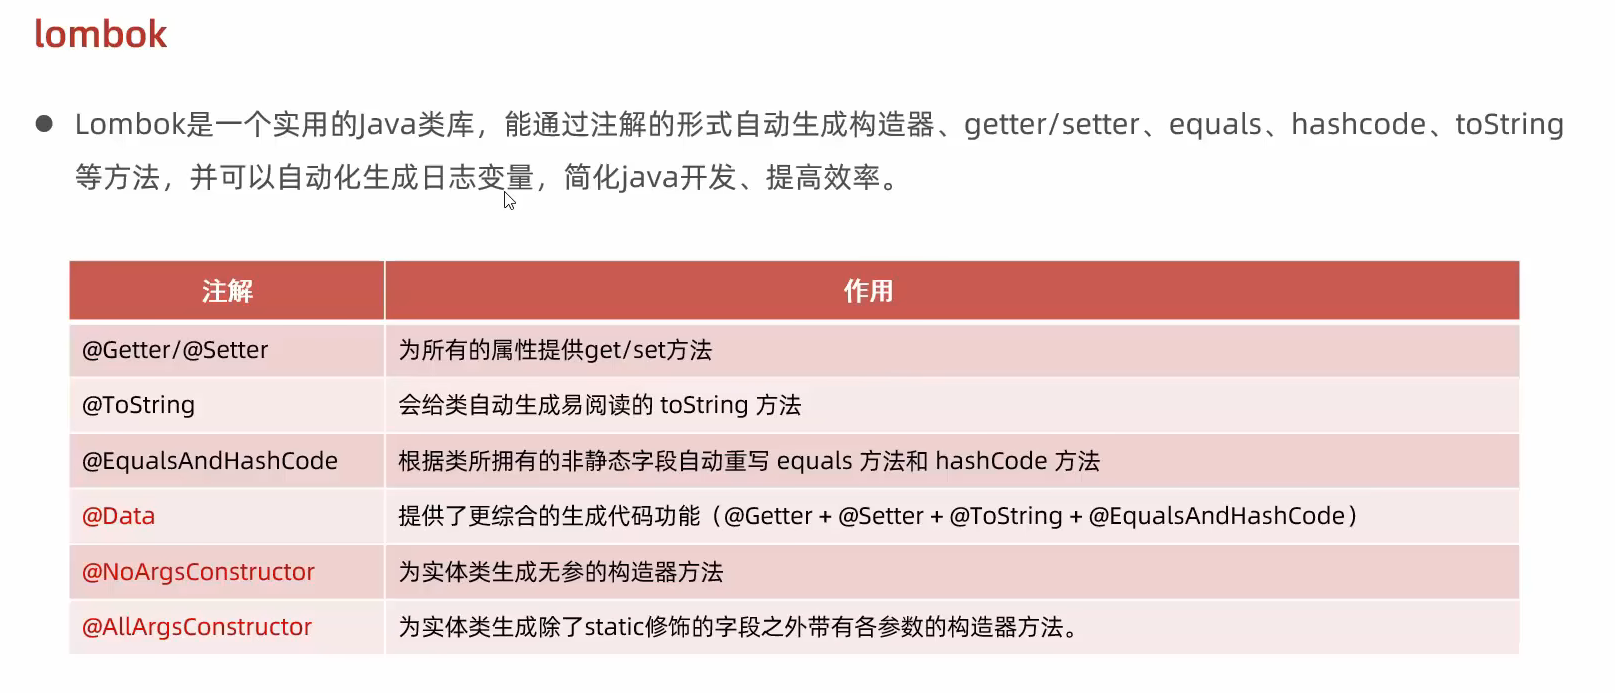
69.lombok 作用 只需要加上注解 那么就拥有了他的方法
引入lombok的依赖 1 2 3 4 <dependency > <groupId > org.projectlombok</groupId > <artifactId > lombok</artifactId > </dependency >
70.Mybatis基础操作 在 [application.properties] 中配置日志信息 可以在控制台得到操作记录 1 2 mybatis.configuration.log-impl =org.apache.ibatis.logging.stdout.StdOutImpl
如果一条语句执行两遍的解决方案
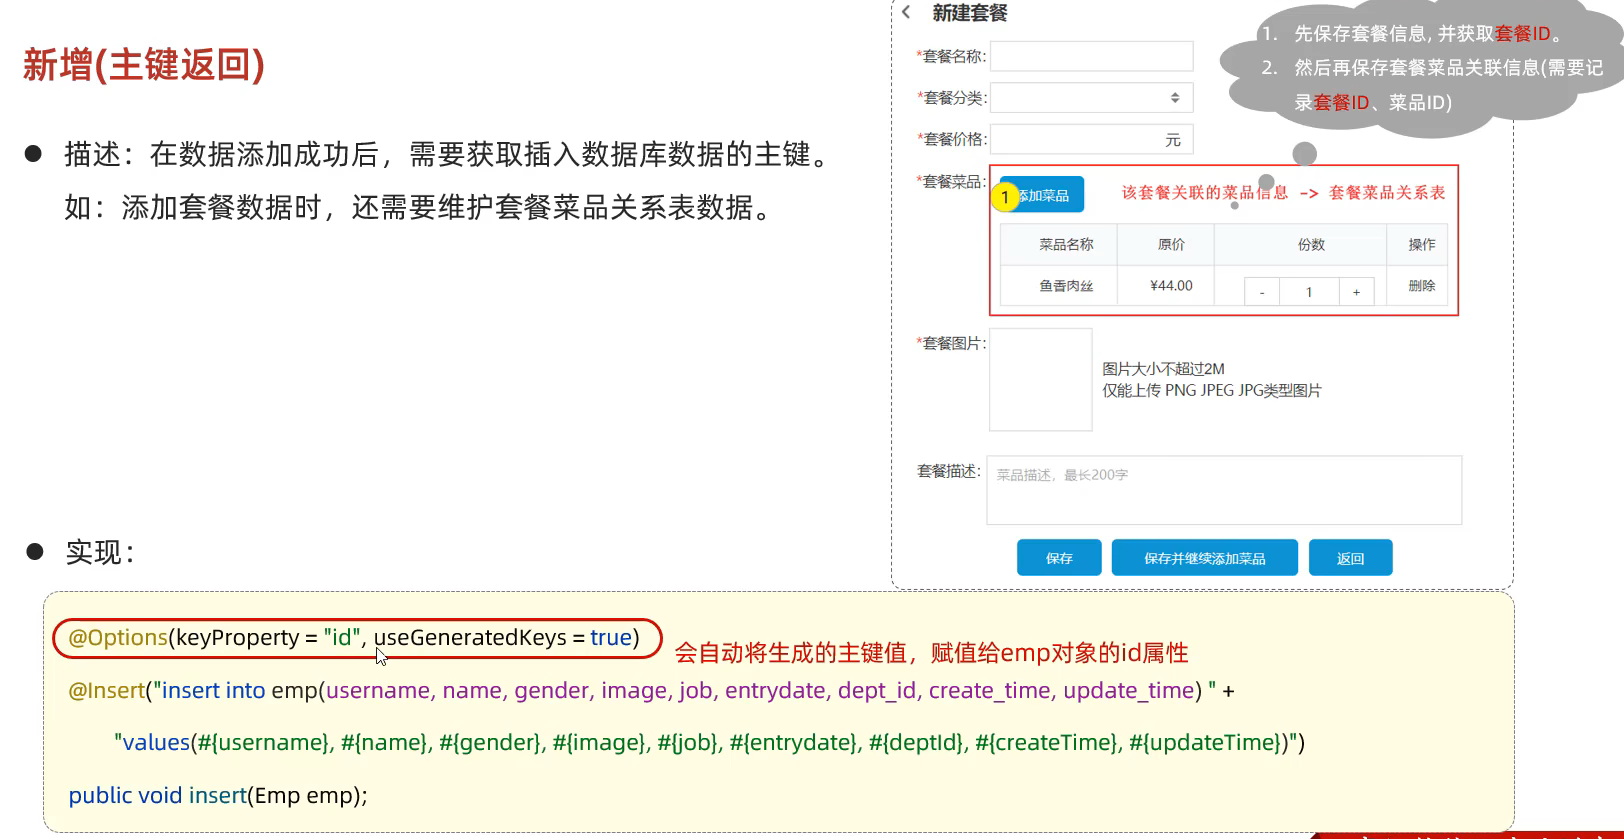
主键返回
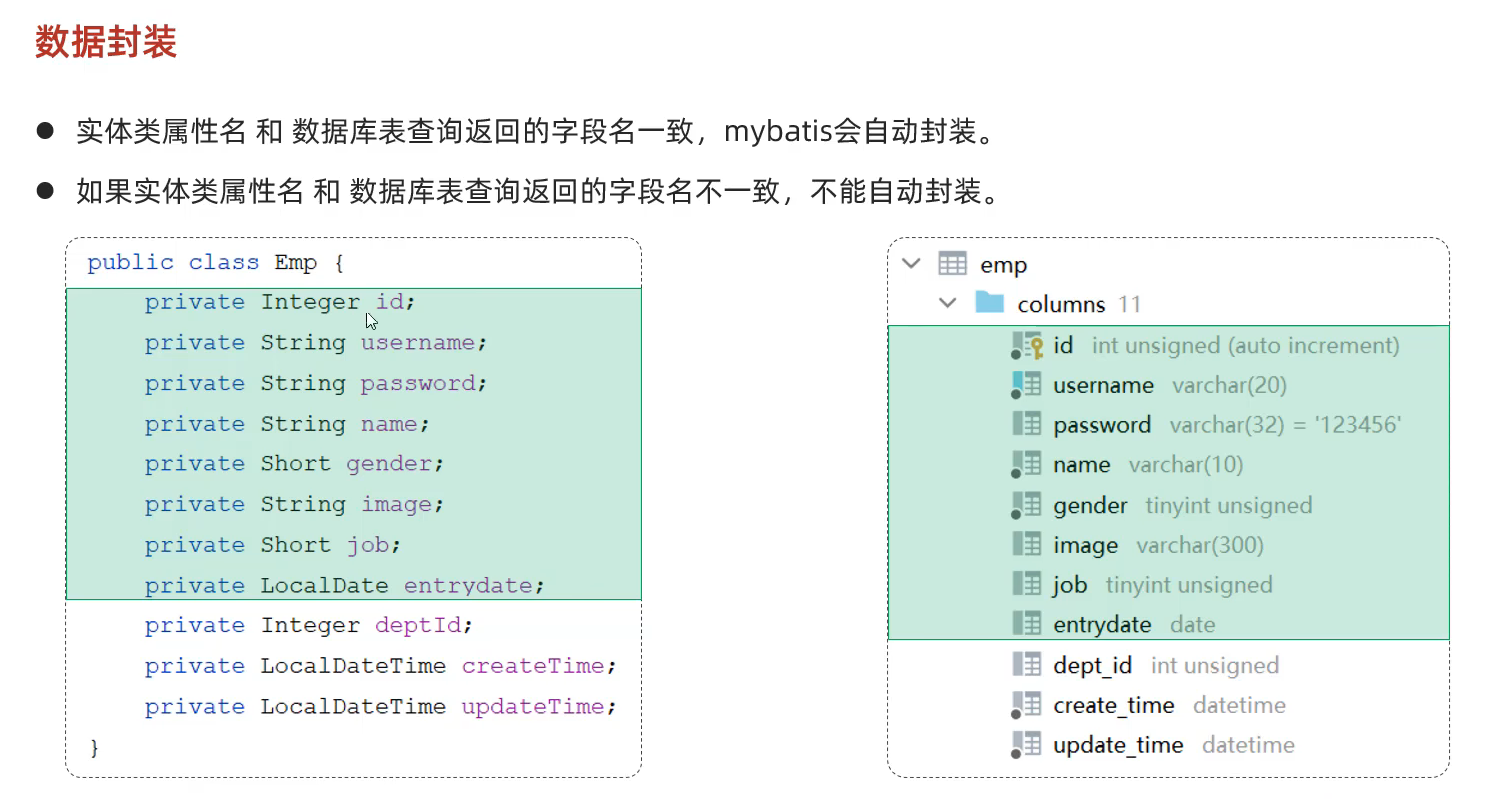
查询操作返回的值因为名字不同而无法数据封装
解决方法: ①查询的时候取别名
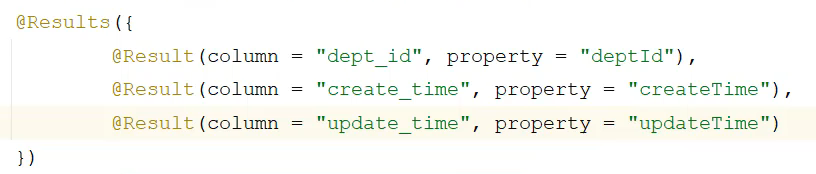
②通过 @Result 注解手动映射封装
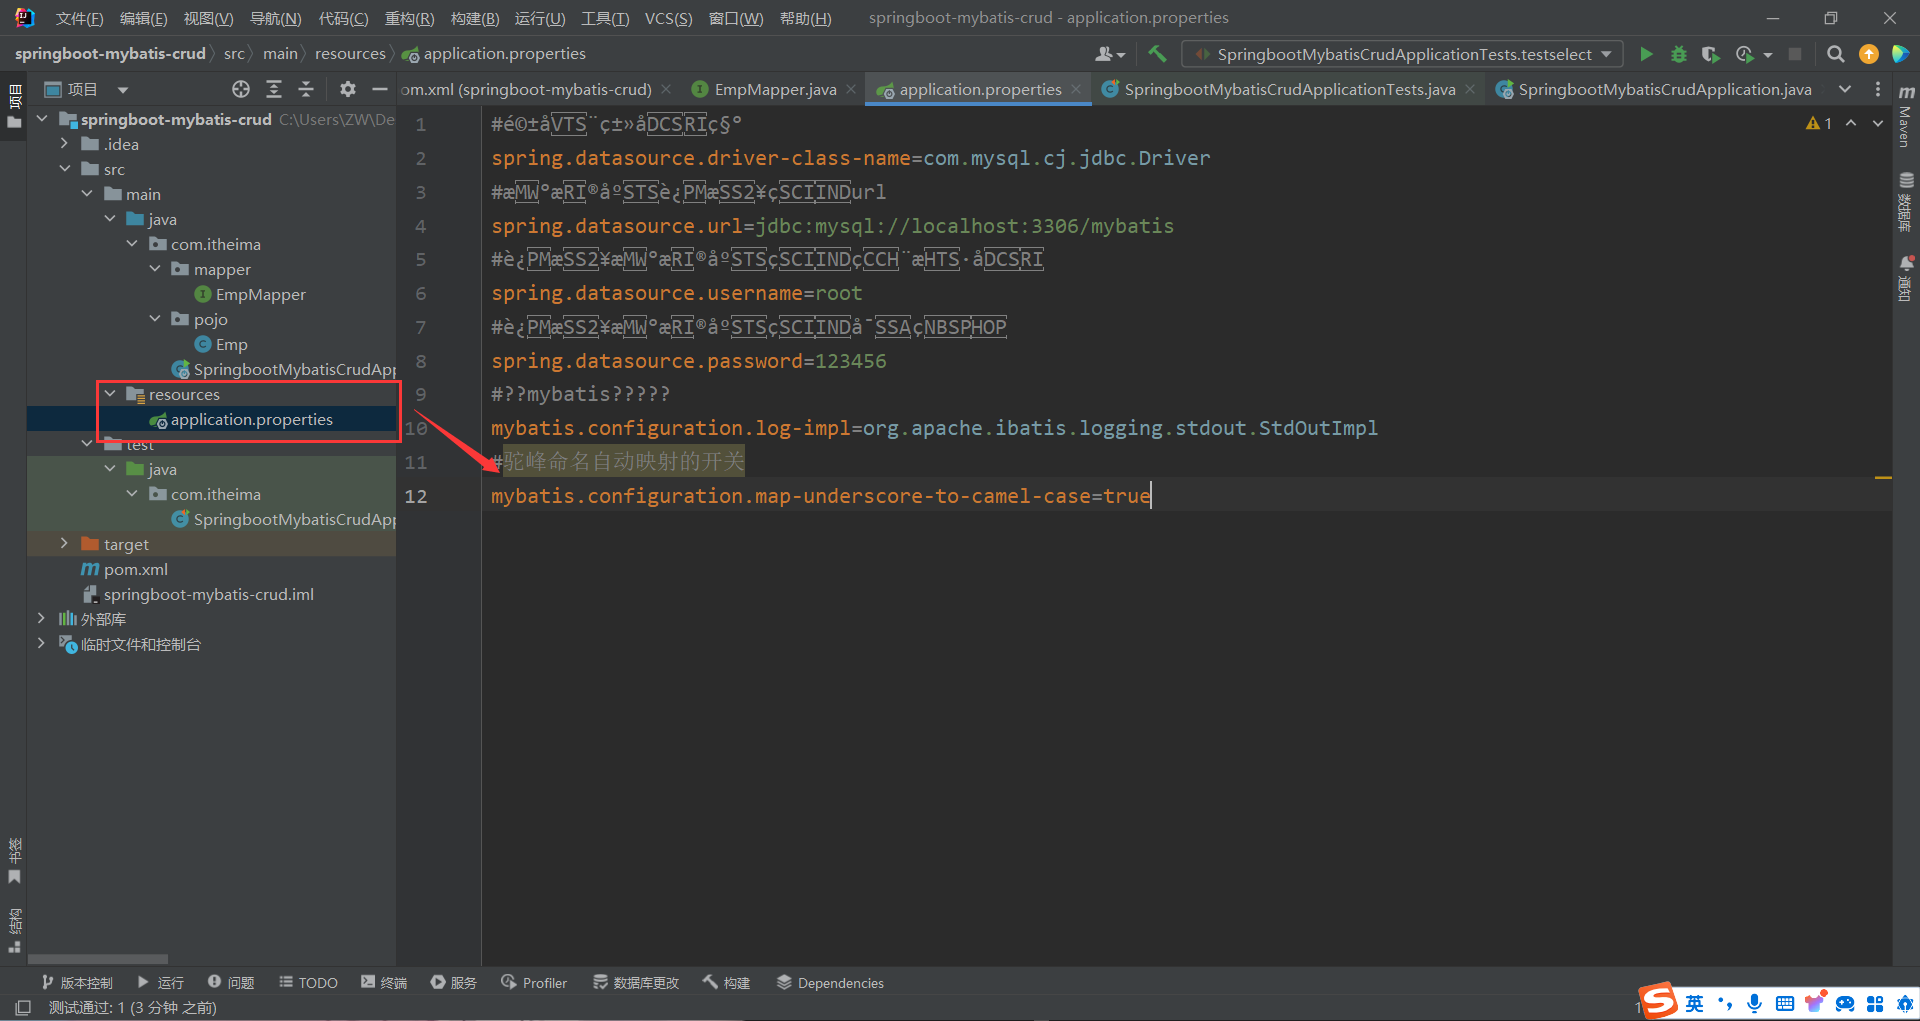
③字段自动映射到驼峰命名的设置
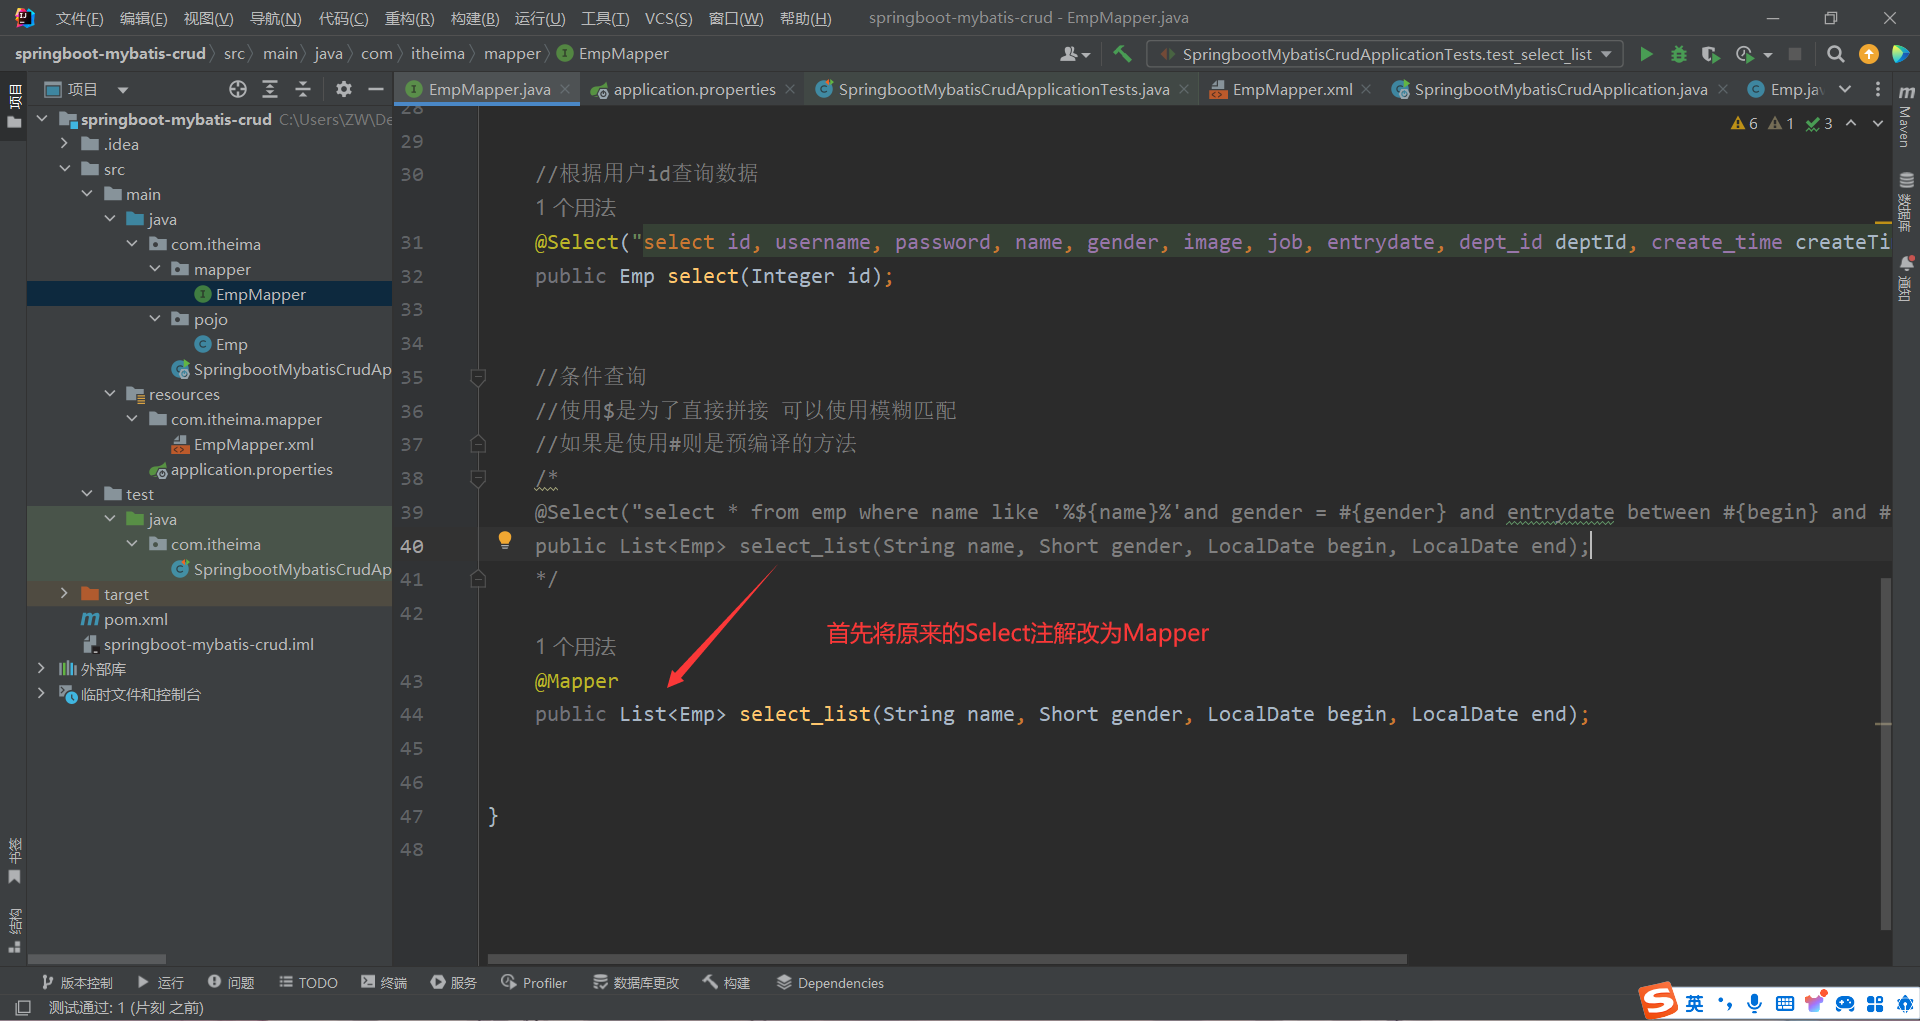
代码实例 [EmpMapper]代码 1 2 3 4 5 6 7 8 9 10 11 12 13 14 15 16 17 18 19 20 21 22 23 24 25 26 27 28 29 30 31 32 33 34 35 36 37 38 39 40 41 42 43 package com.itheima.mapper;import com.itheima.pojo.Emp;import org.apache.ibatis.annotations.*;import java.time.LocalDate;import java.time.LocalDateTime;import java.util.List;@Mapper public interface EmpMapper { @Delete("delete from emp where id = #{id}") public void delete (Integer id) ; @Update("update emp set " + "username=#{username},name=#{name},gender=#{gender},image=#{image},entrydate=#{entrydate},dept_id=#{deptId},update_time=#{updateTime} " + "where id = #{id}") public void update (Emp e) ; @Insert("insert into emp(username,name, gender, image, job, entrydate, dept_id, create_time, update_time) " + "value(#{username},#{name},#{gender},#{image},#{job},#{entrydate},#{deptId},#{createTime},#{updateTime});") public void insert (Emp e) ; @Select("select id, username, password, name, gender, image, job, entrydate, dept_id deptId, create_time createTime, update_time updateTime from emp where id = #{id}") public Emp select (Integer id) ; @Select("select * from emp where name like '%${name}%'and gender = #{gender} and entrydate between #{begin} and #{end} order by update_time desc") public List<Emp> select_list (String name, Short gender, LocalDate begin, LocalDate end) ; }
[SpringbootMybatisCrudApplicationTests]代码 1 2 3 4 5 6 7 8 9 10 11 12 13 14 15 16 17 18 19 20 21 22 23 24 25 26 27 28 29 30 31 32 33 34 35 36 37 38 39 40 41 42 43 44 45 46 47 48 49 50 51 52 53 54 55 56 57 58 59 60 61 62 63 64 65 66 67 68 69 70 71 72 73 74 package com.itheima;import com.itheima.mapper.EmpMapper;import com.itheima.pojo.Emp;import org.junit.jupiter.api.Test;import org.springframework.beans.factory.annotation.Autowired;import org.springframework.beans.factory.annotation.ParameterResolutionDelegate;import org.springframework.boot.test.context.SpringBootTest;import java.time.LocalDate;import java.time.LocalDateTime;import java.util.List;@SpringBootTest class SpringbootMybatisCrudApplicationTests { @Autowired private EmpMapper empMapper; @Test public void TestDelete () { Integer id = 17 ; empMapper.delete(id); } @Test public void testInsert () { Emp e = new Emp (); e.setUsername("zw" ); e.setName("占稳" ); e.setImage("TEST.jpg" ); e.setGender((short )1 ); e.setJob((short )1 ); e.setEntrydate(LocalDate.of(2000 ,1 ,1 )); e.setCreateTime(LocalDateTime.now()); e.setUpdateTime(LocalDateTime.now()); e.setDeptId(1 ); empMapper.insert(e); } @Test public void testupdate () { Emp e = new Emp (); e.setId(24 ); e.setUsername("new_zw" ); e.setName("new_占稳" ); e.setImage("TEST.jpg" ); e.setGender((short )1 ); e.setJob((short )1 ); e.setEntrydate(LocalDate.of(2000 ,1 ,1 )); e.setUpdateTime(LocalDateTime.now()); e.setDeptId(1 ); empMapper.update(e); } @Test public void testselect () { Integer id = 1 ; Emp e = empMapper.select(id); System.out.println(e); } @Test public void test_select_list () { List<Emp> emp_list = empMapper.select_list("张" ,(short )(1 ),LocalDate.of(2010 ,1 ,1 ),LocalDate.of(2020 ,1 ,1 )); System.out.println(emp_list); } }
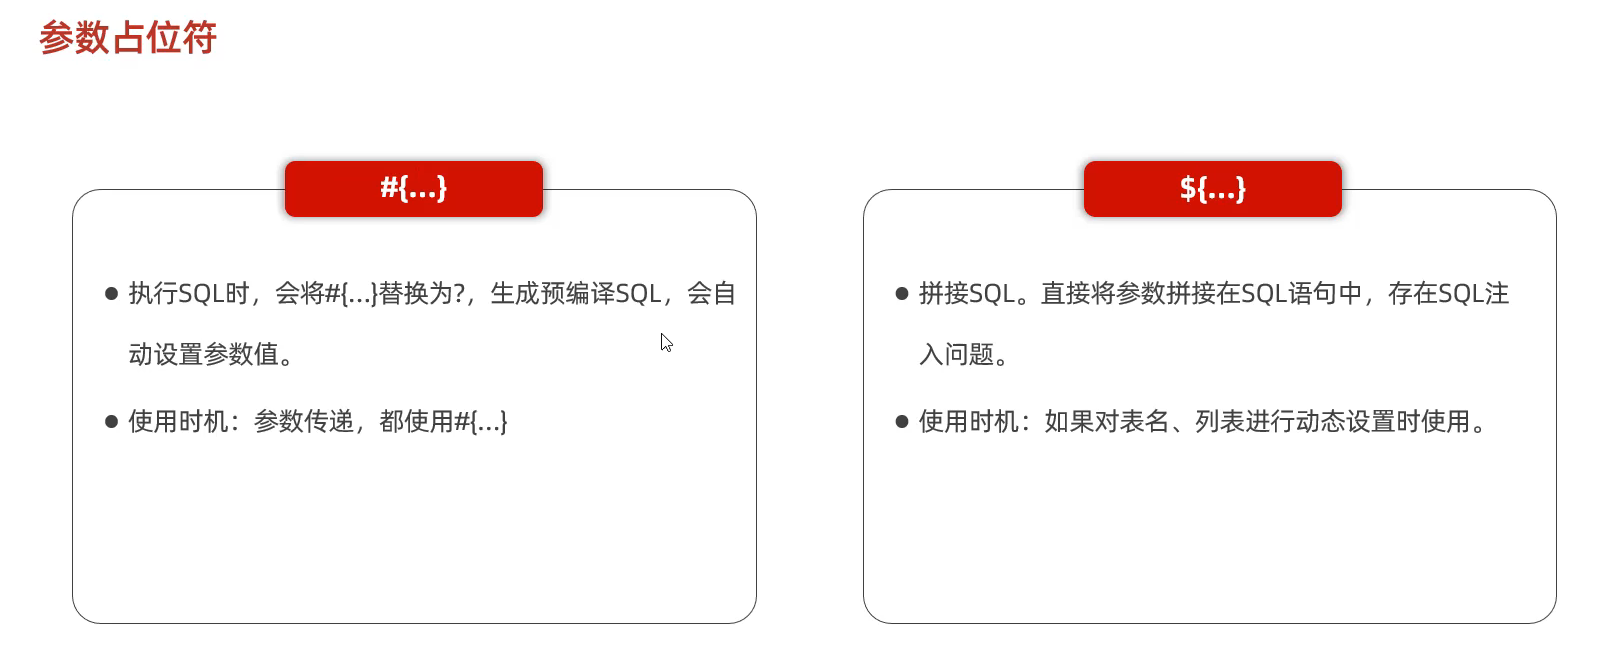
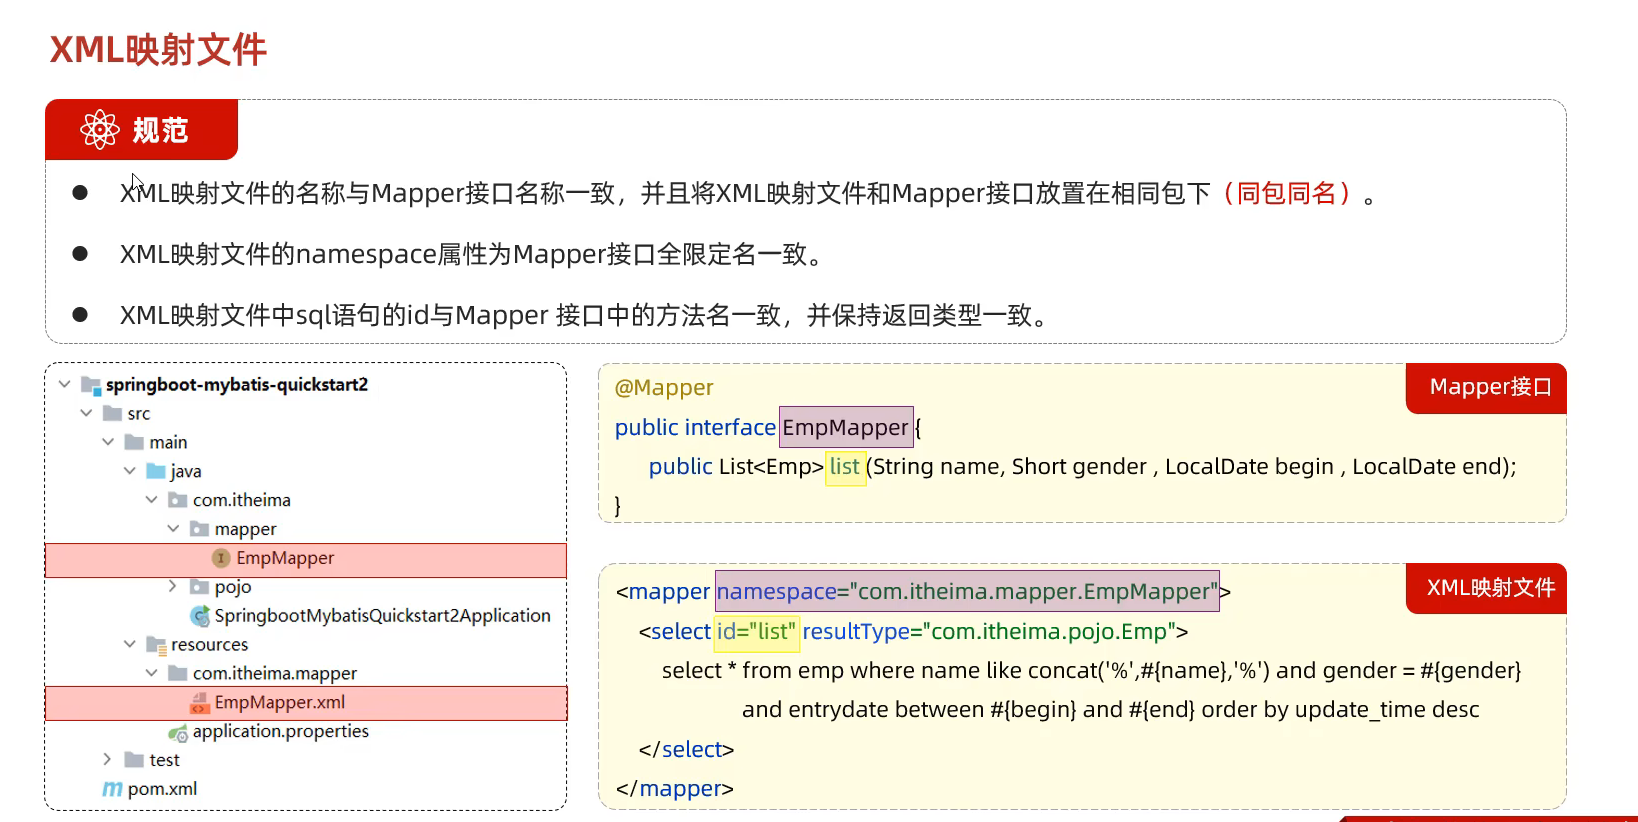
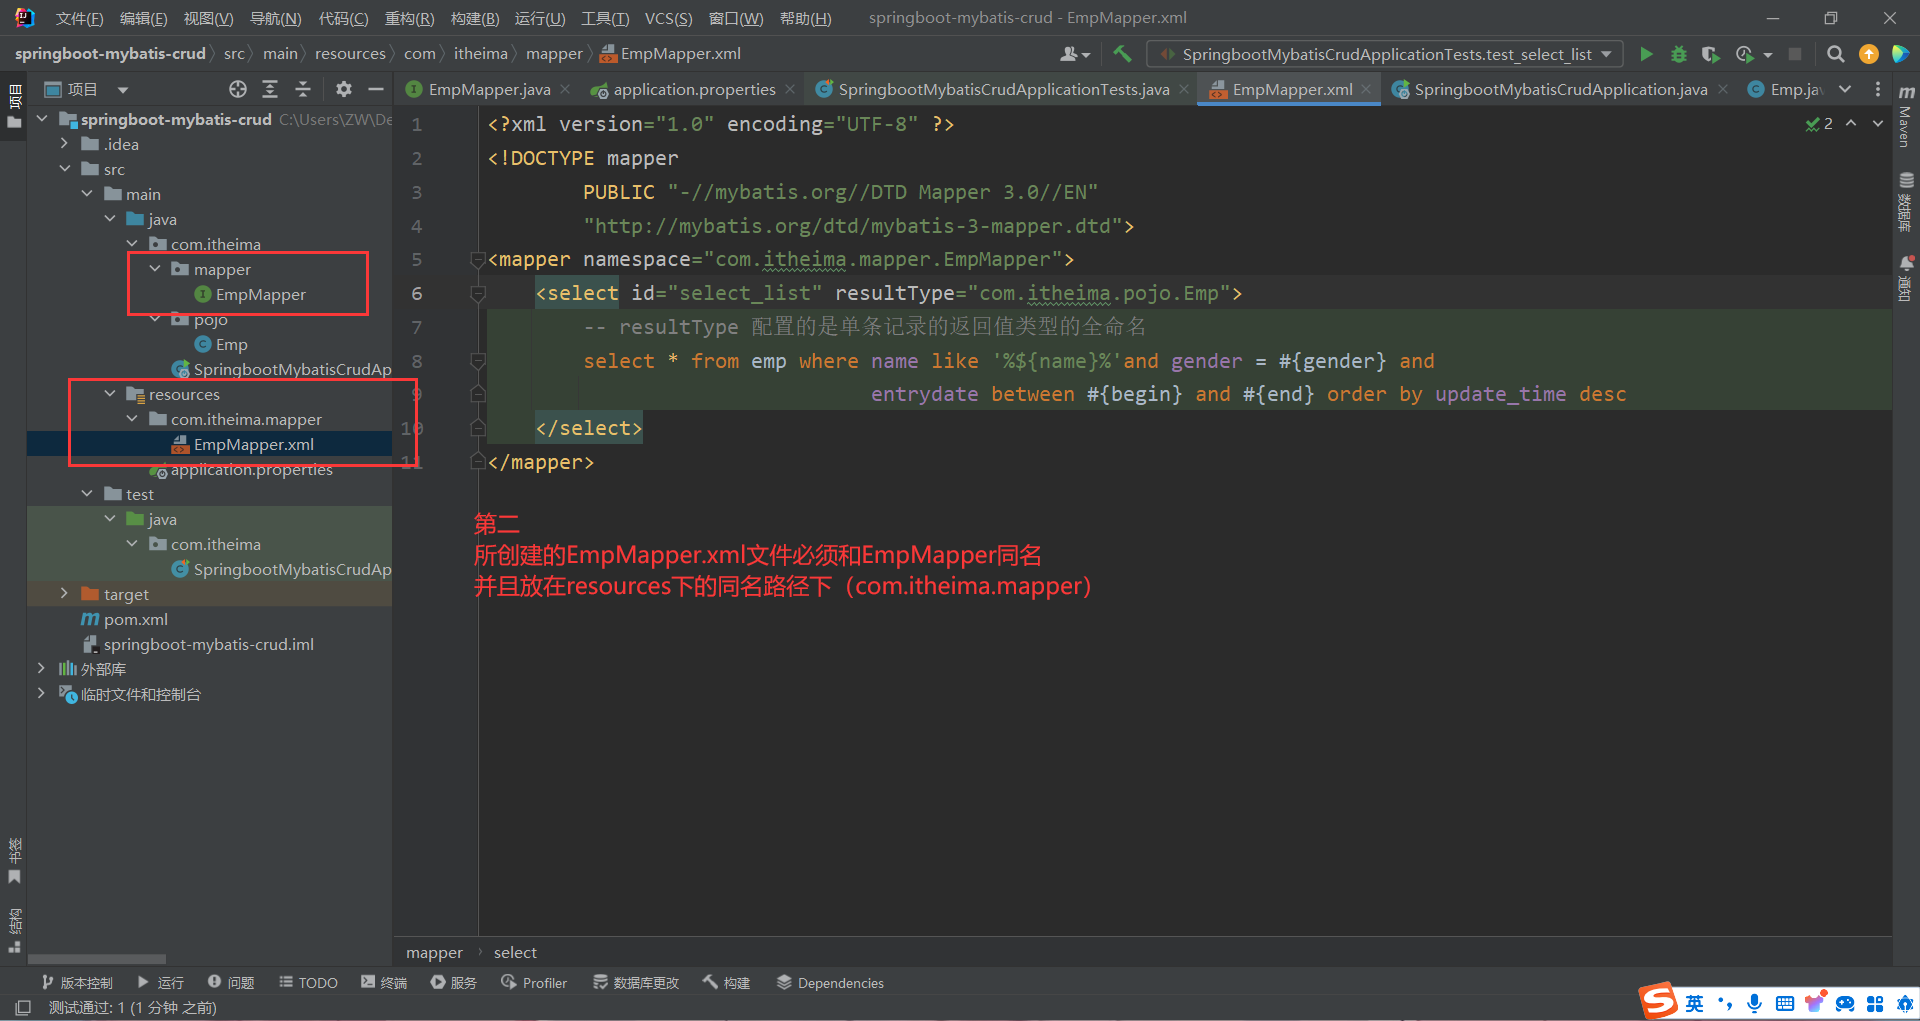
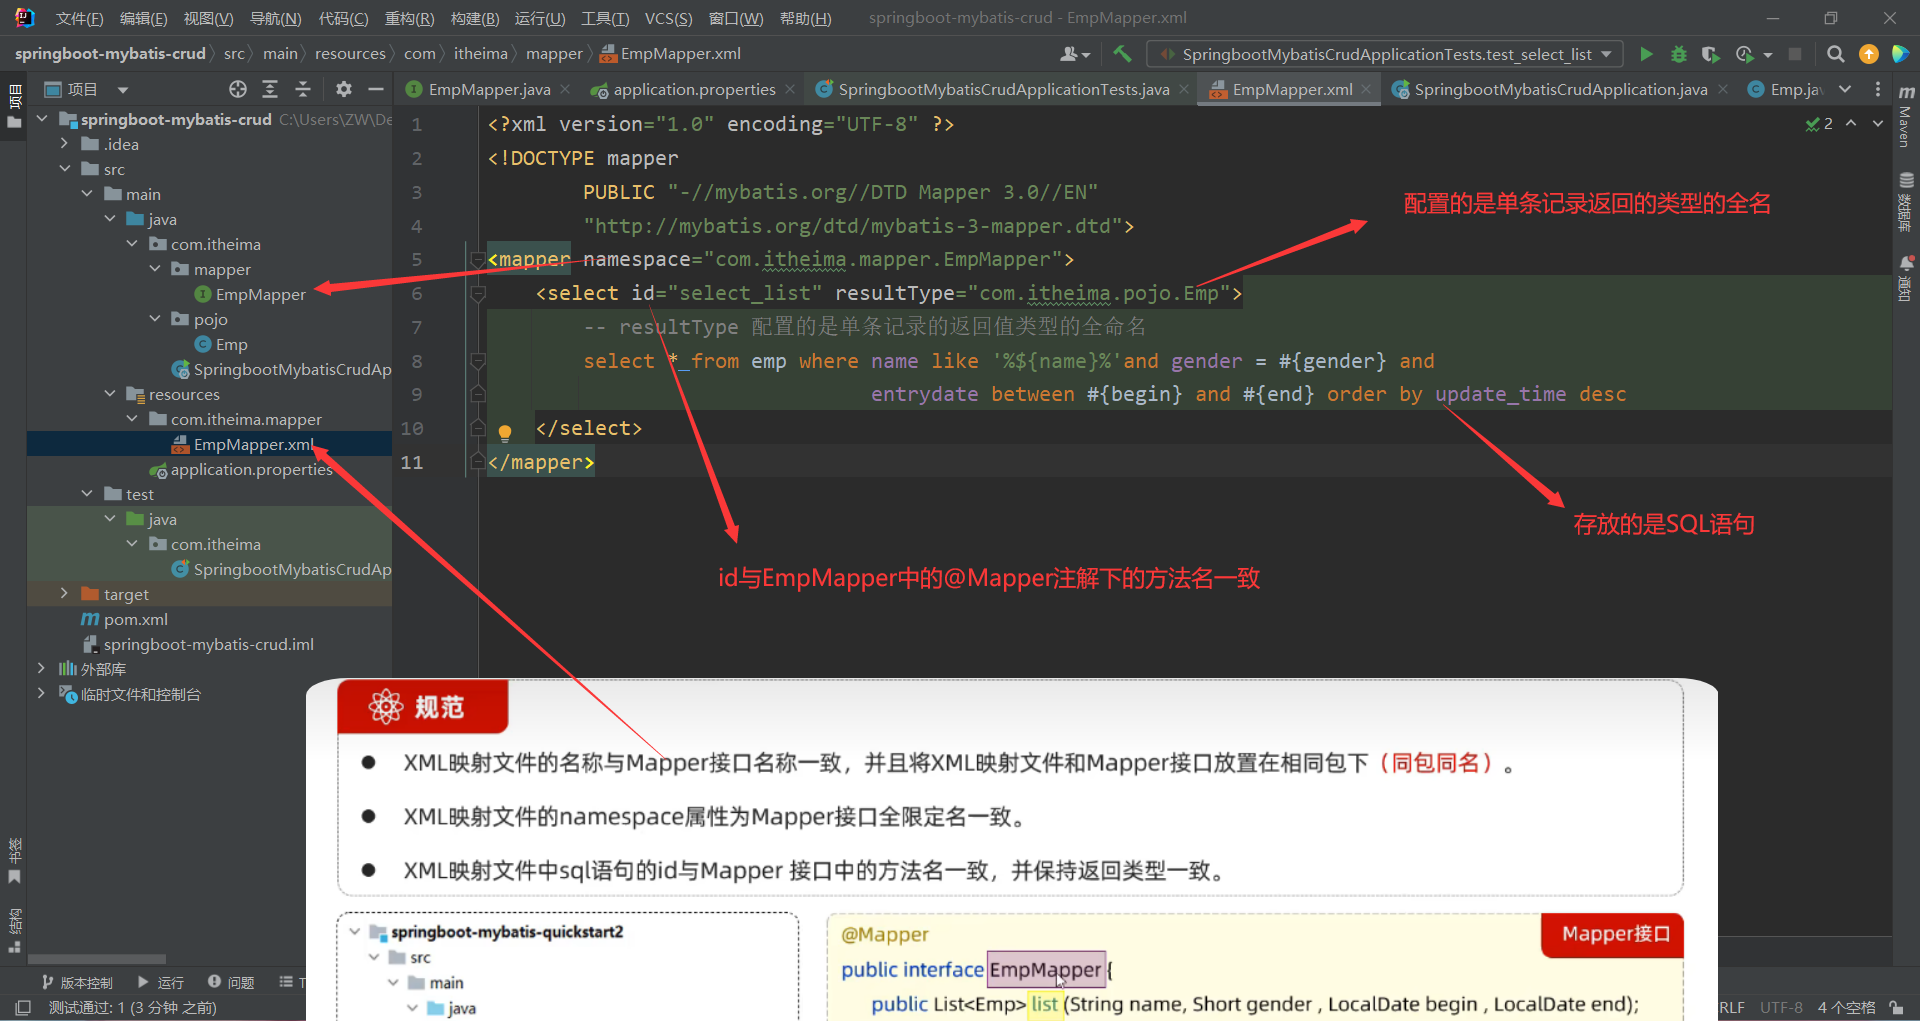
71.通过XML映射配置文件来配置sql语句 使用注解来映射简单语句会使代码显得更加简洁
但对于稍微复杂一点的语句,lava注解不仅力不队心 还会让你本就复杂的SQL语句更加银乱不堪
因此,如果你需要做一些很复杂的操作,最好用XML来映射语句
步骤 ①
②
1 2 3 4 5 6 7 8 9 <?xml version="1.0" encoding="UTF-8" ?> <!DOCTYPE mapper PUBLIC "-//mybatis.org//DTD Mapper 3.0//EN" "http://mybatis.org/dtd/mybatis-3-mapper.dtd" > <mapper namespace ="org.mybatis.example.BlogMapper" > <select id ="selectBlog" resultType ="Blog" > select * from Blog where id = #{id} </select > </mapper >
③
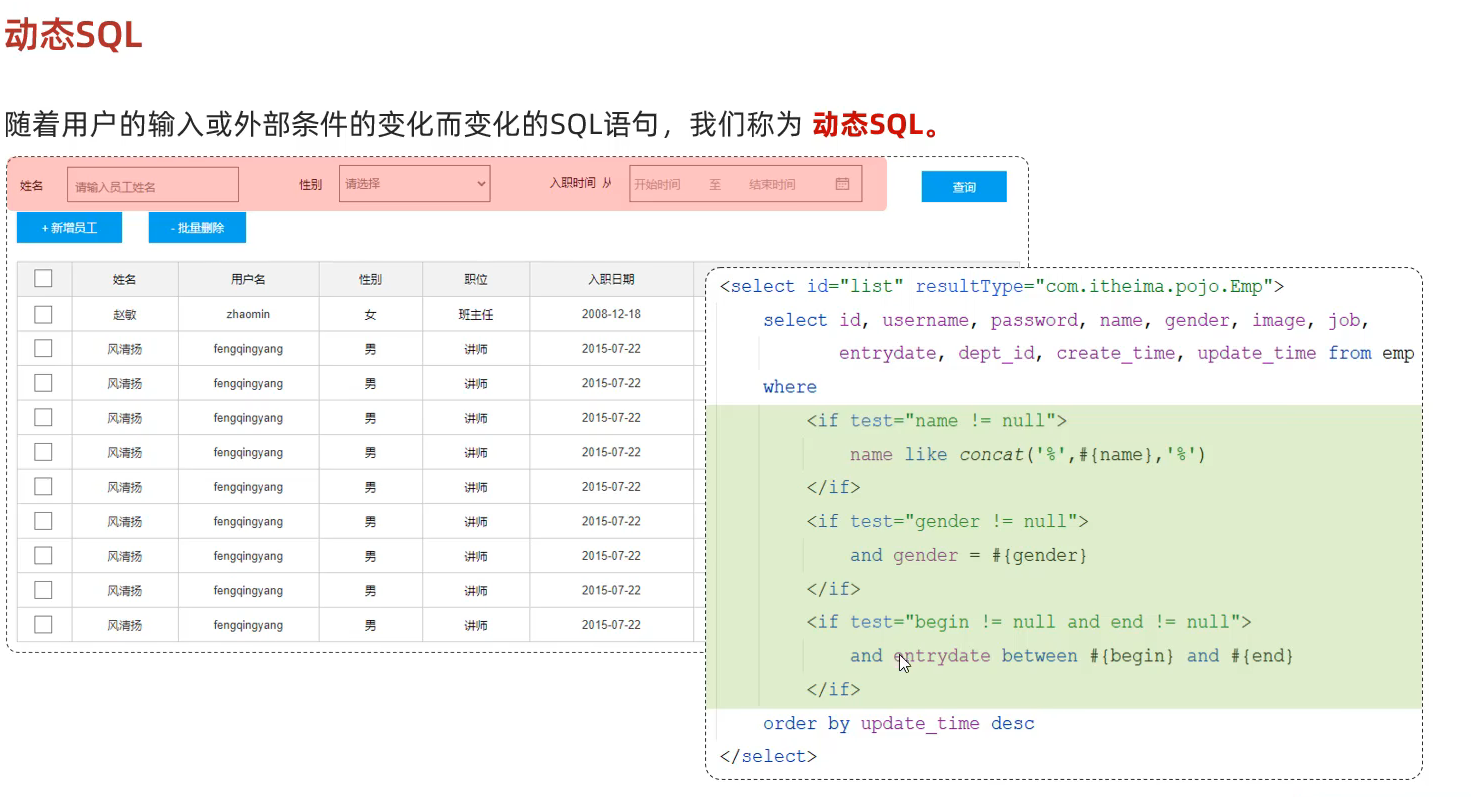
72.动态SQL语句
①if 标签
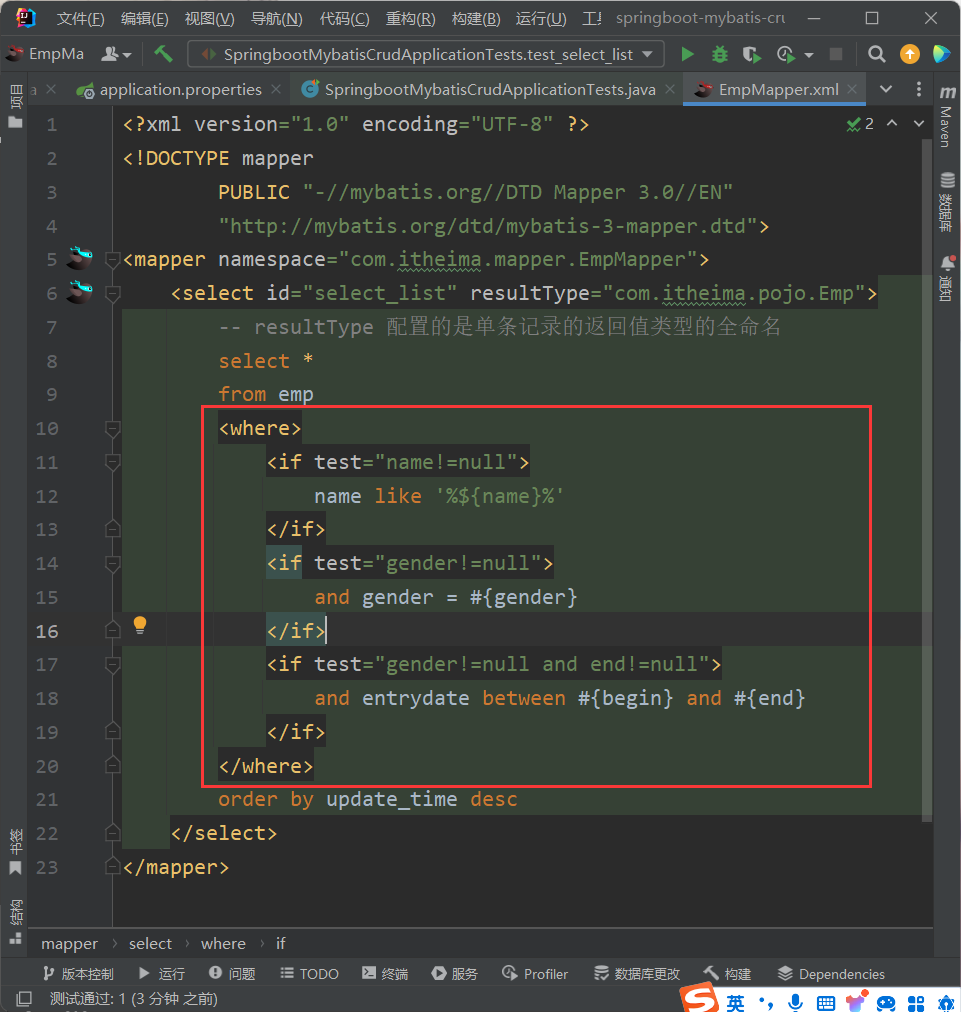
1 2 3 4 5 6 7 8 9 10 11 12 13 14 15 16 17 18 19 20 21 22 23 <?xml version="1.0" encoding="UTF-8" ?> <!DOCTYPE mapper PUBLIC "-//mybatis.org//DTD Mapper 3.0//EN" "http://mybatis.org/dtd/mybatis-3-mapper.dtd" > <mapper namespace ="com.itheima.mapper.EmpMapper" > <select id ="select_list" resultType ="com.itheima.pojo.Emp" > -- resultType 配置的是单条记录的返回值类型的全命名 select * from emp <where > <if test ="name!=null" > name like '%${name}%' </if > <if test ="gender!=null" > and gender = #{gender} </if > <if test ="gender!=null and end!=null" > and entrydate between #{begin} and #{end} </if > </where > order by update_time desc </select > </mapper >
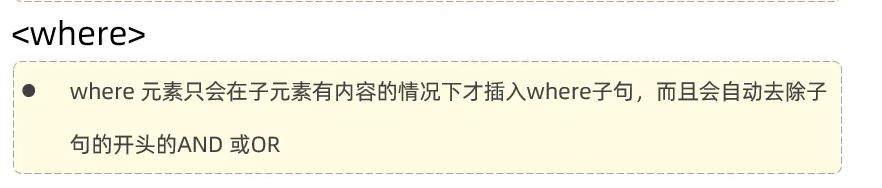
②where标签
③set标签
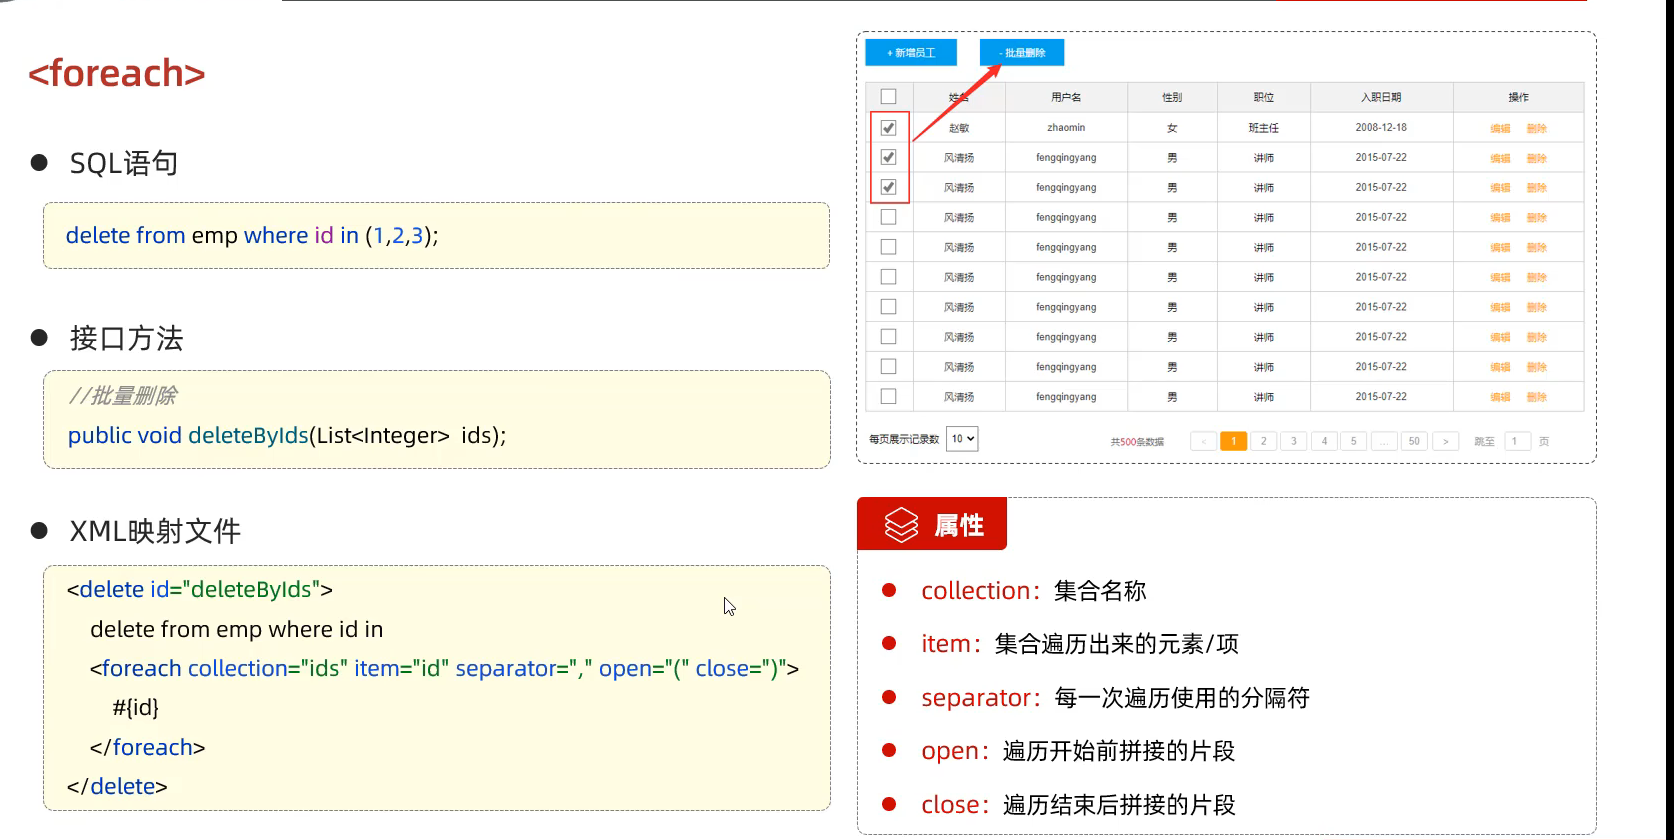
④foreach标签
1 2 3 4 5 6 7 8 <delete id ="deleteByid" > delete from emp where id in <foreach collection ="ids" item ="id" separator ="," open ="(" close =")" > #{id} </foreach > </delete >
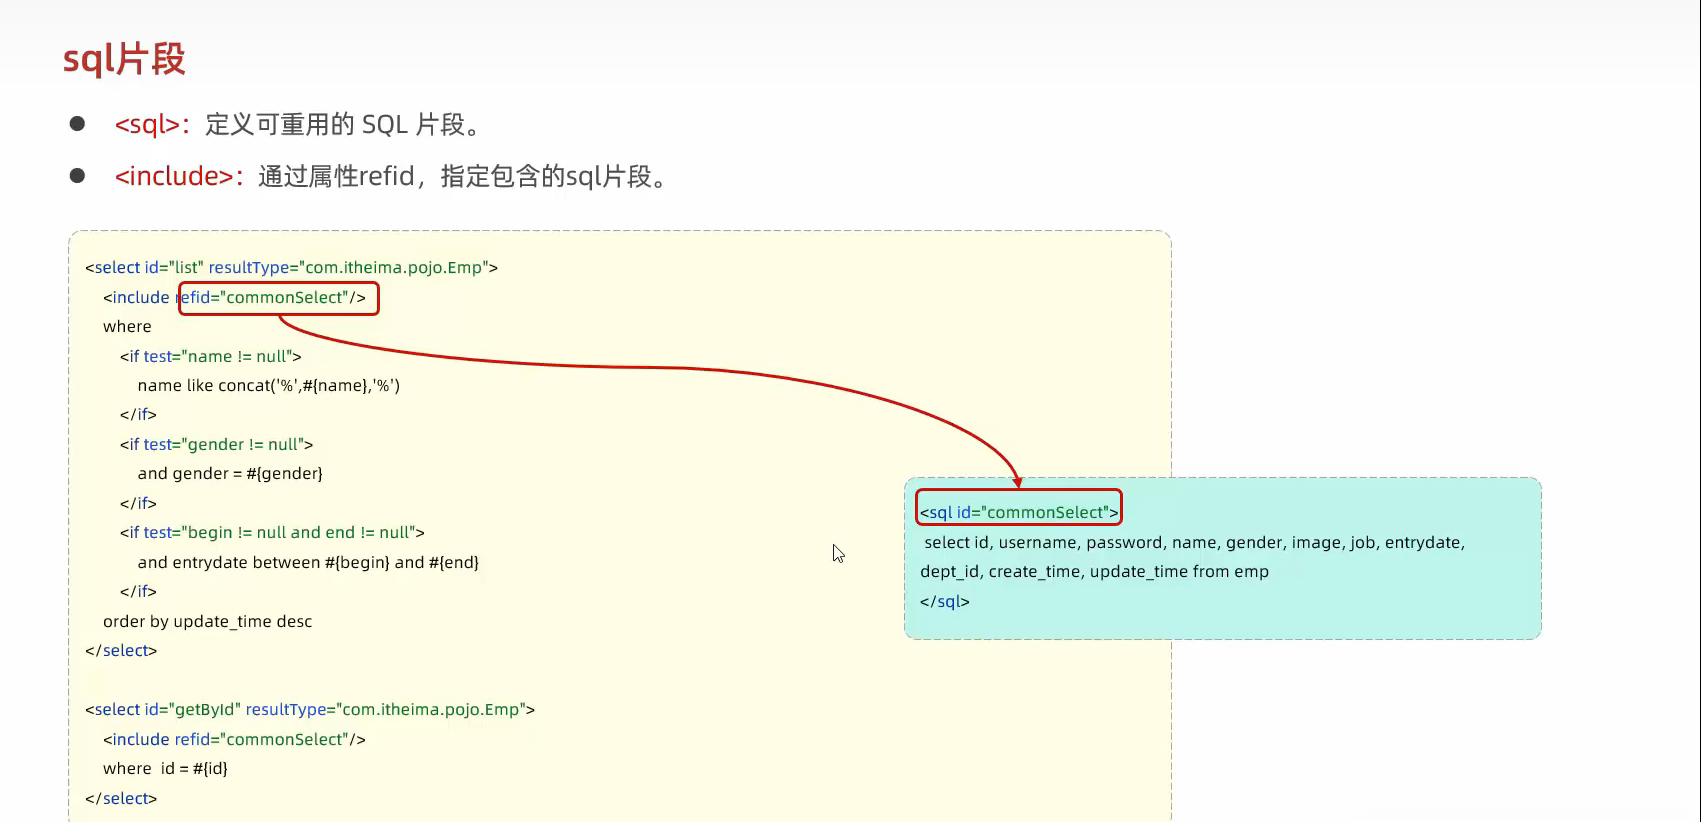
⑤sql include标签
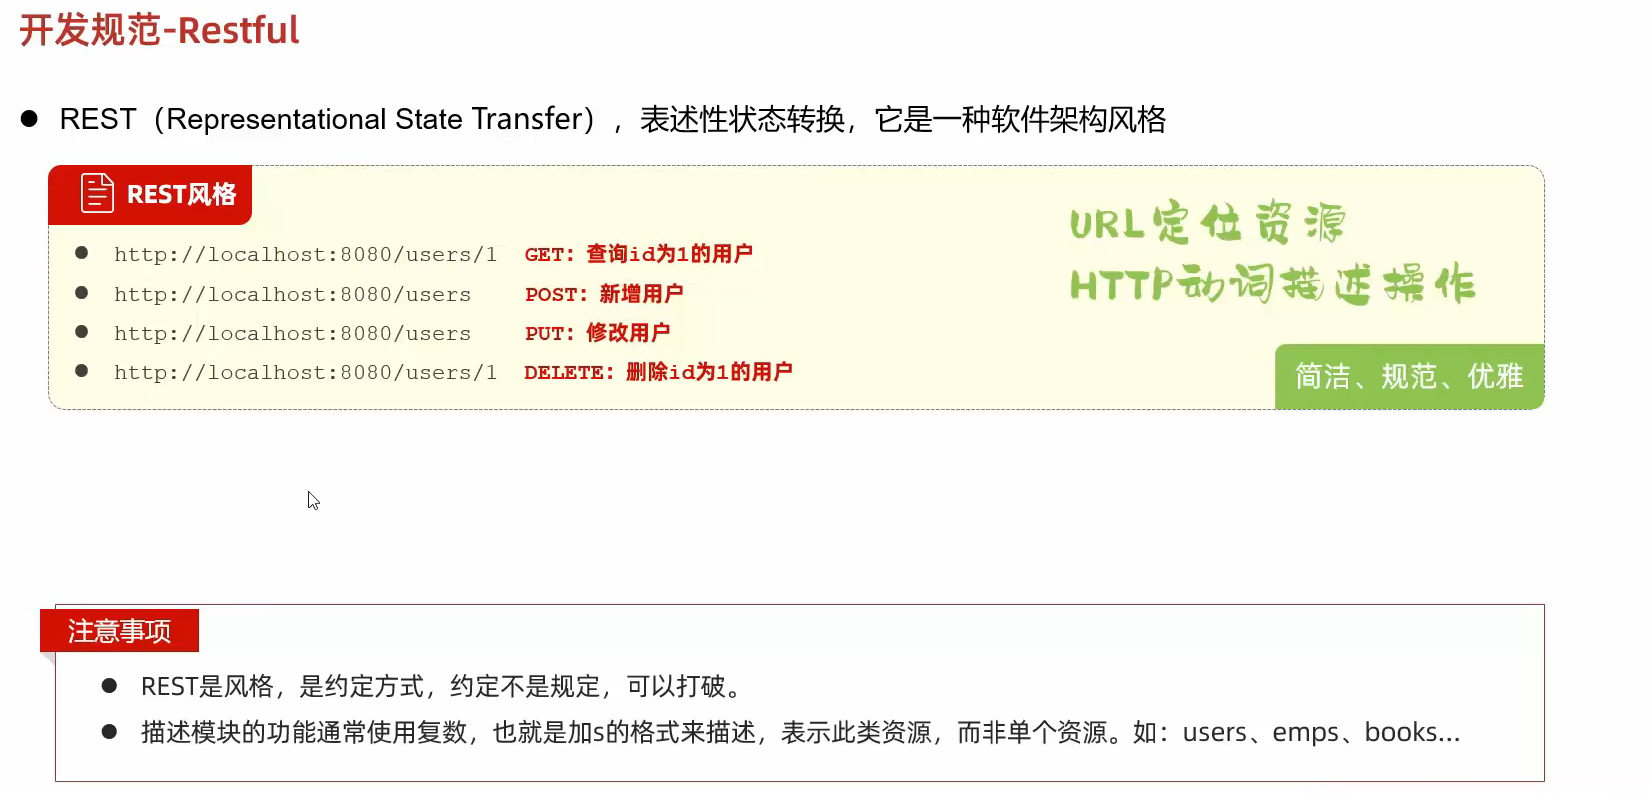
73.开发规范(rest风格) 请求格式-post put get delete
74.三层架构 各自的作用
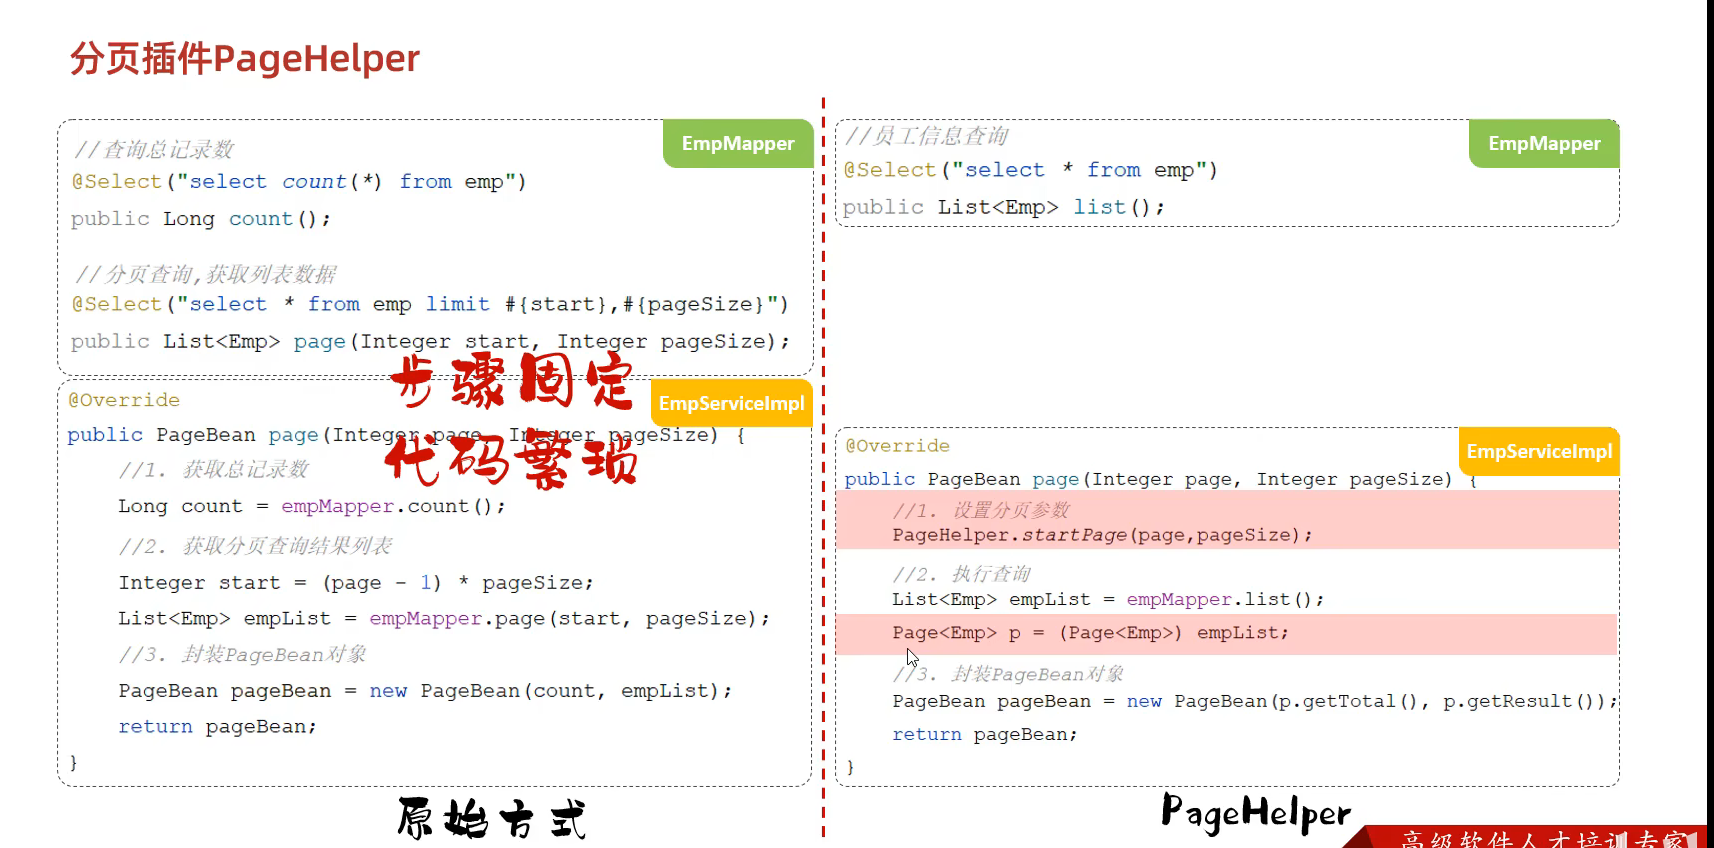
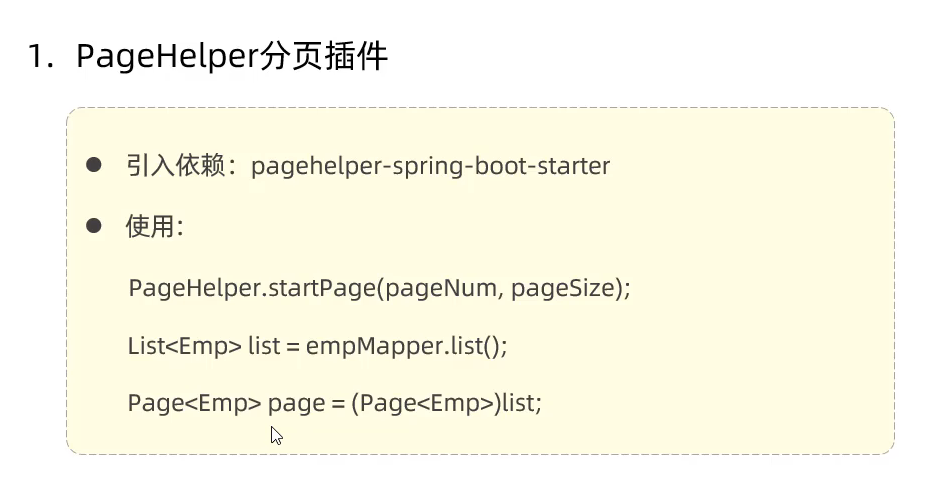
75.分页查询的改进(PageHelper) 由于分页查询的代码固定并且繁琐 使用PageHelper插件进行快速编写
76.Web开发中一些的注释含义 ① @Mapper 代表了是Mapper类
② @RestController Controller类
③ @Service Service类(放在实现类上 而不是接口上)
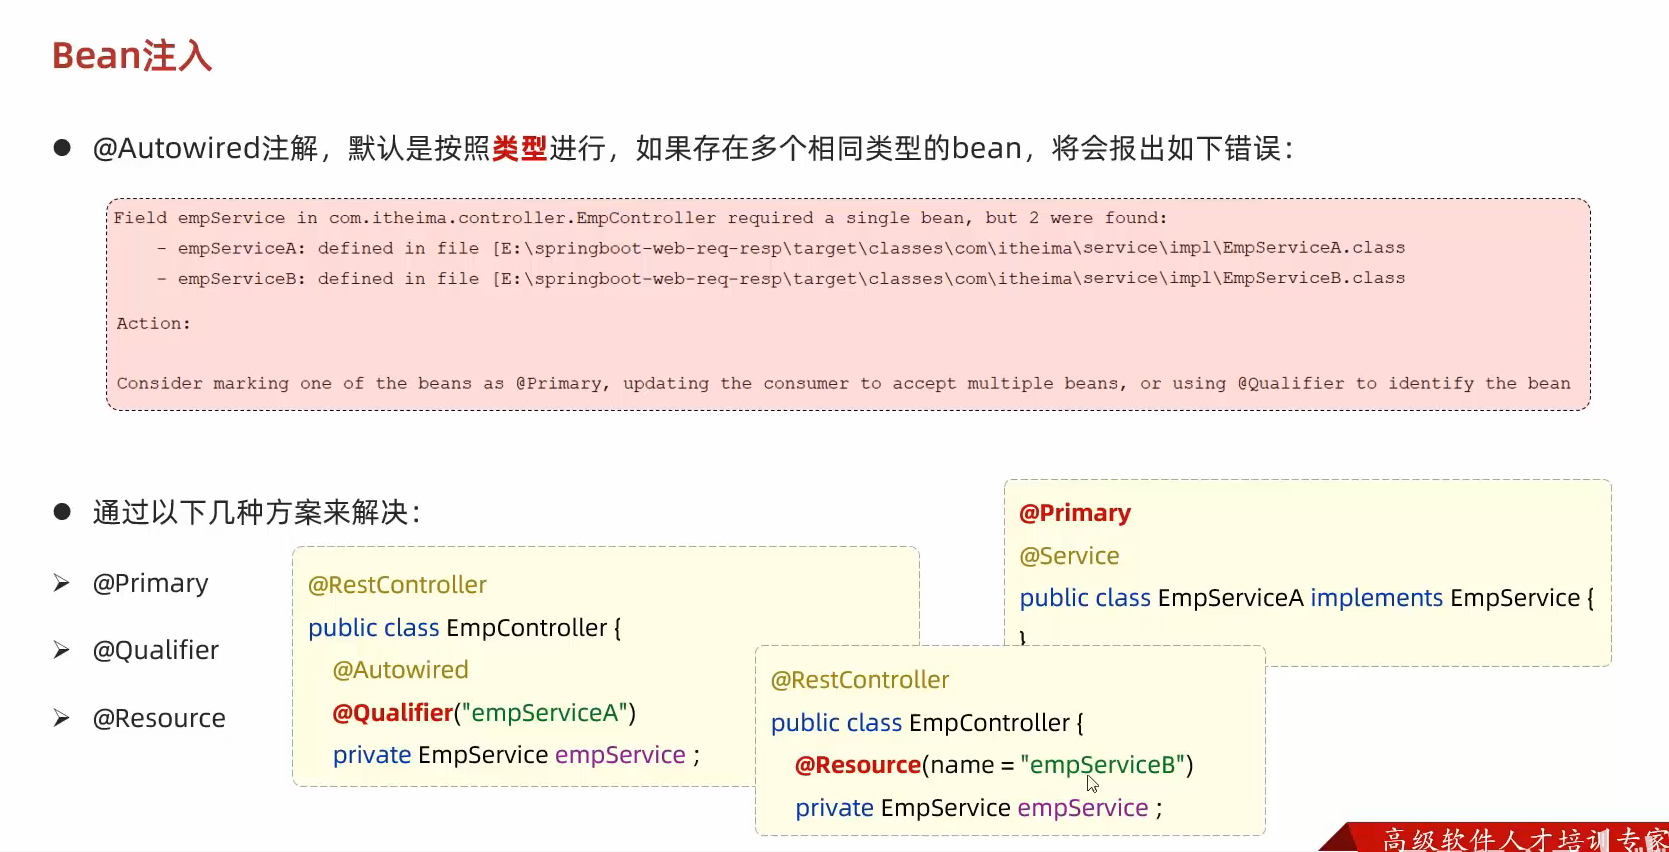
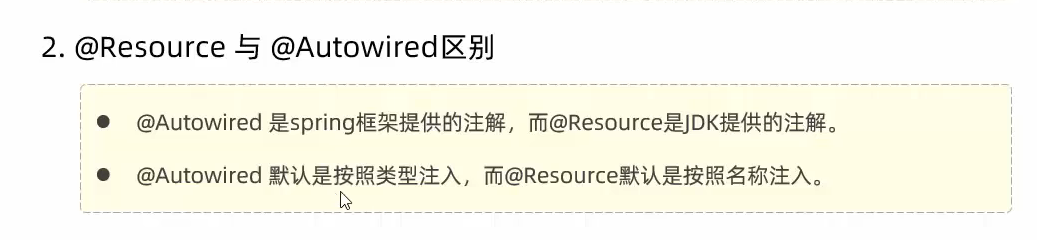
④ @Autowired和@Component 他们搭配使用 目的是为了交给容器管理 依赖注入
⑤ @Data @NoArgsConstructor @AllArgsConstructor 他们简化了操作 Data代表了各个参数的get和set方法
NoArgsConstructor是无参构造 AllArgsConstructor是全参构造
⑥ @Select @Delete @Insert等 都是表示为数据库的操作 他们会执行sql语句并返回给函数的返回值
⑦@PostMapping @PostMapping @GetMapping等 都是代表为各种类型的前端请求
⑧ @Slf4j 代表了生成了一个可生成日志的类 通过
1 log.info("执行删除操作:ids:{}" ,ids);
来得到日志信息
⑨ @RequestBody 表示该参数应该从请求的 body(请求体)中获取数据 将请求体中的数据绑定到方法参数上 以便在后续的处理逻辑中使用
⑩ @PathVariable PathVariable 注解允许url中的占位符中的值提取出来 并将其作为方法的参数进行处理
⑪@RequestParam(defaultValue = “1”) 可以设置参数的默认值
设置日期格式
⑬⑭⑮⑯⑰⑱⑲⑳
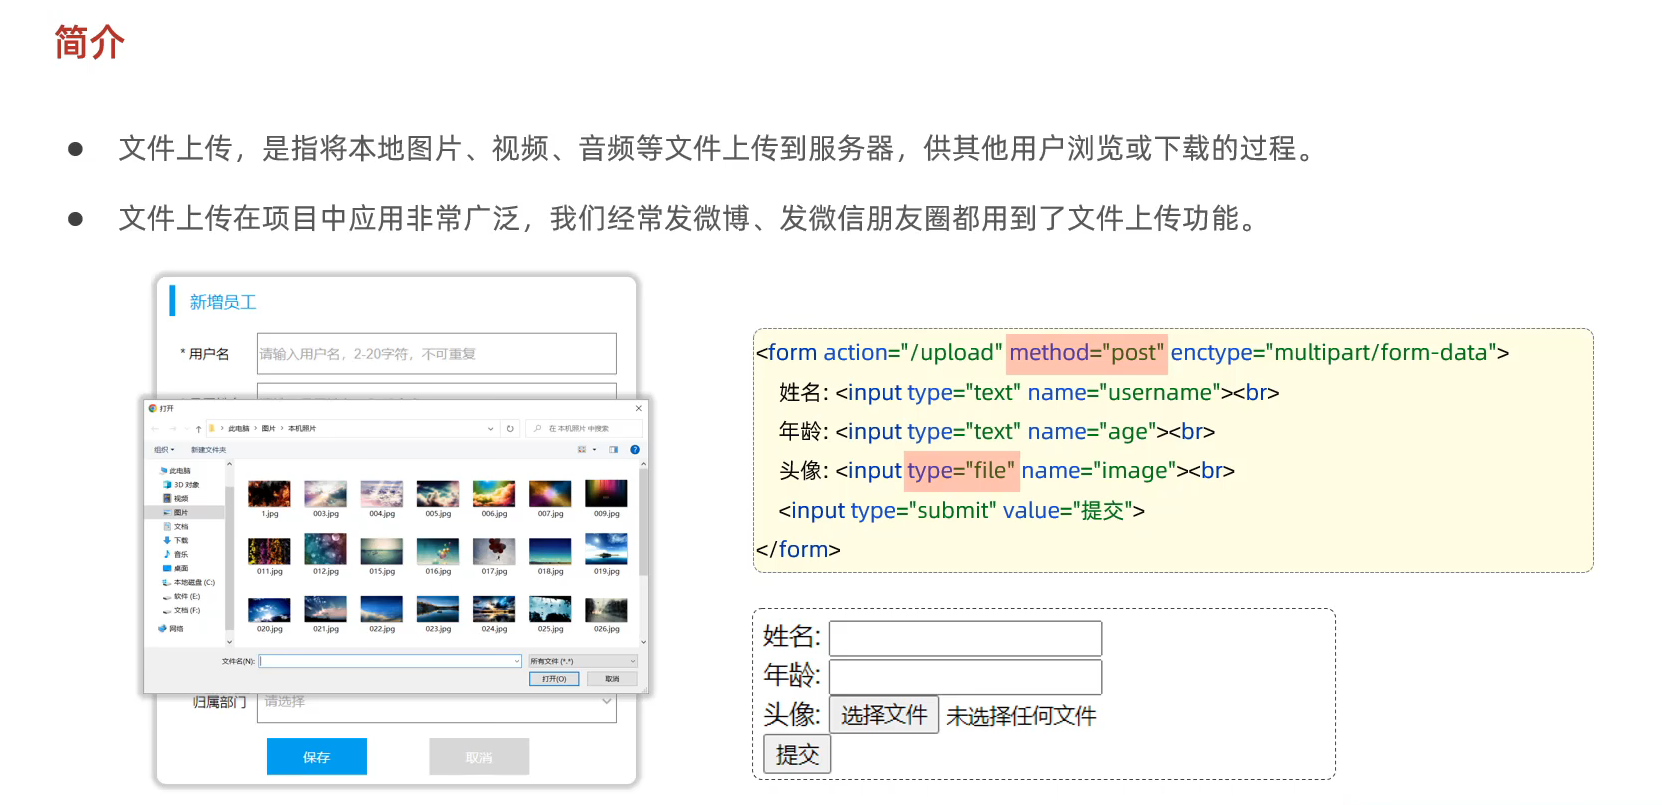
77.文件上传
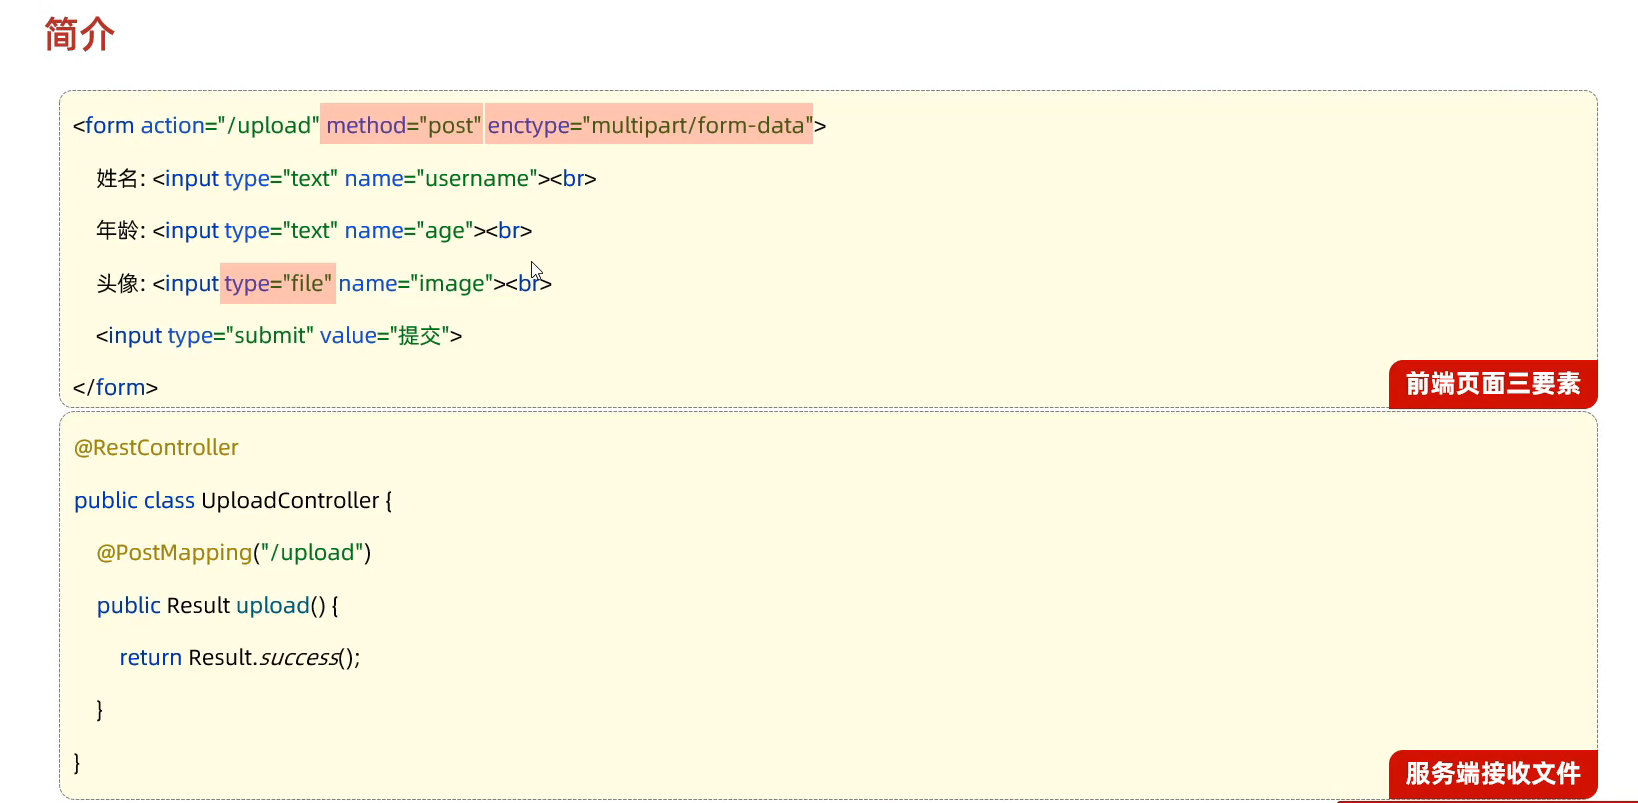
文件上传端代码 1 2 3 4 5 6 7 8 9 10 11 12 13 14 15 16 17 18 <!DOCTYPE html > <html lang ="en" > <head > <meta charset ="UTF-8" > <title > 上传文件</title > </head > <body > <form action ="/upload" method ="post" enctype ="multipart/form-data" > 姓名: <input type ="text" name ="username" > <br > 年龄: <input type ="text" name ="age" > <br > 头像: <input type ="file" name ="image" > <br > <input type ="submit" value ="提交" > </form > </body > </html >
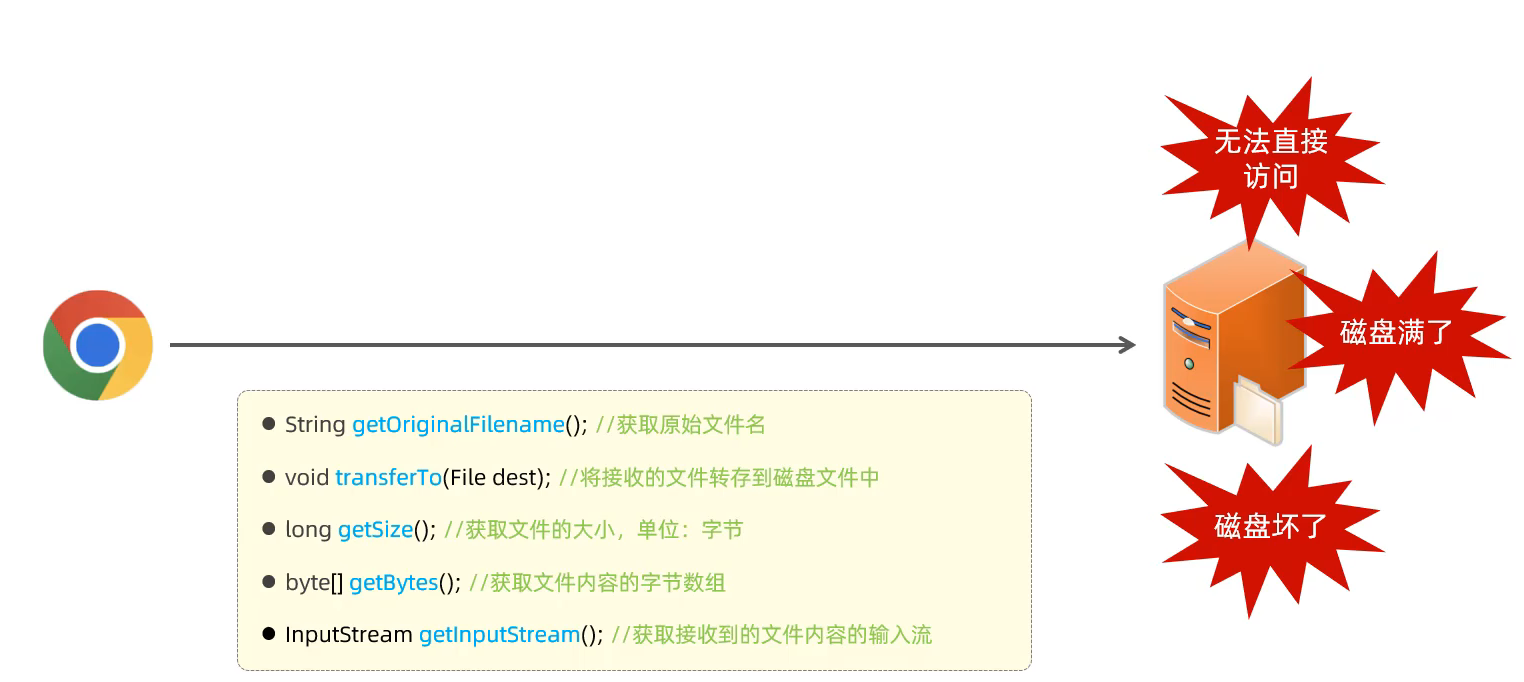
服务端接受文件并将文件存储到本地代码 1 2 3 4 5 6 7 8 9 10 11 12 13 14 15 16 17 18 19 20 21 22 23 24 25 26 27 28 29 30 31 32 33 package com.itheima.controller;import com.itheima.pojo.Result;import lombok.extern.slf4j.Slf4j;import org.springframework.web.bind.annotation.PostMapping;import org.springframework.web.bind.annotation.RestController;import org.springframework.web.multipart.MultipartFile;import java.io.File;import java.io.IOException;import java.util.UUID;@Slf4j @RestController public class UploadController { @PostMapping("/upload") public Result upload (String username, Integer age, MultipartFile image) throws IOException { log.info("文件上传: {}, {}, {}" ,username,age,image); String OriginalFilename = image.getOriginalFilename(); int index = OriginalFilename.indexOf("." ); String extname = OriginalFilename.substring(index); String newFileName = UUID.randomUUID().toString()+extname; log.info(newFileName); image.transferTo(new File ("D:\\study_images\\" +newFileName)); return Result.success(); } }
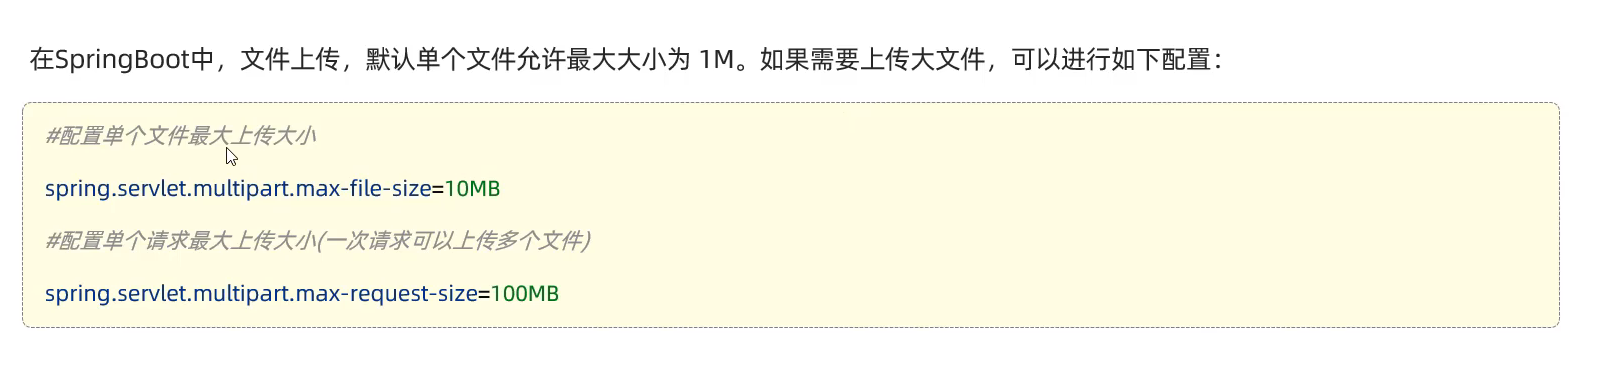
1 2 3 4 spring.servlet.multipart.max-file-size =10MB spring.servlet.multipart.max-request-size =100MB
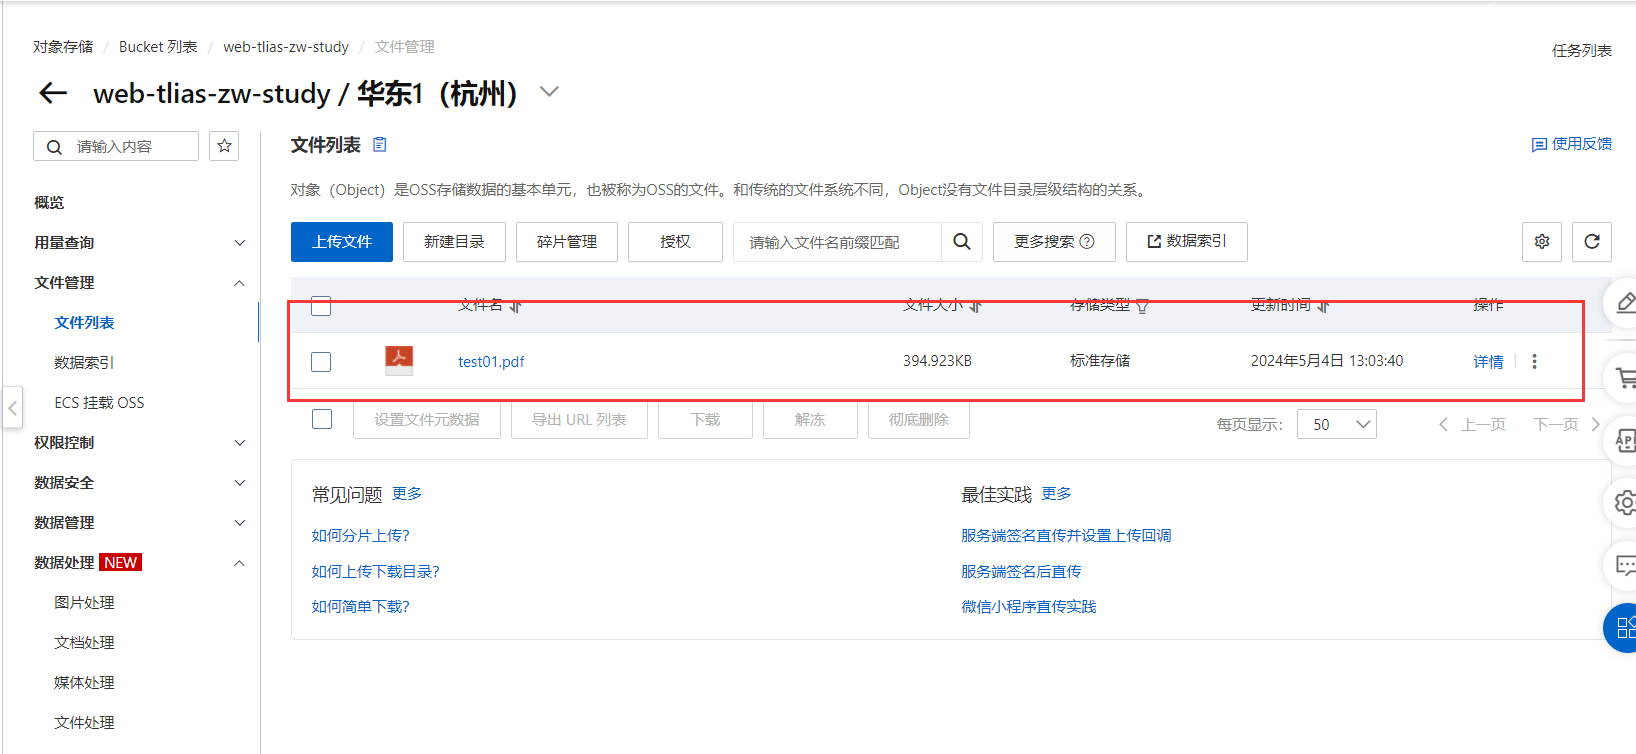
78.文件存储到阿里云OSS 1 2 3 4 5 6 7 8 9 10 11 12 13 14 15 16 17 18 19 20 21 22 23 24 25 26 27 28 29 30 31 32 33 34 35 36 37 38 39 40 41 42 43 44 45 46 47 48 49 50 51 52 53 54 55 56 package com.itheima;import com.aliyun.oss.ClientException;import com.aliyun.oss.OSS;import com.aliyun.oss.common.auth.*;import com.aliyun.oss.OSSClientBuilder;import com.aliyun.oss.OSSException;import com.aliyun.oss.model.PutObjectRequest;import com.aliyun.oss.model.PutObjectResult;import java.io.FileInputStream;import java.io.InputStream;public class Demo { public static void main (String[] args) throws Exception { String endpoint = "https://oss-cn-hangzhou.aliyuncs.com" ; EnvironmentVariableCredentialsProvider credentialsProvider = CredentialsProviderFactory.newEnvironmentVariableCredentialsProvider(); String bucketName = "web-tlias-zw-study" ; String objectName = "test01.pdf" ; String filePath= "C:\\Users\\ZW\\Desktop\\Temporary\\准考证.pdf" ; OSS ossClient = new OSSClientBuilder ().build(endpoint, credentialsProvider); try { InputStream inputStream = new FileInputStream (filePath); PutObjectRequest putObjectRequest = new PutObjectRequest (bucketName, objectName, inputStream); PutObjectResult result = ossClient.putObject(putObjectRequest); } catch (OSSException oe) { System.out.println("Caught an OSSException, which means your request made it to OSS, " + "but was rejected with an error response for some reason." ); System.out.println("Error Message:" + oe.getErrorMessage()); System.out.println("Error Code:" + oe.getErrorCode()); System.out.println("Request ID:" + oe.getRequestId()); System.out.println("Host ID:" + oe.getHostId()); } catch (ClientException ce) { System.out.println("Caught an ClientException, which means the client encountered " + "a serious internal problem while trying to communicate with OSS, " + "such as not being able to access the network." ); System.out.println("Error Message:" + ce.getMessage()); } finally { if (ossClient != null ) { ossClient.shutdown(); } } } }
如果发生了报错信息([ERROR] Command execution failed.)
那么需要再xml中加入下面的插件
1 2 3 4 5 6 7 8 9 10 11 <plugins > <plugin > <groupId > org.codehaus.mojo</groupId > <artifactId > exec-maven-plugin</artifactId > <version > 1.6.0</version > <configuration > <classpathScope > test</classpathScope > </configuration > </plugin > </plugins >
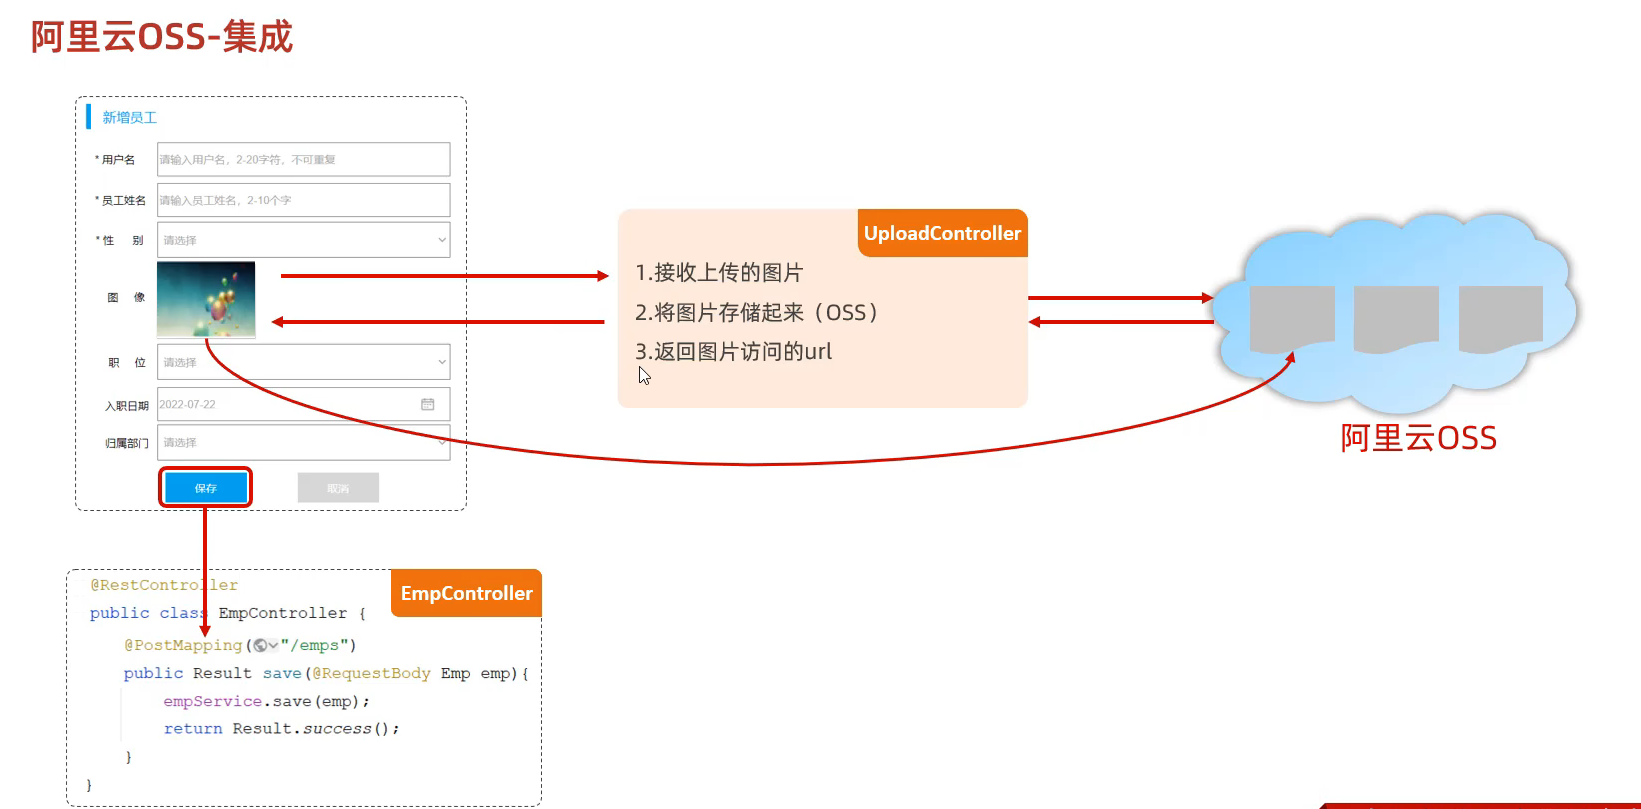
79.阿里云集成
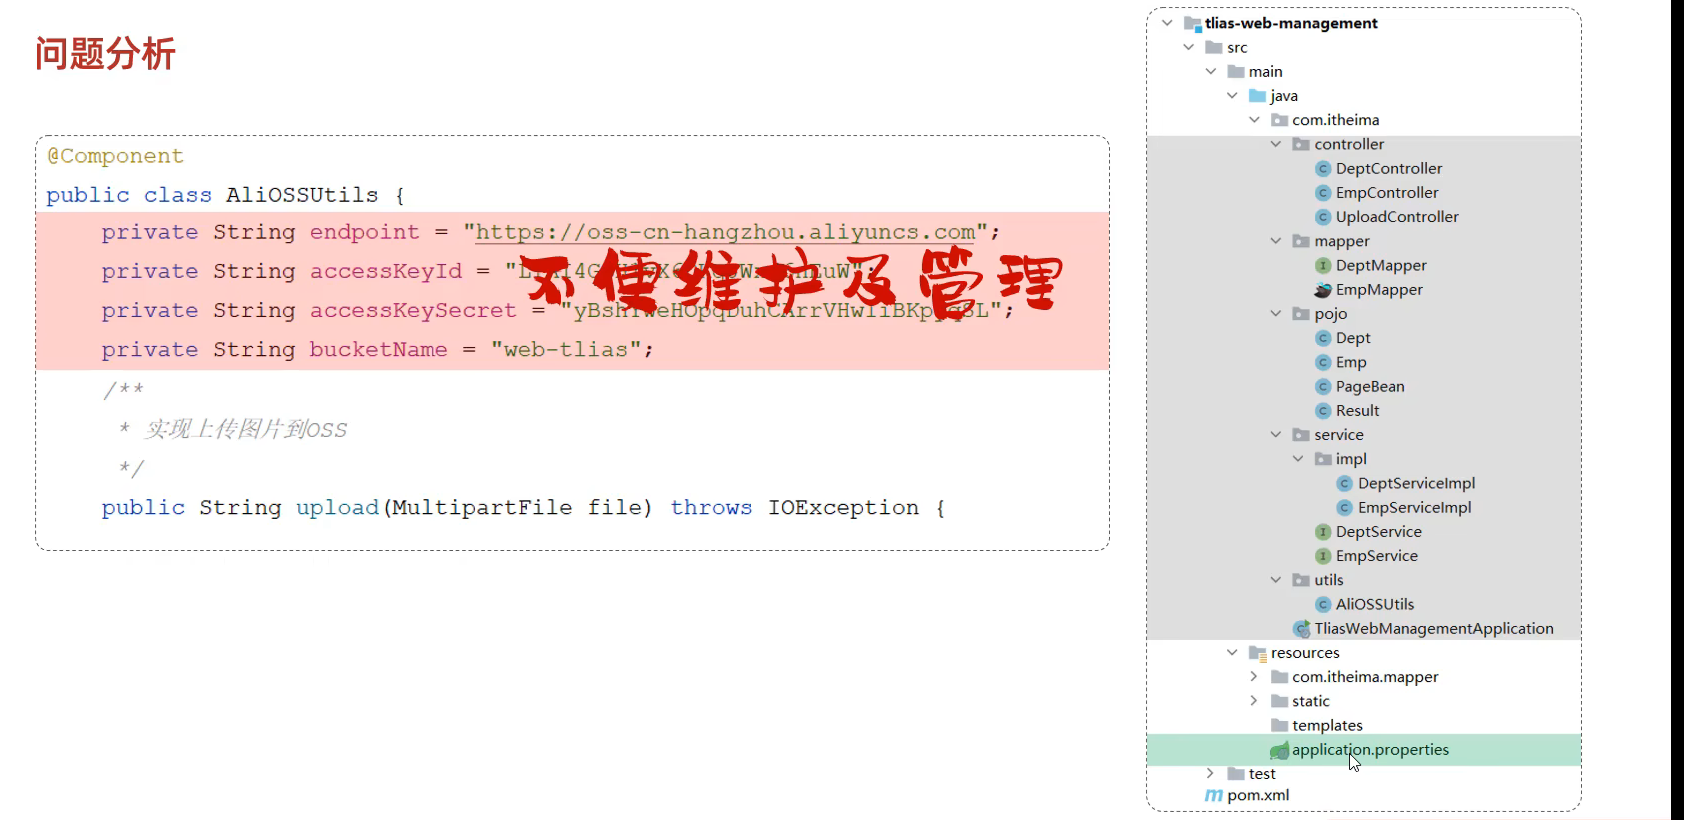
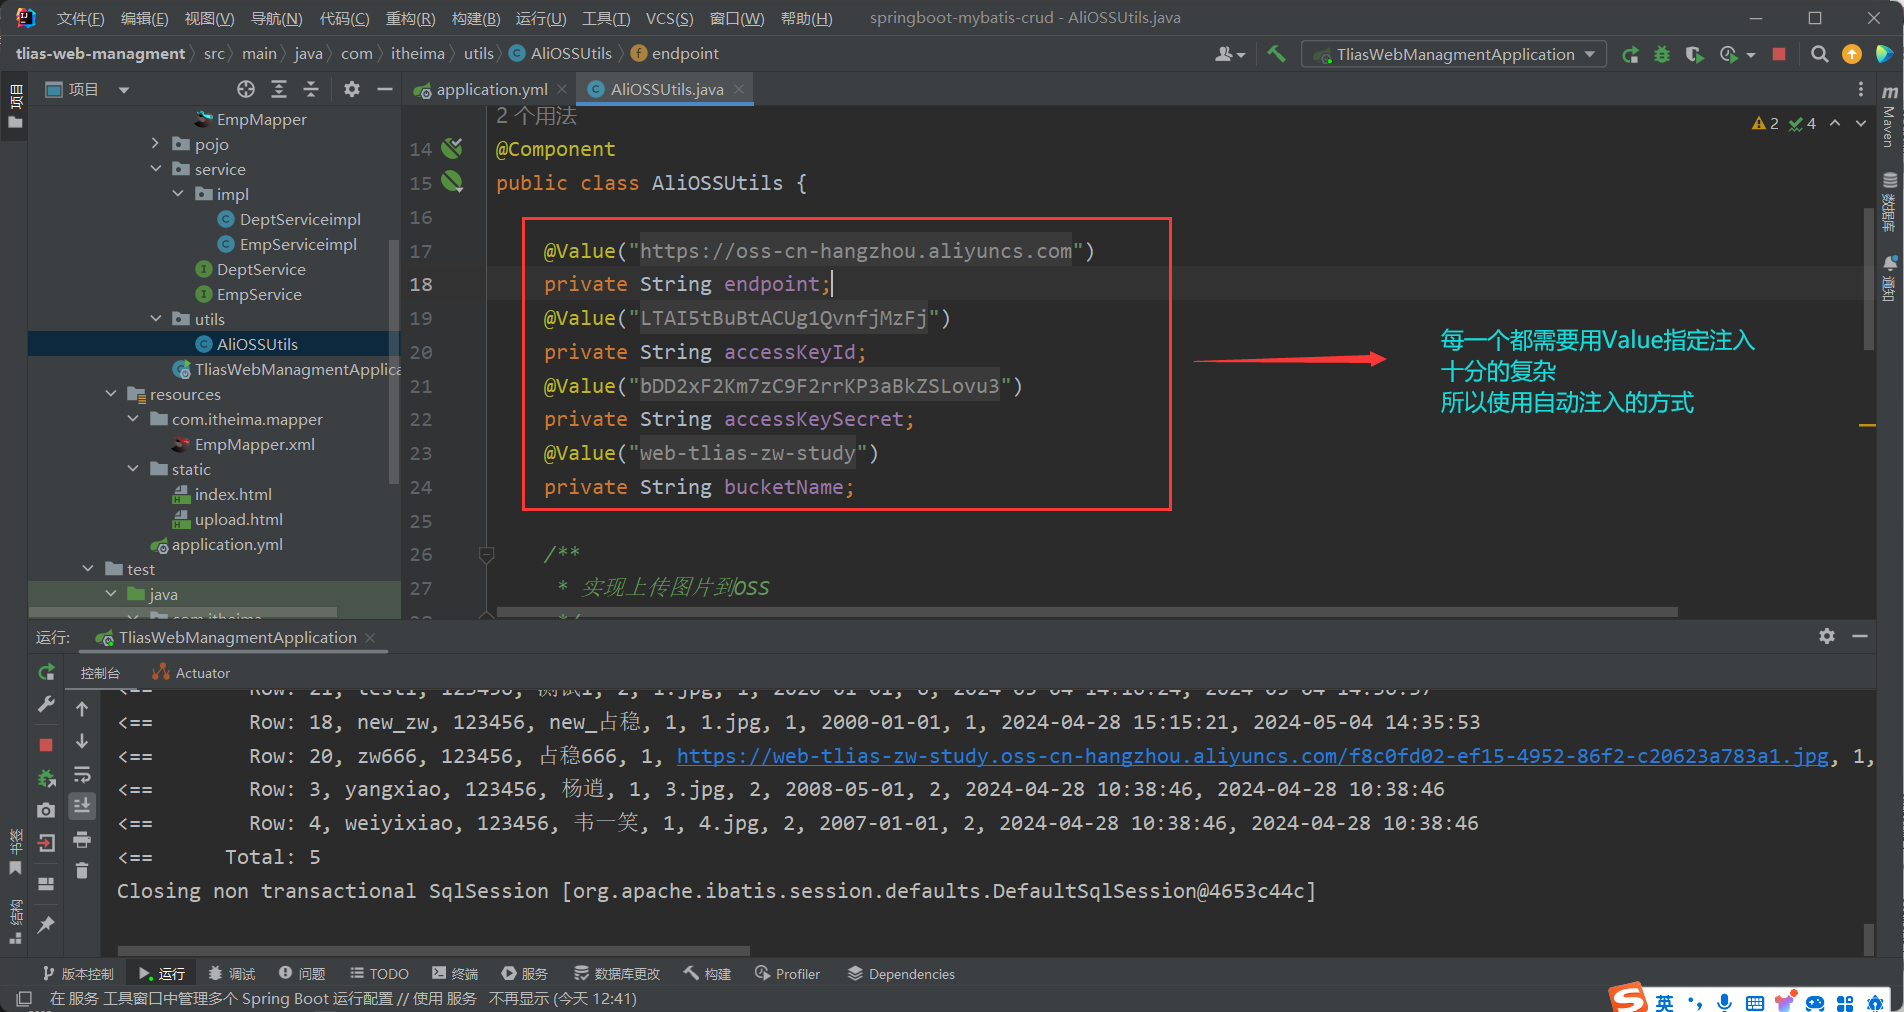
1 2 3 4 5 6 7 8 9 10 11 12 13 14 15 16 17 18 19 20 21 22 23 24 25 26 27 28 29 30 31 32 33 34 35 36 37 38 39 40 41 42 43 44 package com.itheima.utils;import com.aliyun.oss.OSS;import com.aliyun.oss.OSSClientBuilder;import org.springframework.stereotype.Component;import org.springframework.web.multipart.MultipartFile;import java.io.*;import java.util.UUID;@Component public class AliOSSUtils { private String endpoint = "https://oss-cn-hangzhou.aliyuncs.com" ; private String accessKeyId = "LTAI5tBuBtACUg1QvnfjMzFj" ; private String accessKeySecret = "bDD2xF2Km7zC9F2rrKP3aBkZSLovu3" ; private String bucketName = "web-tlias-zw-study" ; public String upload (MultipartFile file) throws IOException { InputStream inputStream = file.getInputStream(); String originalFilename = file.getOriginalFilename(); String fileName = UUID.randomUUID().toString() + originalFilename.substring(originalFilename.lastIndexOf("." )); OSS ossClient = new OSSClientBuilder ().build(endpoint, accessKeyId, accessKeySecret); ossClient.putObject(bucketName, fileName, inputStream); String url = endpoint.split("//" )[0 ] + "//" + bucketName + "." + endpoint.split("//" )[1 ] + "/" + fileName; ossClient.shutdown(); return url; } }
1 2 3 4 5 6 7 8 9 10 11 12 13 14 15 16 17 18 19 20 21 22 23 24 25 26 27 28 29 30 31 32 33 34 35 36 37 38 39 40 41 42 43 44 45 46 47 48 49 package com.itheima.controller;import com.itheima.pojo.Result;import com.itheima.utils.AliOSSUtils;import lombok.extern.slf4j.Slf4j;import org.springframework.beans.factory.annotation.Autowired;import org.springframework.web.bind.annotation.PostMapping;import org.springframework.web.bind.annotation.RestController;import org.springframework.web.multipart.MultipartFile;import java.io.File;import java.io.IOException;import java.util.UUID;@Slf4j @RestController public class UploadController { @Autowired private AliOSSUtils aliOSSUtils; @PostMapping("/upload") public Result upload (MultipartFile image) throws IOException { log.info("文件上传:文件名为{}" ,image.getOriginalFilename()); String url = aliOSSUtils.upload(image); log.info("文件上传完成,文件访问的url为{}" ,url); return Result.success(url); } }
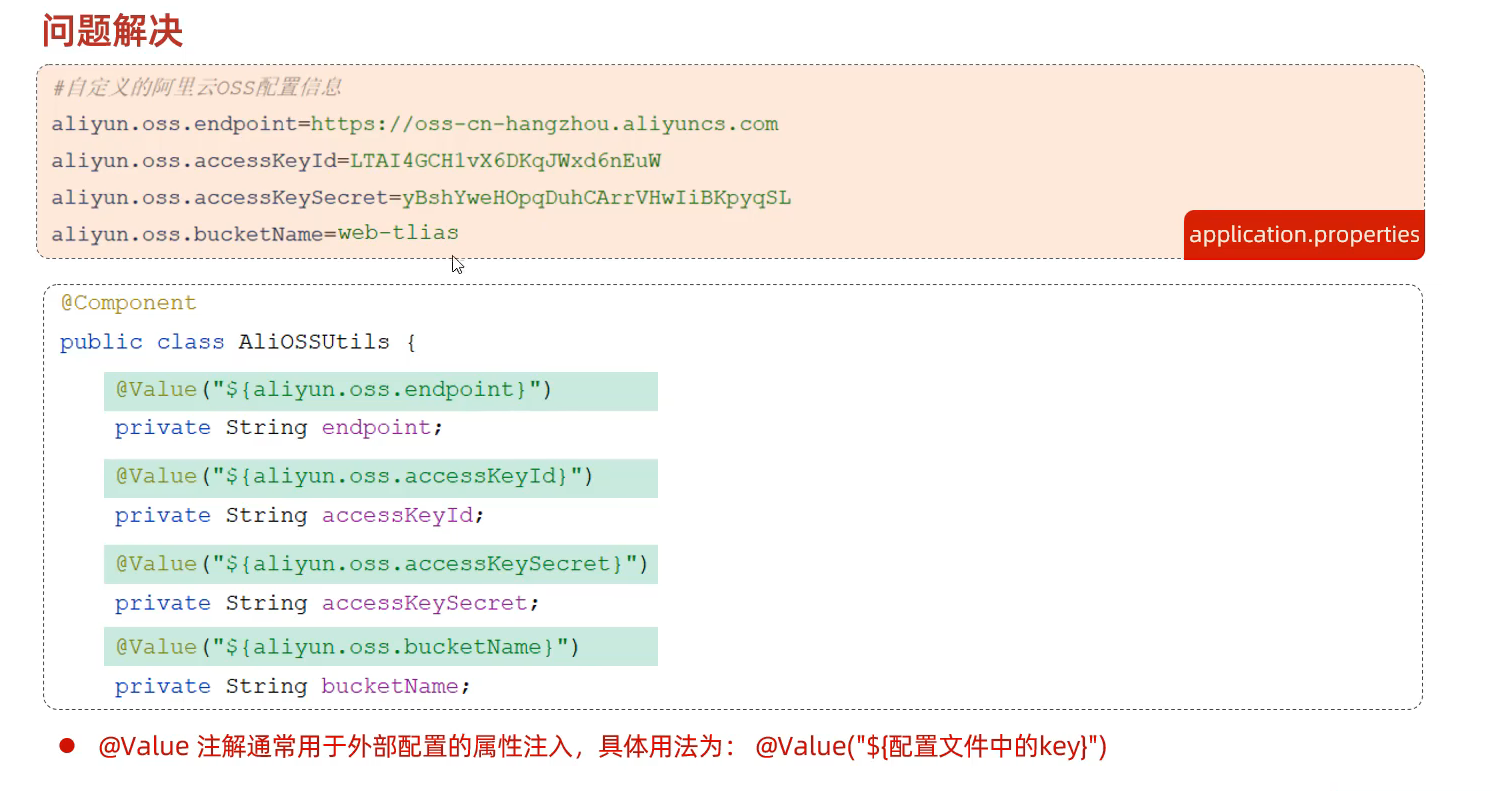
80.参数配置化 多个项目均依赖 不便维护 但是 application.properties 只有一个 将参数配置到里面去后更加方便整洁
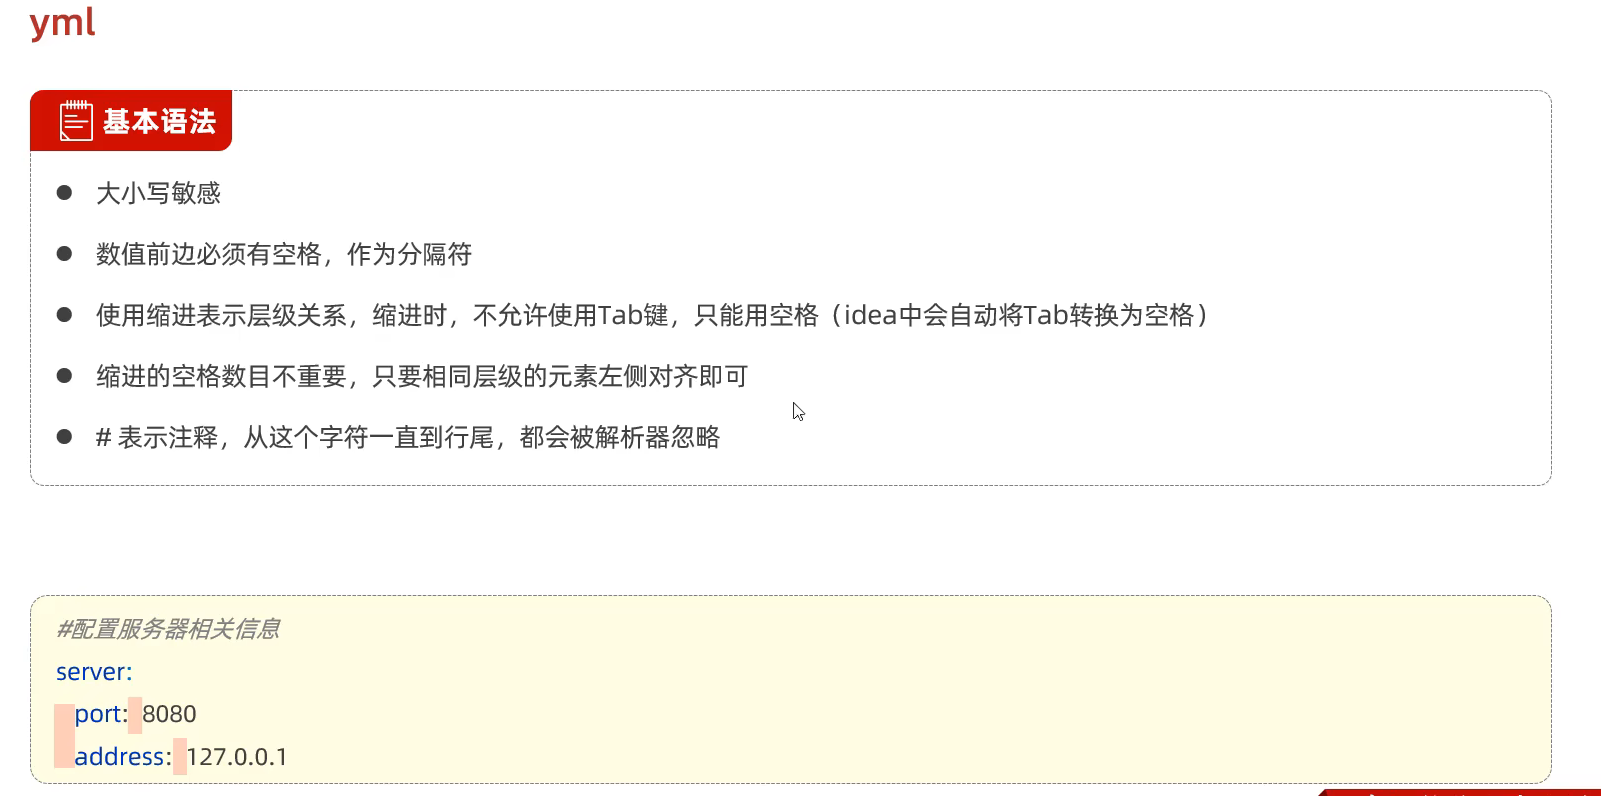
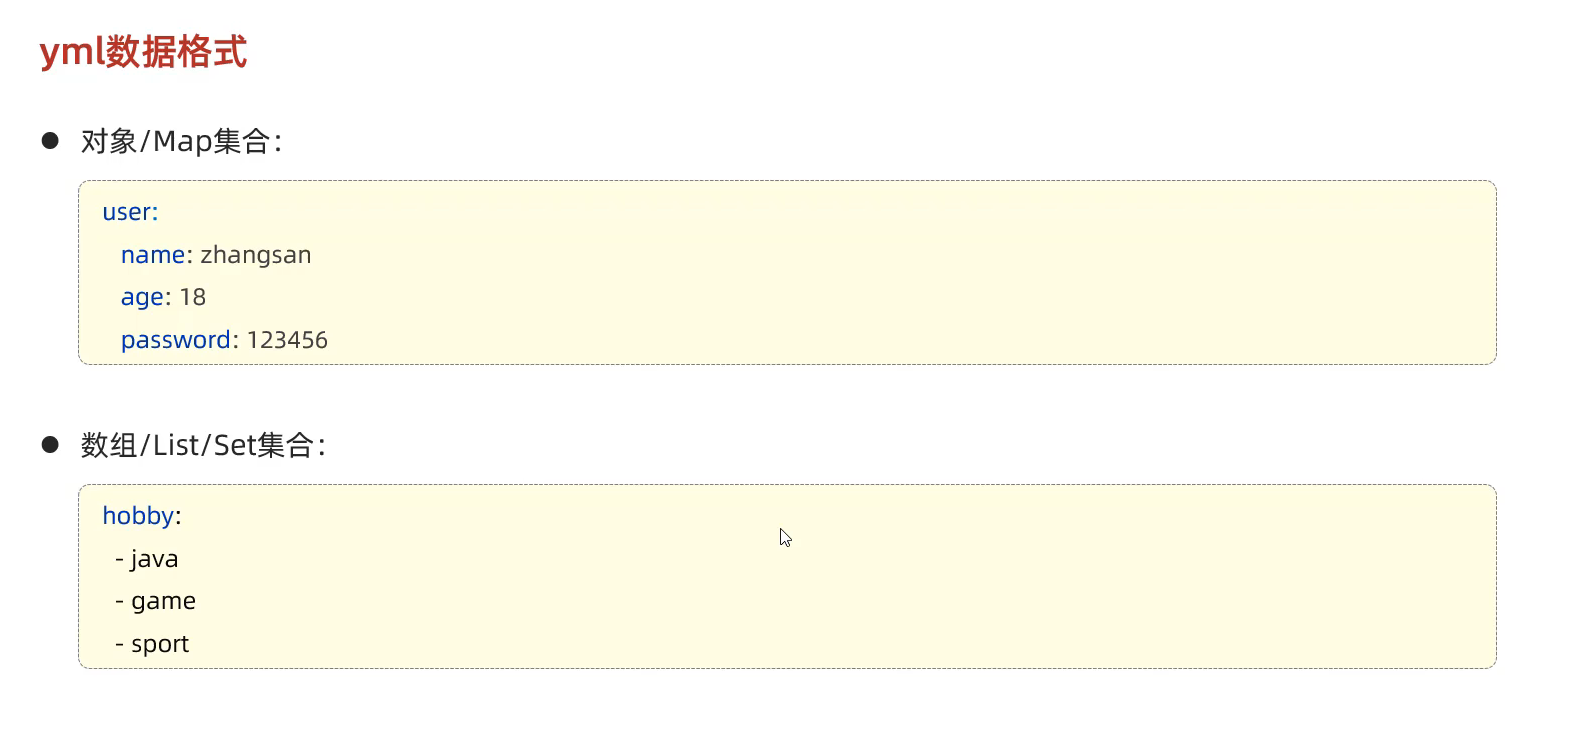
81.Yml配置文件
基本语法
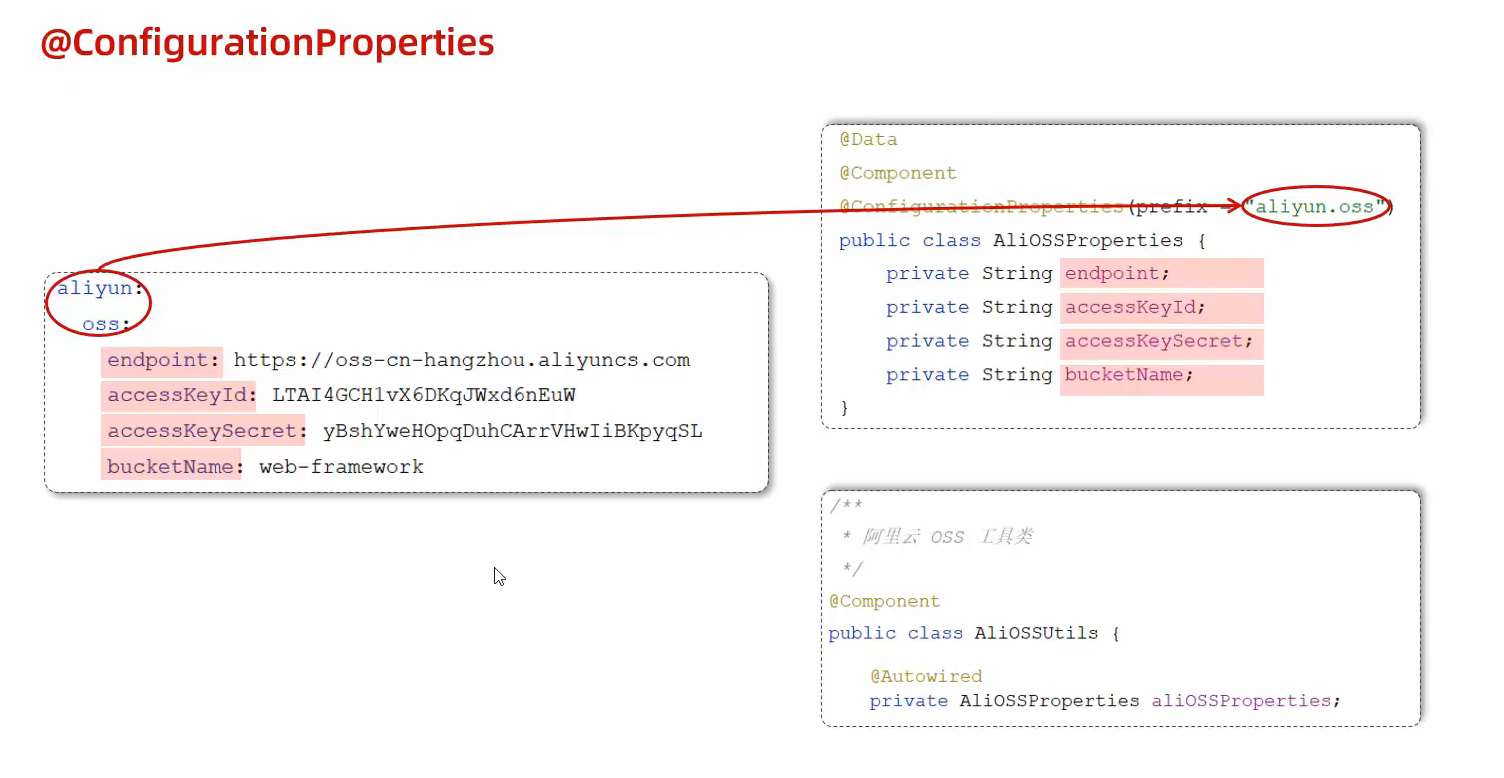
1 2 3 4 5 6 7 8 9 10 11 12 13 14 15 16 17 18 19 20 21 22 23 24 25 26 27 28 29 30 spring: datasource: driver-class-name: com.mysql.cj.jdbc.Driver url: jdbc:mysql://localhost:3306/tlias username: root password: 123456 servlet: multipart: max-file-size: 10MB max-request-size: 100MB mybatis: configuration: log-impl: org.apache.ibatis.logging.stdout.StdOutImpl map-underscore-to-camel-case: true aliyun: oss: endpoint: https://oss-cn-hangzhou.aliyuncs.com accessKeyId: LTAI5tBuBtACUg1QvnfjMzFj accessKeySecret: bDD2xF2Km7zC9F2rrKP3aBkZSLovu3 bucketName: web-tlias-zw-study
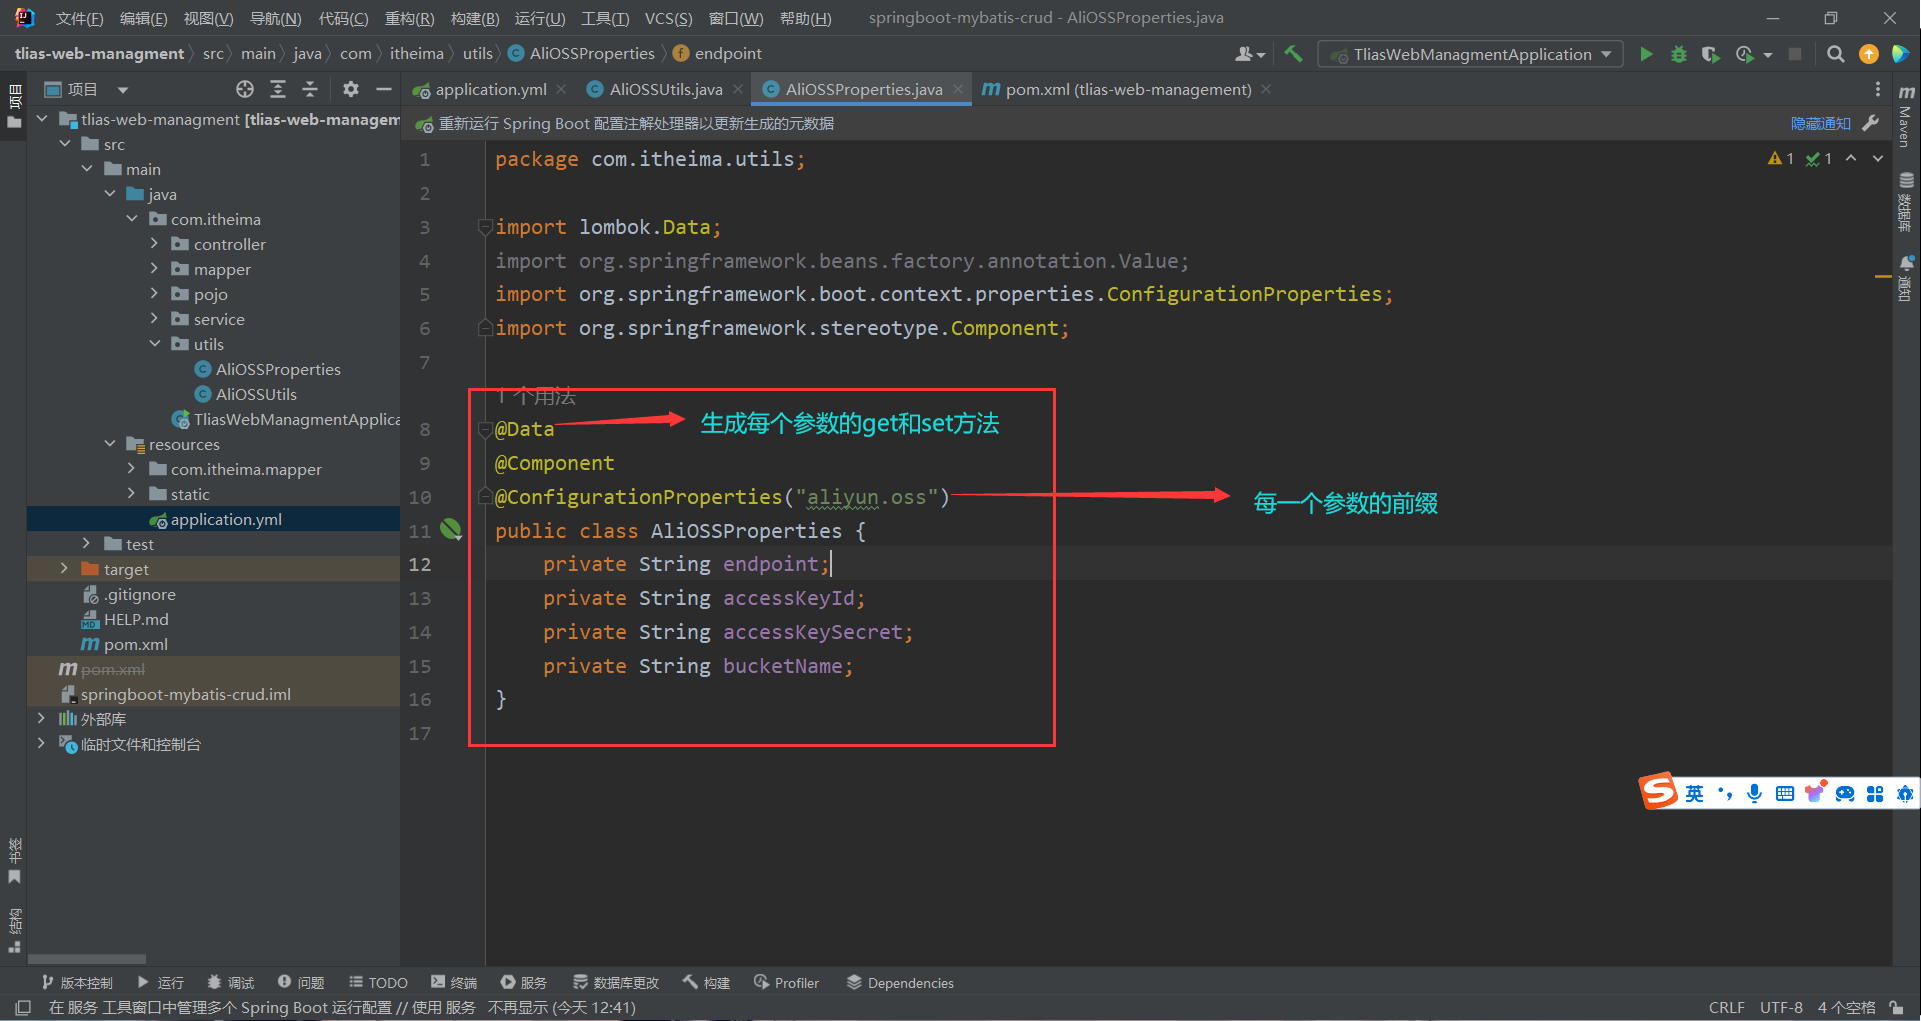
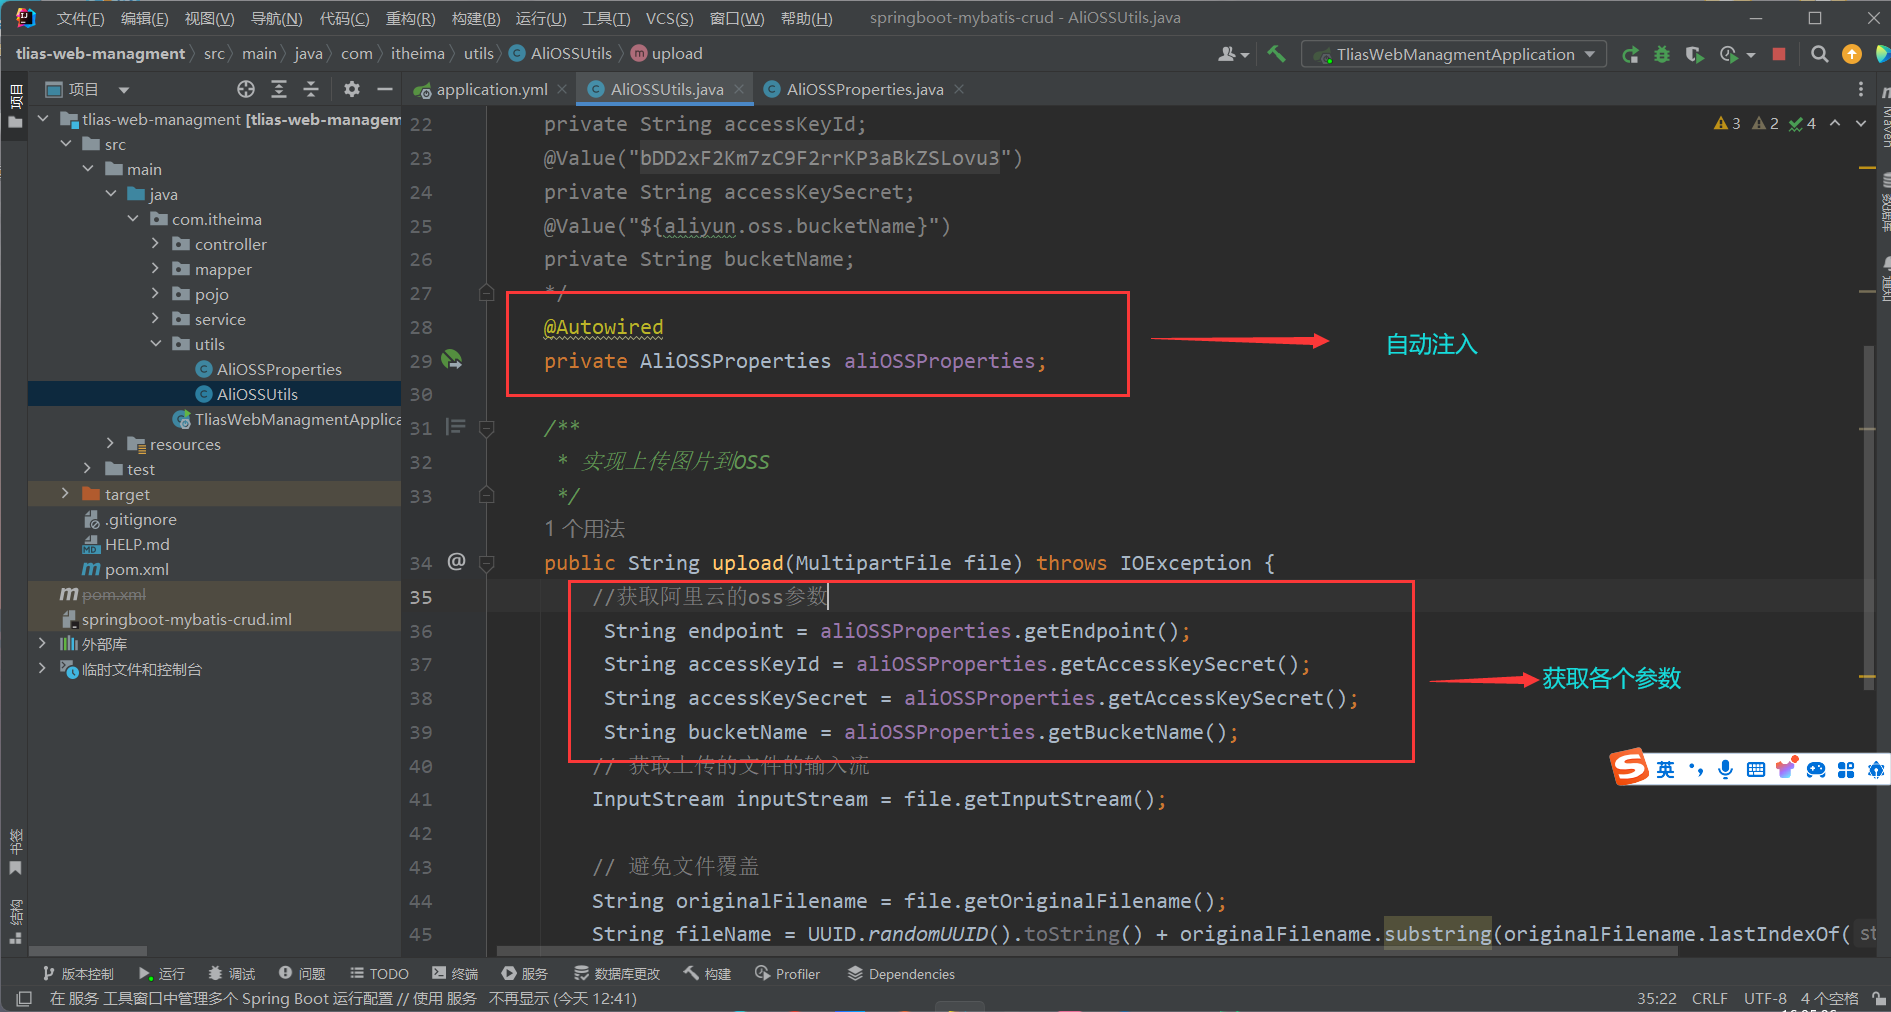
82.简化注入方式的配置
创建一个 AliOSSProperties.java 在其中声明各个参数 要求与配置 application.yml 的参数一致
在 AliOSSUtils.java 中获取各个参数
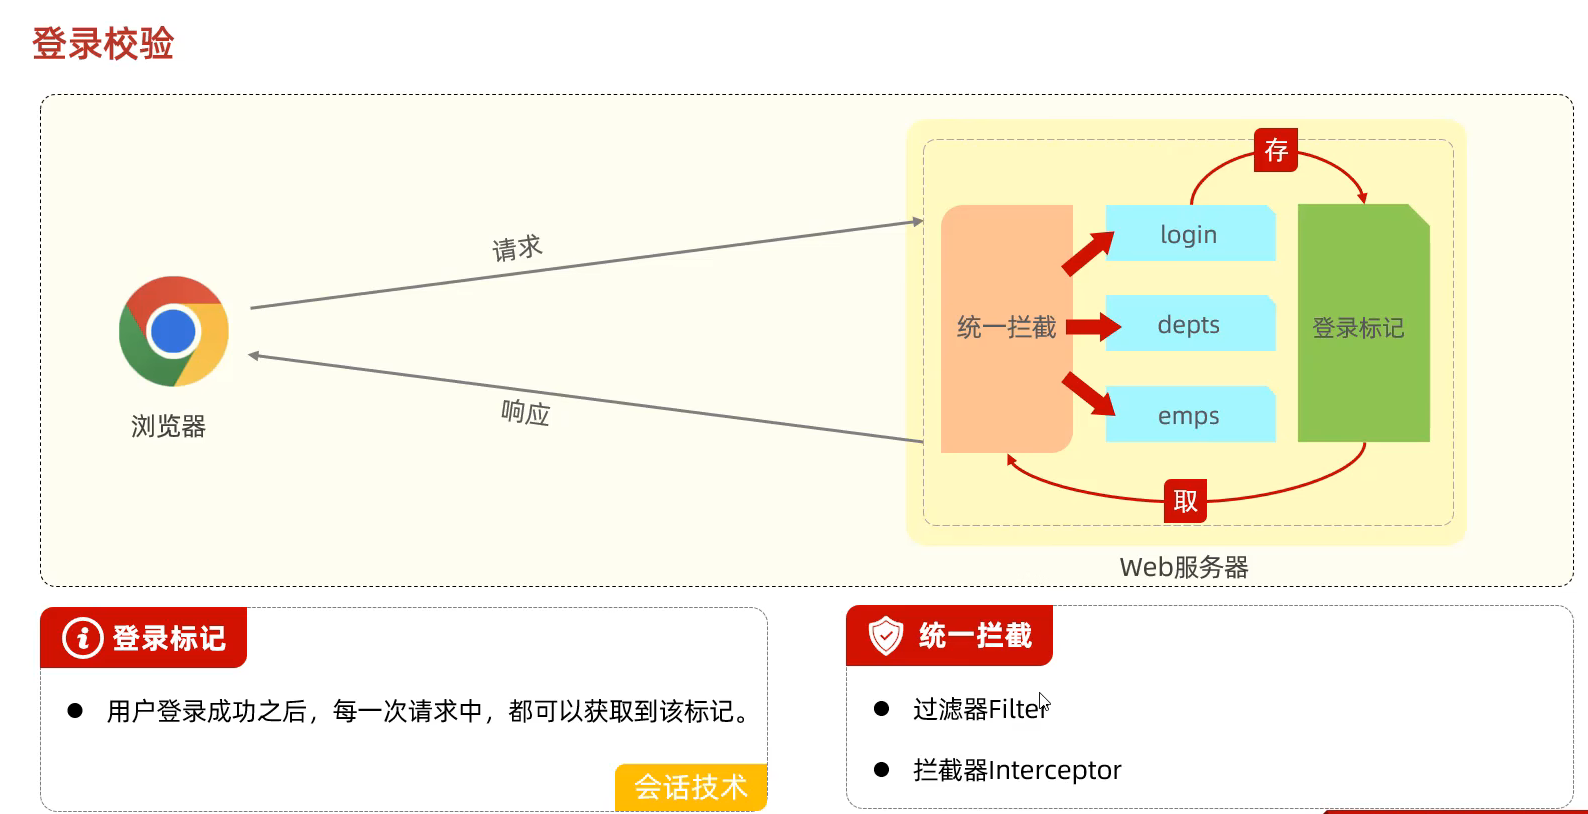
83.登录校验
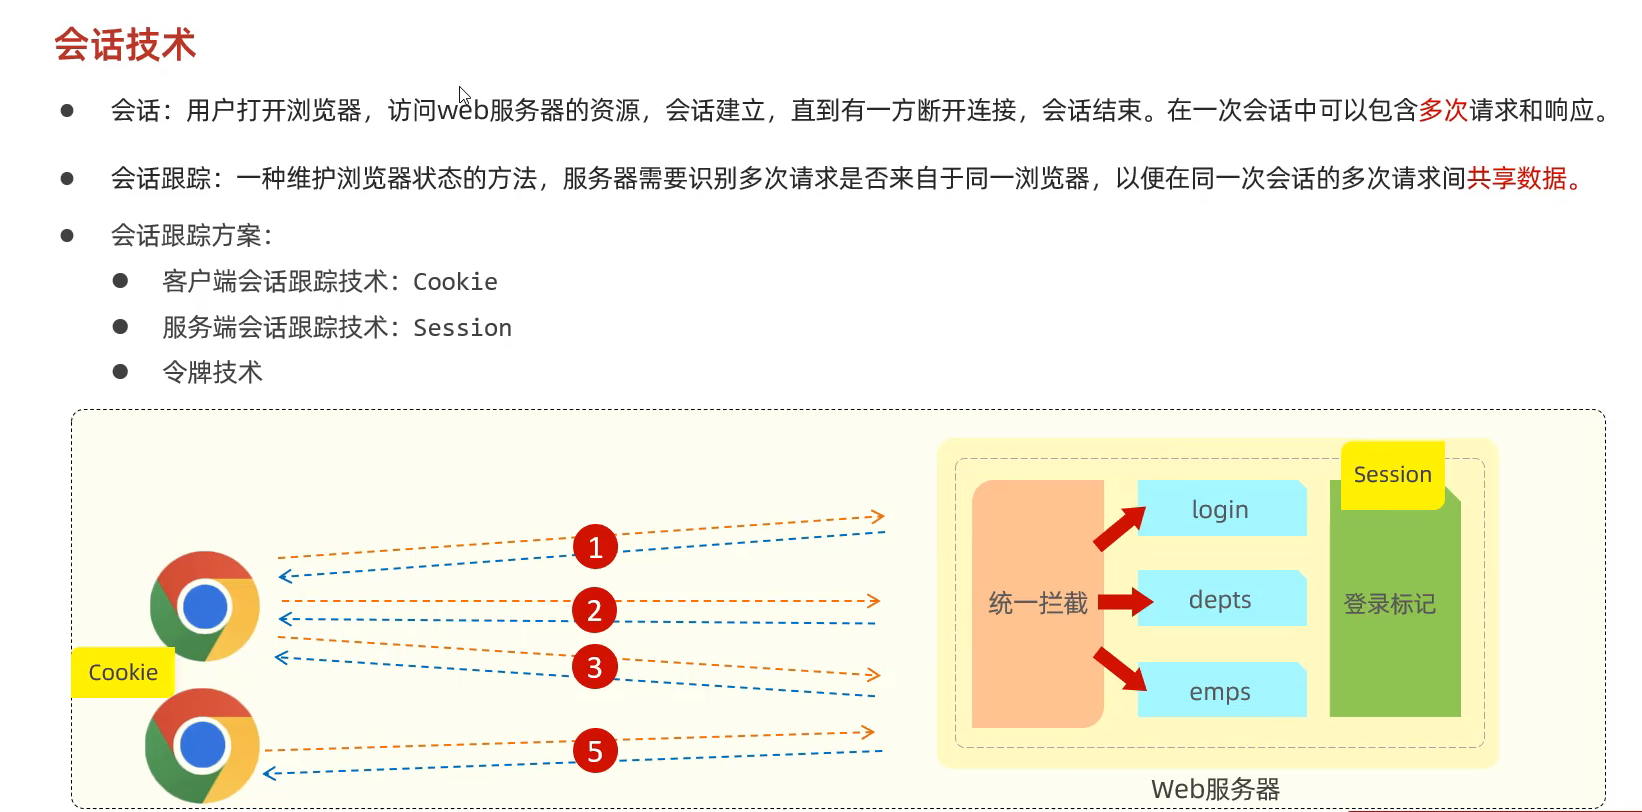
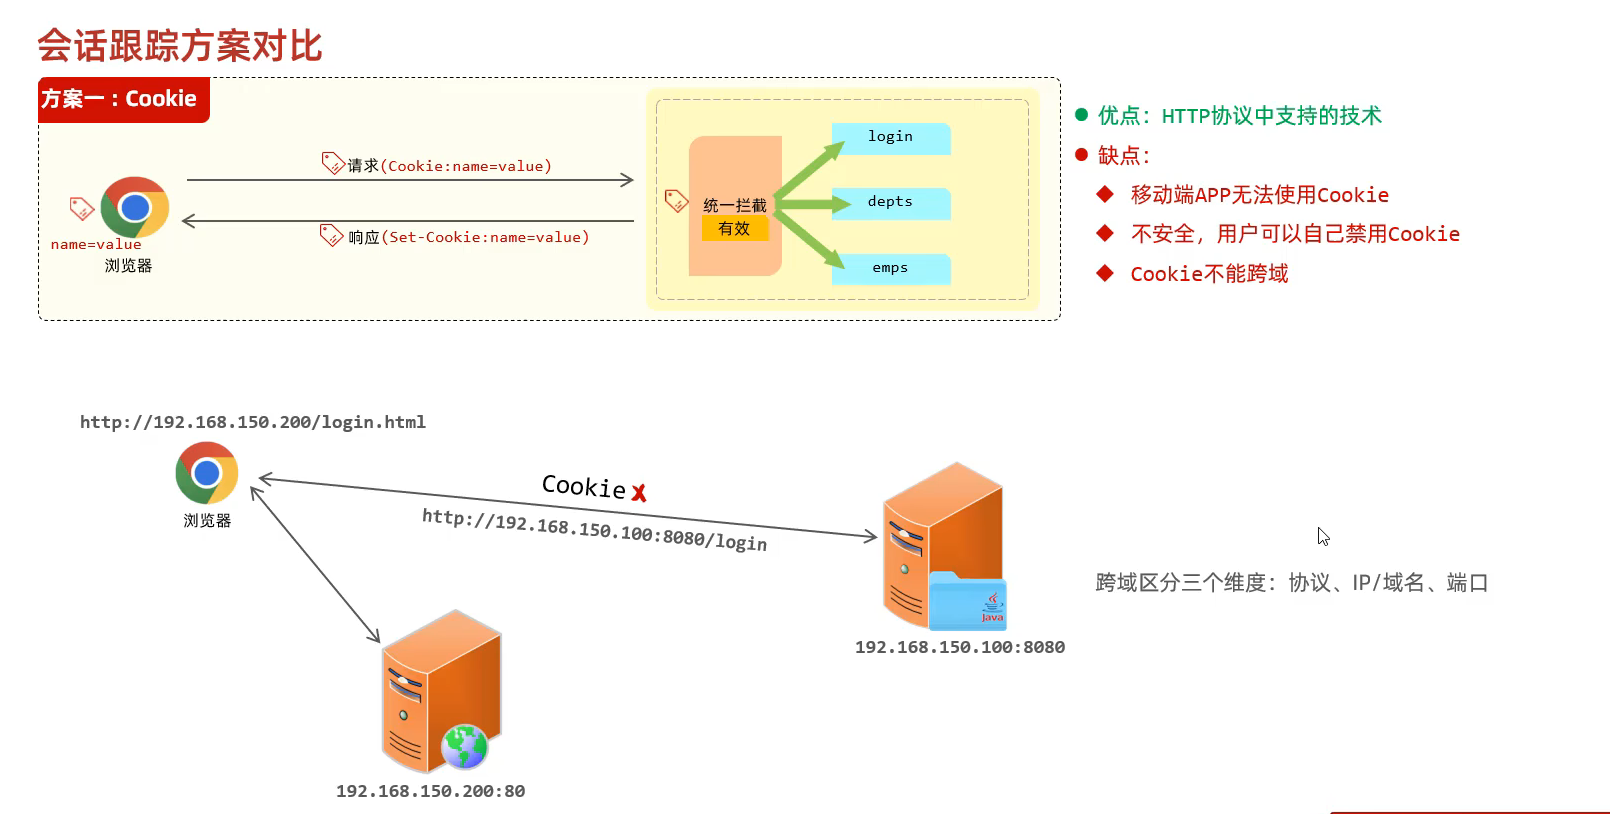
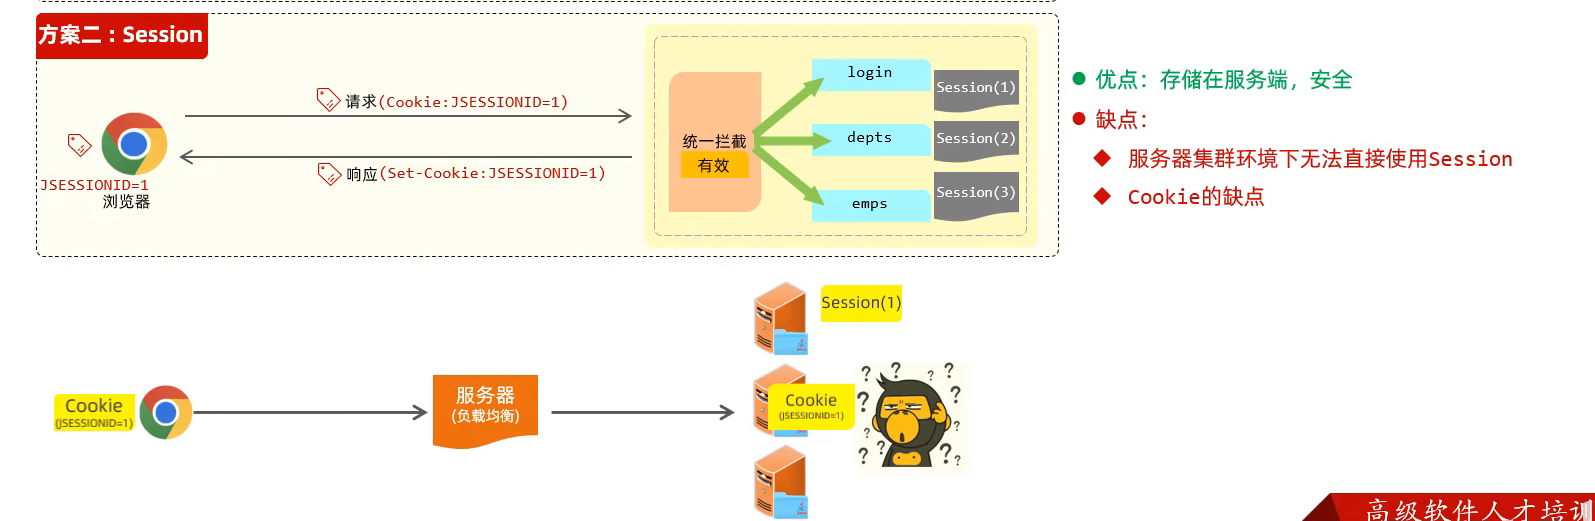
会话技术
cookie技术
session技术
令牌技术(主流技术)
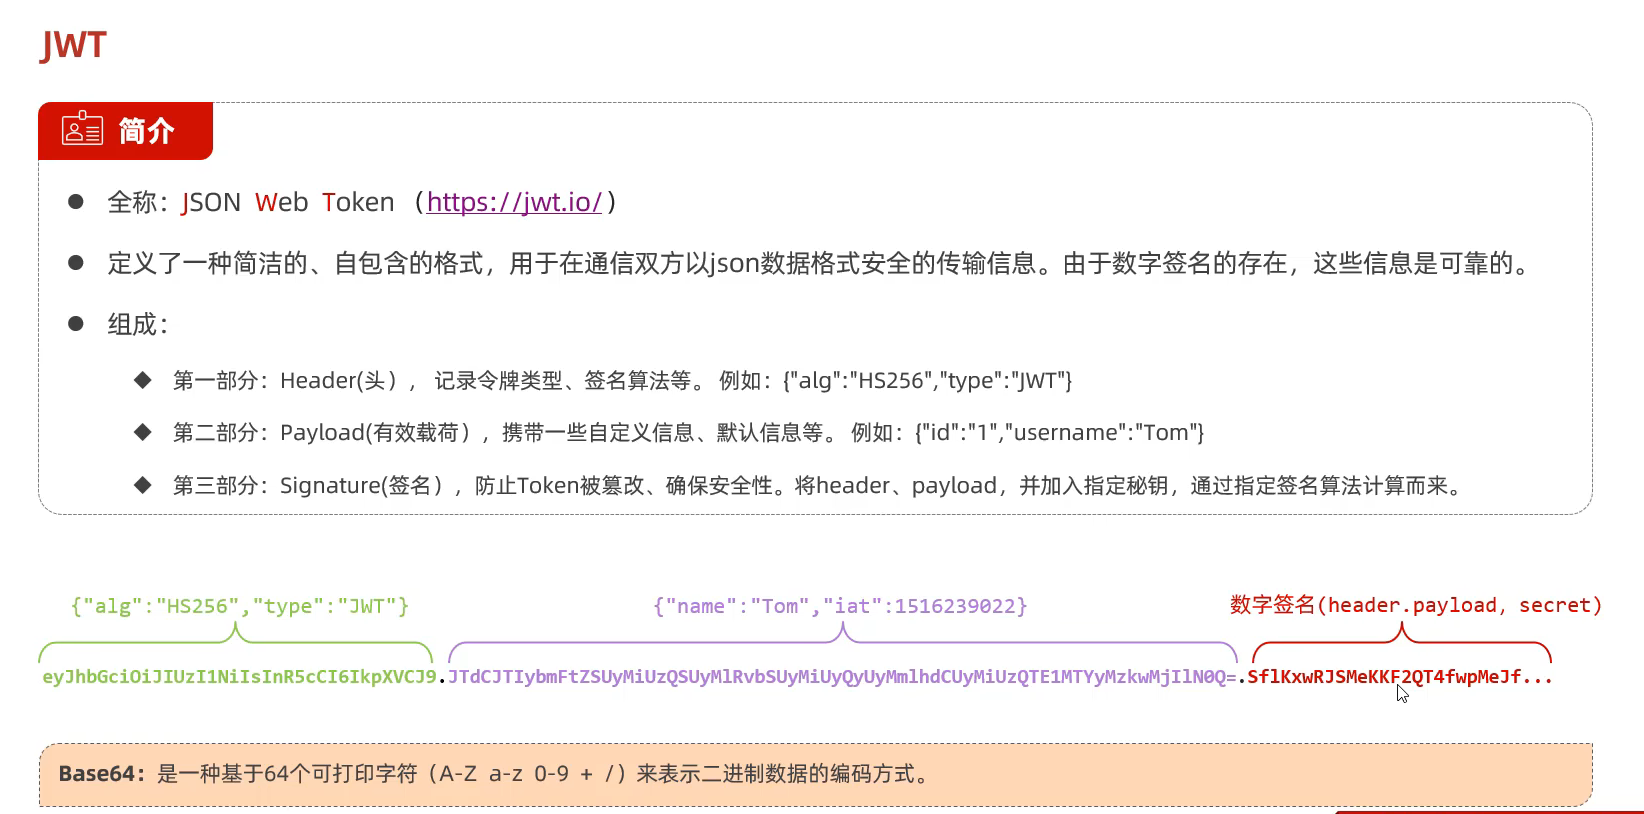
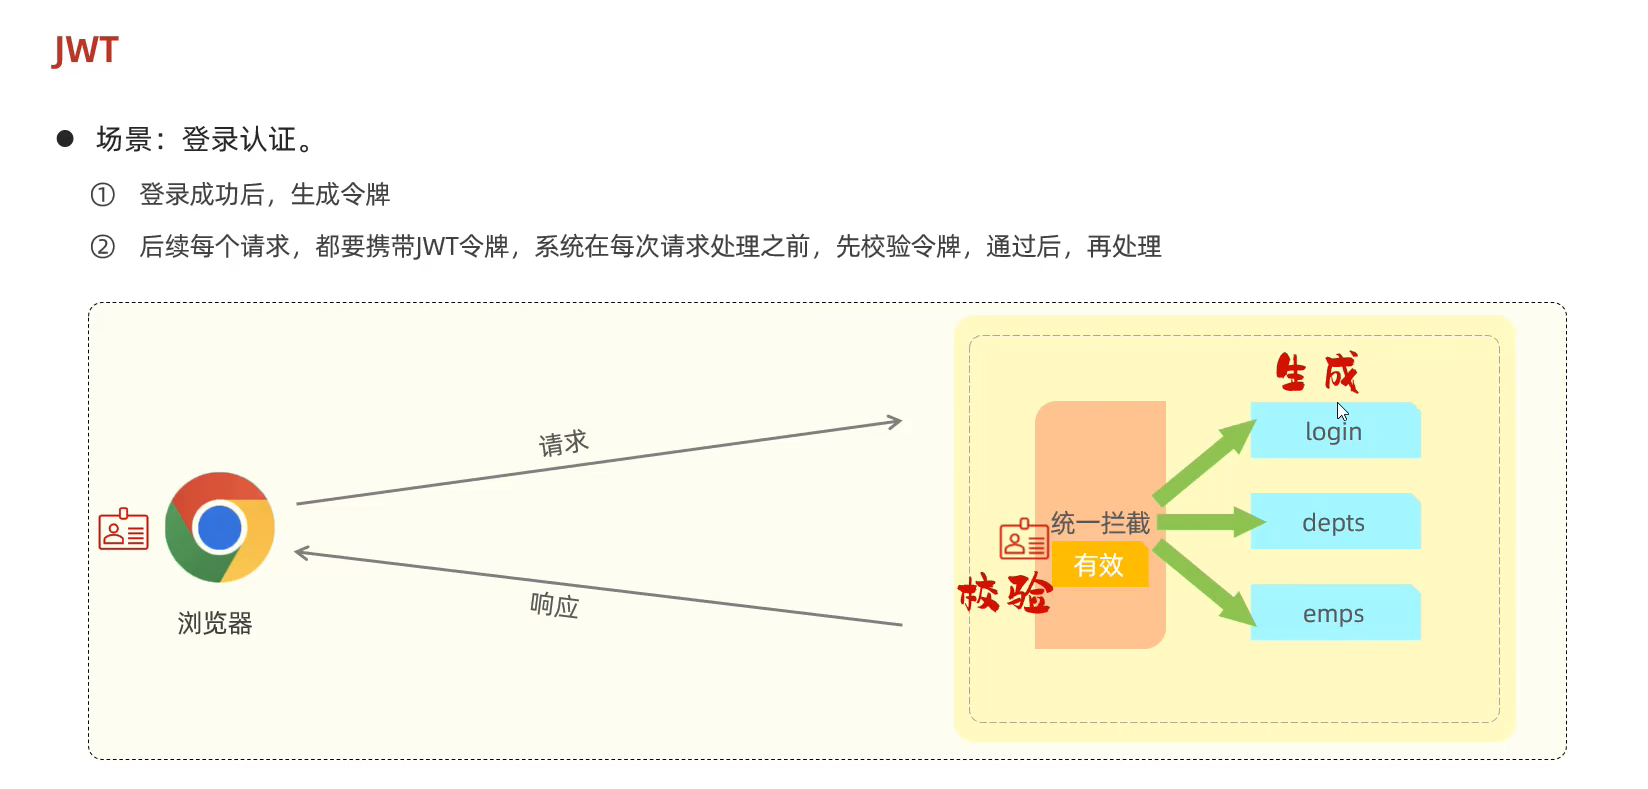
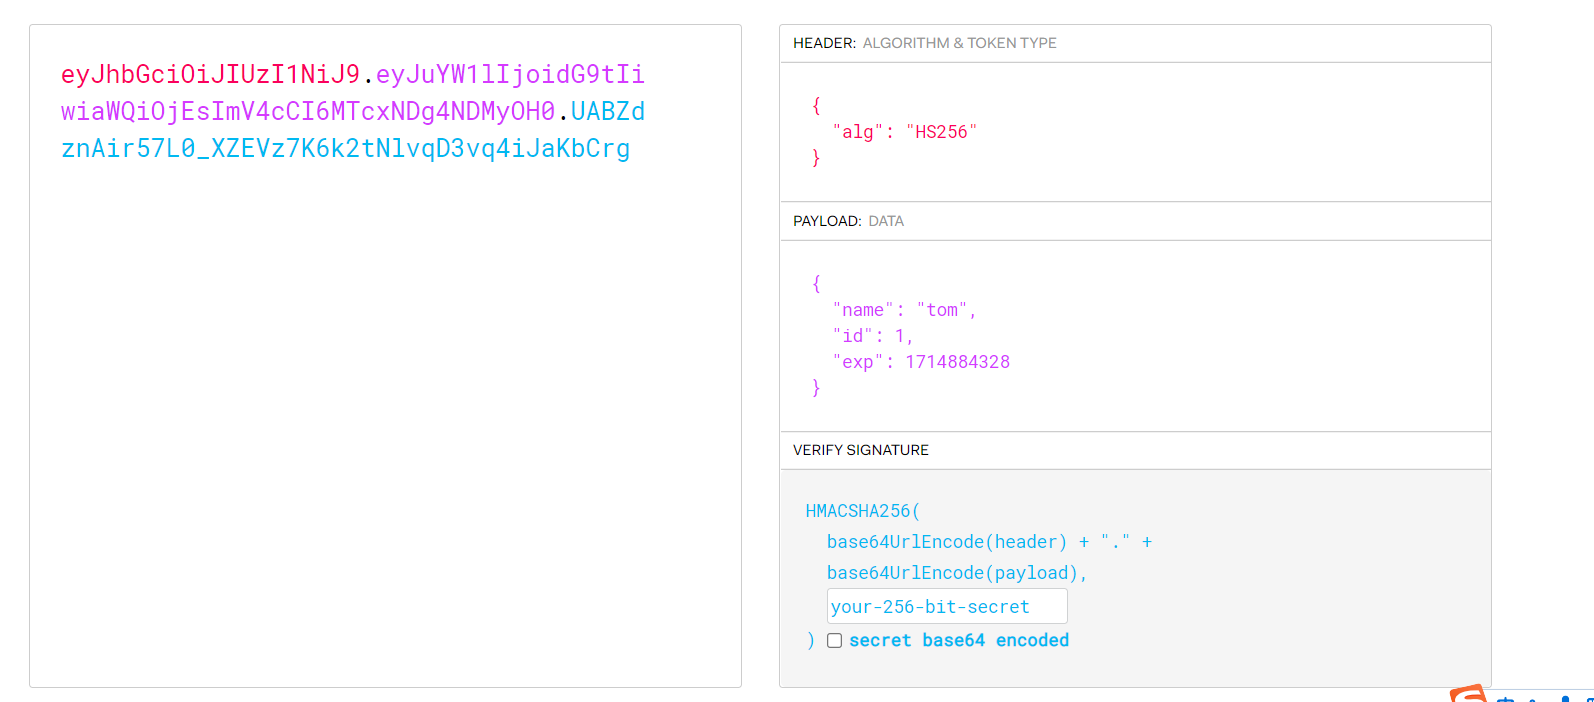
84.JWT令牌技术 JWT是什么?
JWT令牌的生成 1 2 3 4 5 6 7 8 9 10 11 12 13 14 15 16 17 @Test public void testGenJwt () { Map<String, Object> claims = new HashMap <>(); claims.put("id" ,1 ); claims.put("name" ,"tom" ); String jwt = Jwts.builder() .signWith(SignatureAlgorithm.HS256, "zw666" ) .setClaims(claims) .setExpiration(new Date (System.currentTimeMillis() + 3600 * 1000 )) .compact(); System.out.println(jwt); } }
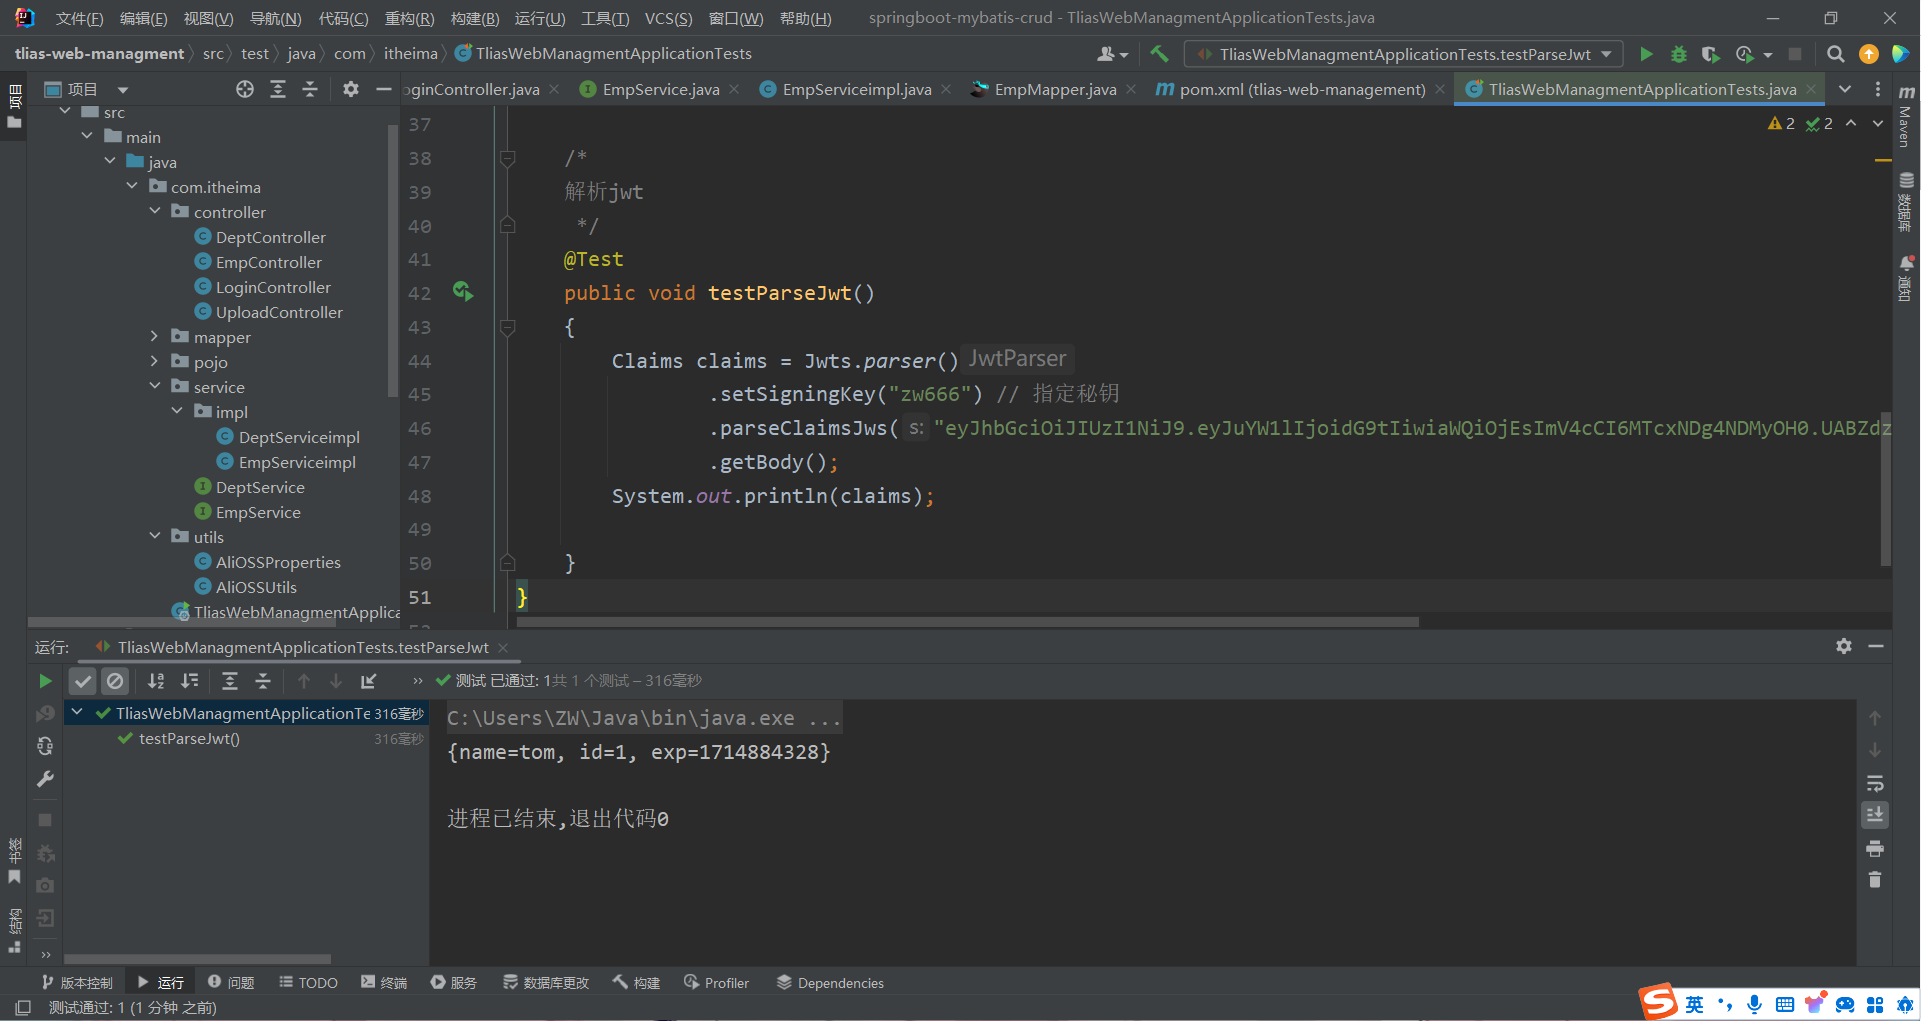
Jwt令牌的解析校验
1 2 3 4 5 6 7 8 9 10 11 12 13 @Test public void testParseJwt () { Claims claims = Jwts.parser() .setSigningKey("zw666" ) .parseClaimsJws("eyJhbGciOiJIUzI1NiJ9.eyJuYW1lIjoidG9tIiwiaWQiOjEsImV4cCI6MTcxNDg4NDMyOH0.UABZdznAir57L0_XZEVz7K6k2tNlvqD3vq4iJaKbCrg" ) .getBody(); System.out.println(claims); }
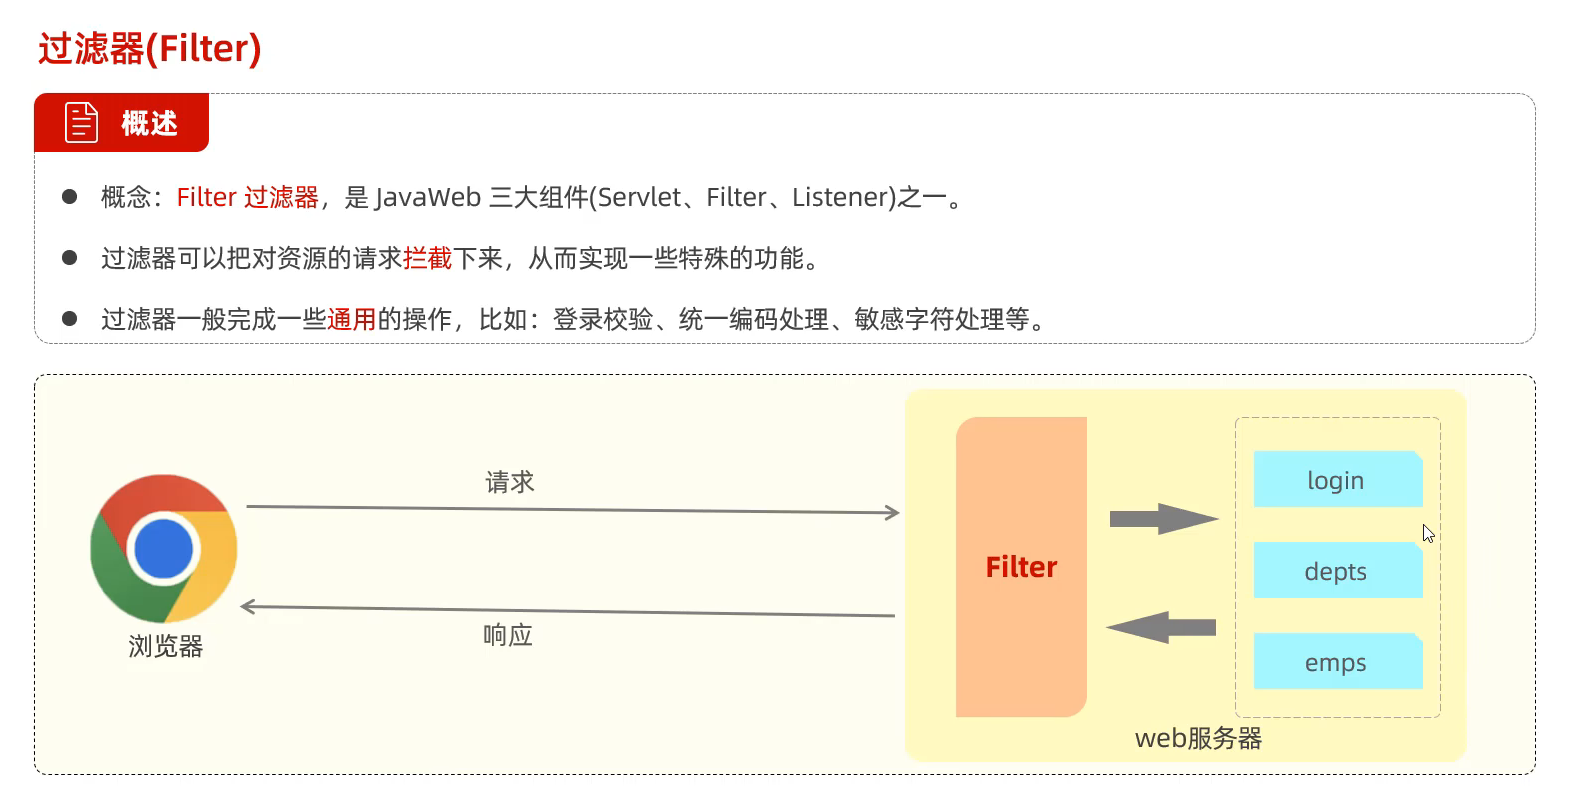
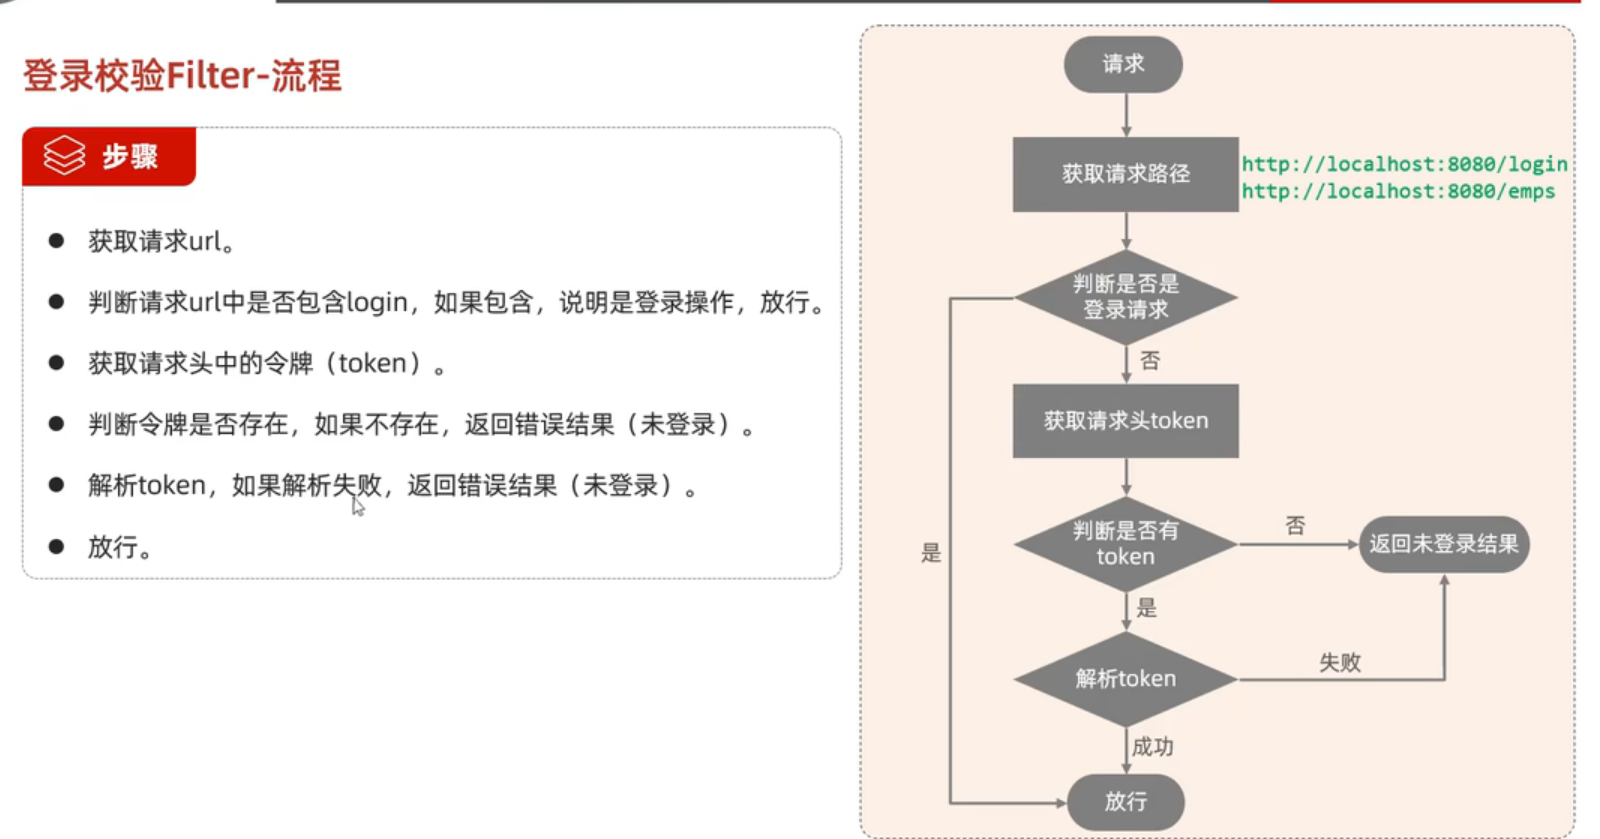
85.统一拦截校验令牌技术(选择其一即可) ①过滤器Filter
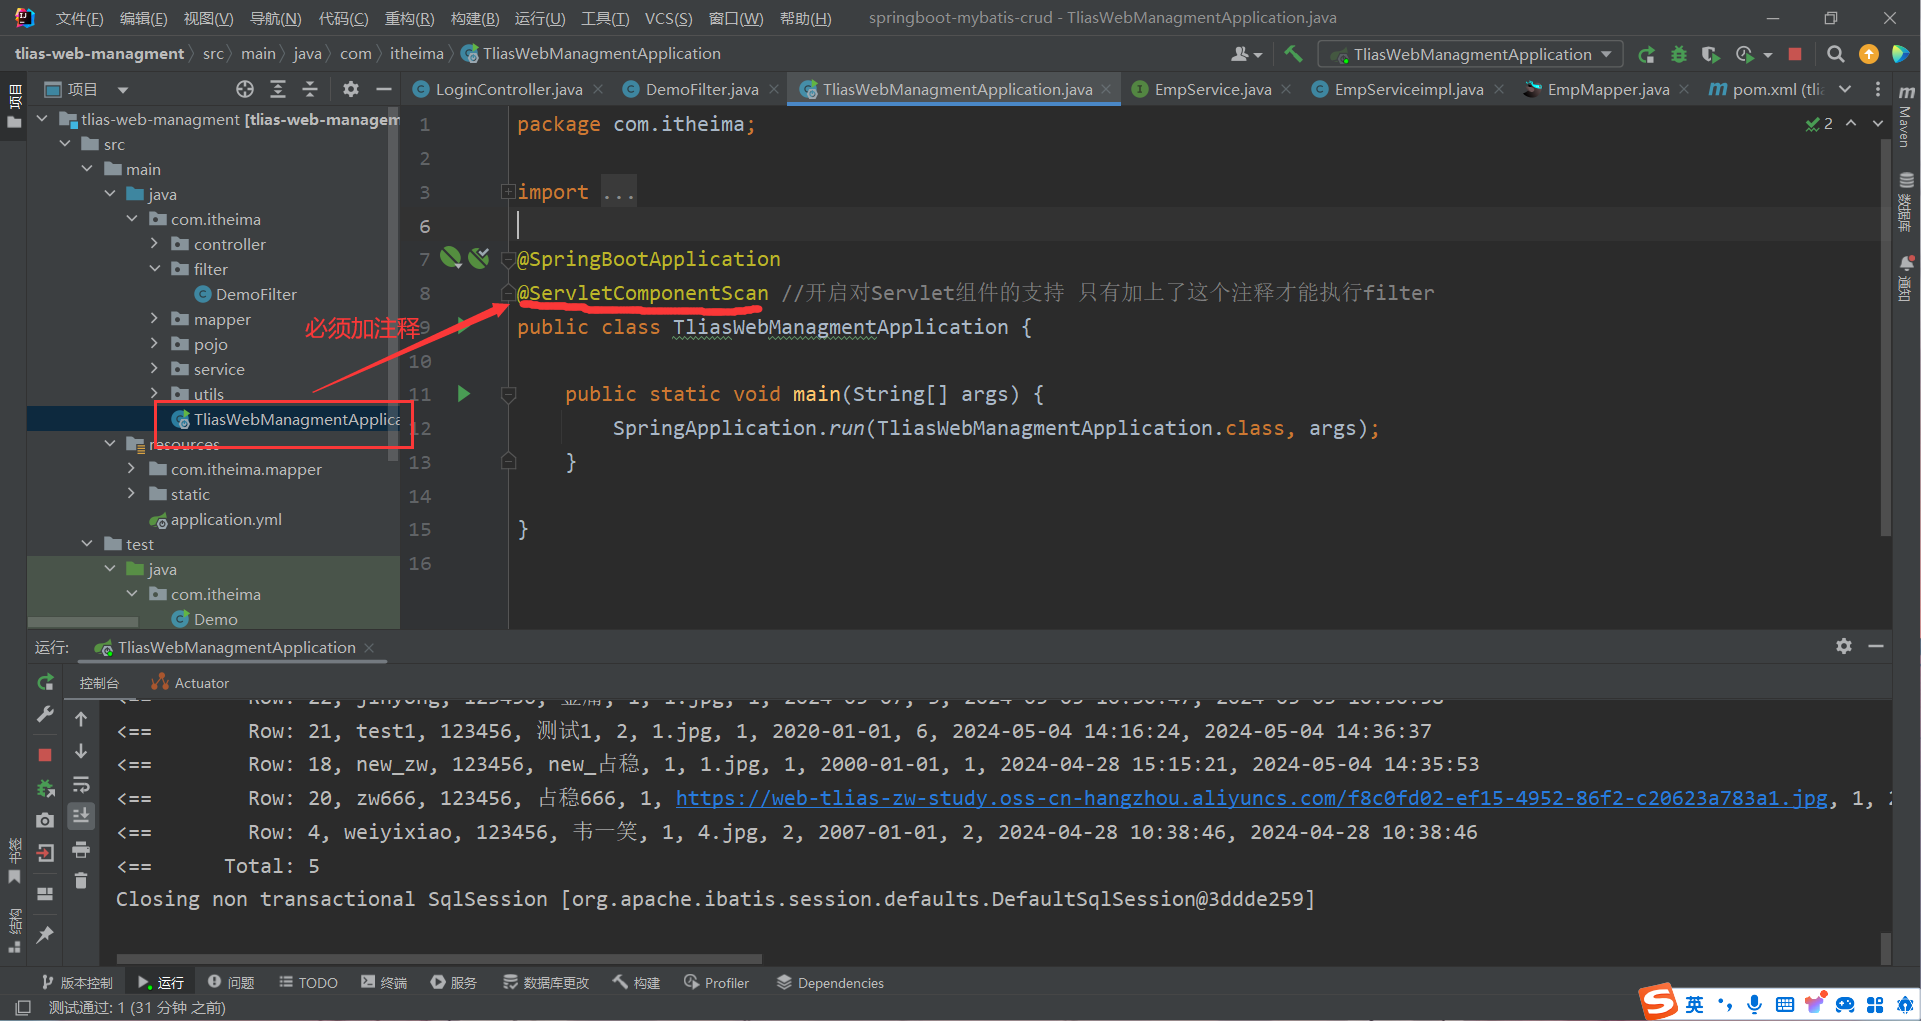
Filter演示代码实现 注意在启动类中必须加上注释
1 2 3 4 5 6 7 8 9 10 11 12 13 14 15 16 17 18 19 20 21 22 23 24 25 26 27 28 29 30 package com.itheima.filter;import javax.servlet.*;import javax.servlet.annotation.WebFilter;import java.io.IOException;@WebFilter(urlPatterns = "/*") public class DemoFilter implements Filter { @Override public void init (FilterConfig filterConfig) throws ServletException { System.out.println("init方法执行" ); } @Override public void doFilter (ServletRequest servletRequest, ServletResponse servletResponse, FilterChain filterChain) throws IOException, ServletException { System.out.println("拦截到请求" ); filterChain.doFilter(servletRequest,servletResponse); } @Override public void destroy () { System.out.println("destroy方法执行" ); } }
Filter完整代码实现 1 2 3 4 5 6 7 8 9 10 11 12 13 14 15 16 17 18 19 20 21 22 23 24 25 26 27 28 29 30 31 32 33 34 35 36 37 38 39 40 41 42 43 44 45 46 47 48 49 50 51 52 53 54 55 56 57 58 59 60 61 62 63 64 65 66 package com.itheima.filter;import com.alibaba.fastjson.JSONObject;import com.google.gson.JsonObject;import com.itheima.pojo.Result;import com.itheima.utils.JwtUtils;import lombok.extern.slf4j.Slf4j;import org.springframework.util.StringUtils;import org.springframework.web.bind.annotation.RequestBody;import javax.servlet.*;import javax.servlet.annotation.WebFilter;import javax.servlet.http.HttpServletRequest;import javax.servlet.http.HttpServletResponse;import java.io.IOException;@Slf4j @WebFilter(urlPatterns = "/*") public class LoginCheckFilter implements Filter { @Override public void doFilter (ServletRequest servletRequest, ServletResponse servletResponse, FilterChain filterChain) throws IOException, ServletException { HttpServletRequest req = (HttpServletRequest) servletRequest; HttpServletResponse resp = (HttpServletResponse) servletResponse; String url = req.getRequestURL().toString(); log.info("请求的url为{}" ,url); if (url.contains("login" )) { filterChain.doFilter(servletRequest,servletResponse); return ; } String jwt = req.getHeader("token" ); if (!StringUtils.hasLength(jwt)) { log.info("请求头token为空 返回未登录信息" ); Result error = Result.error("NOT_LOGIN" ); String notLogin = JSONObject.toJSONString(error); resp.getWriter().write(notLogin); return ; } try { JwtUtils.parseJWT(jwt); }catch (Exception e) { log.info("解析令牌失败 返回未登录的错误信息" ); Result error = Result.error("NOT_LOGIN" ); String notLogin = JSONObject.toJSONString(error); resp.getWriter().write(notLogin); return ; } log.info("令牌合法" ); filterChain.doFilter(servletRequest,servletResponse); return ; } }
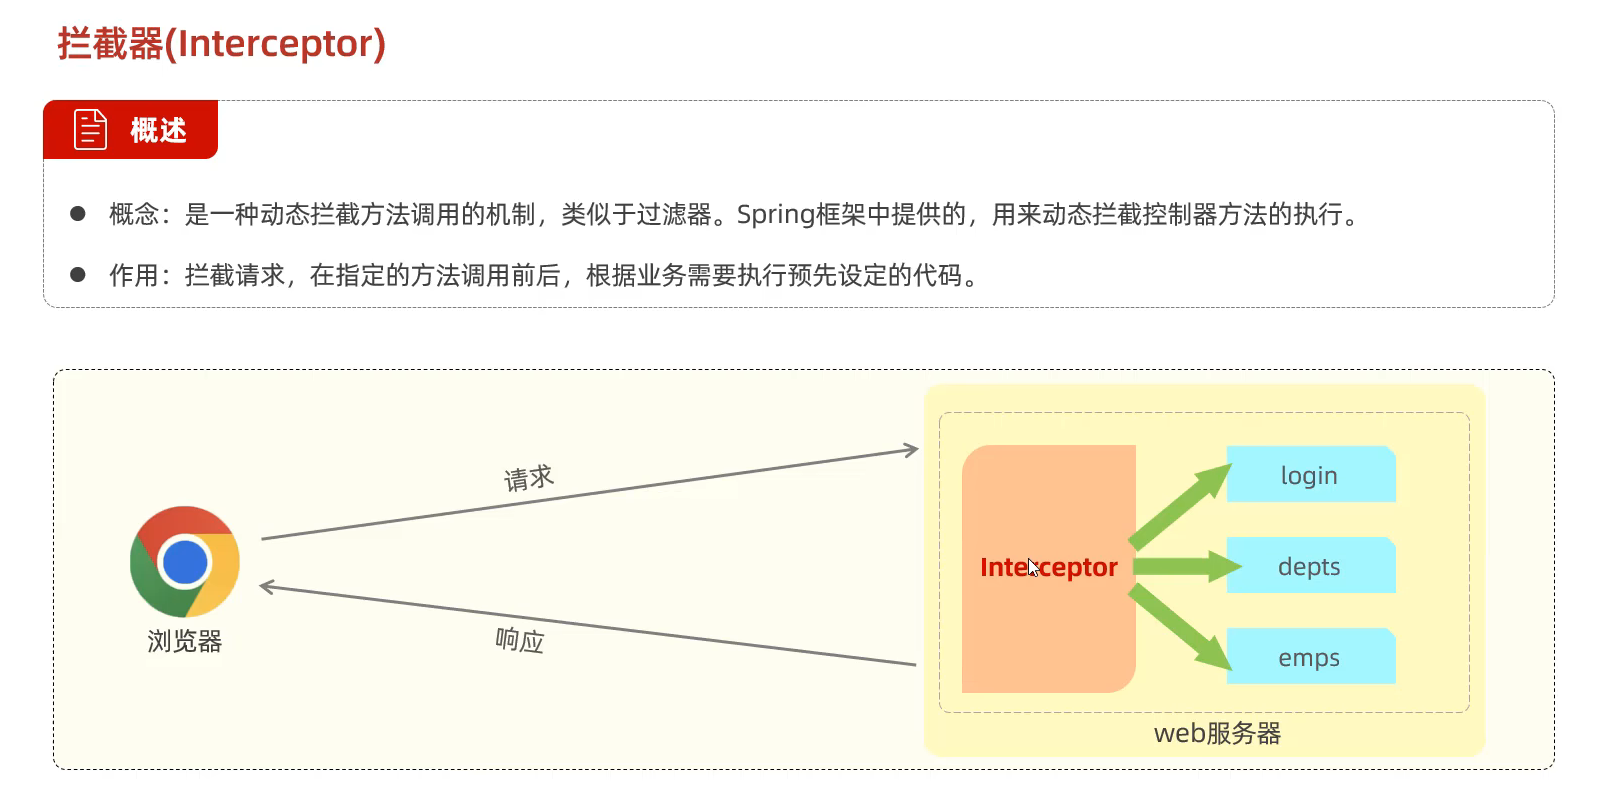
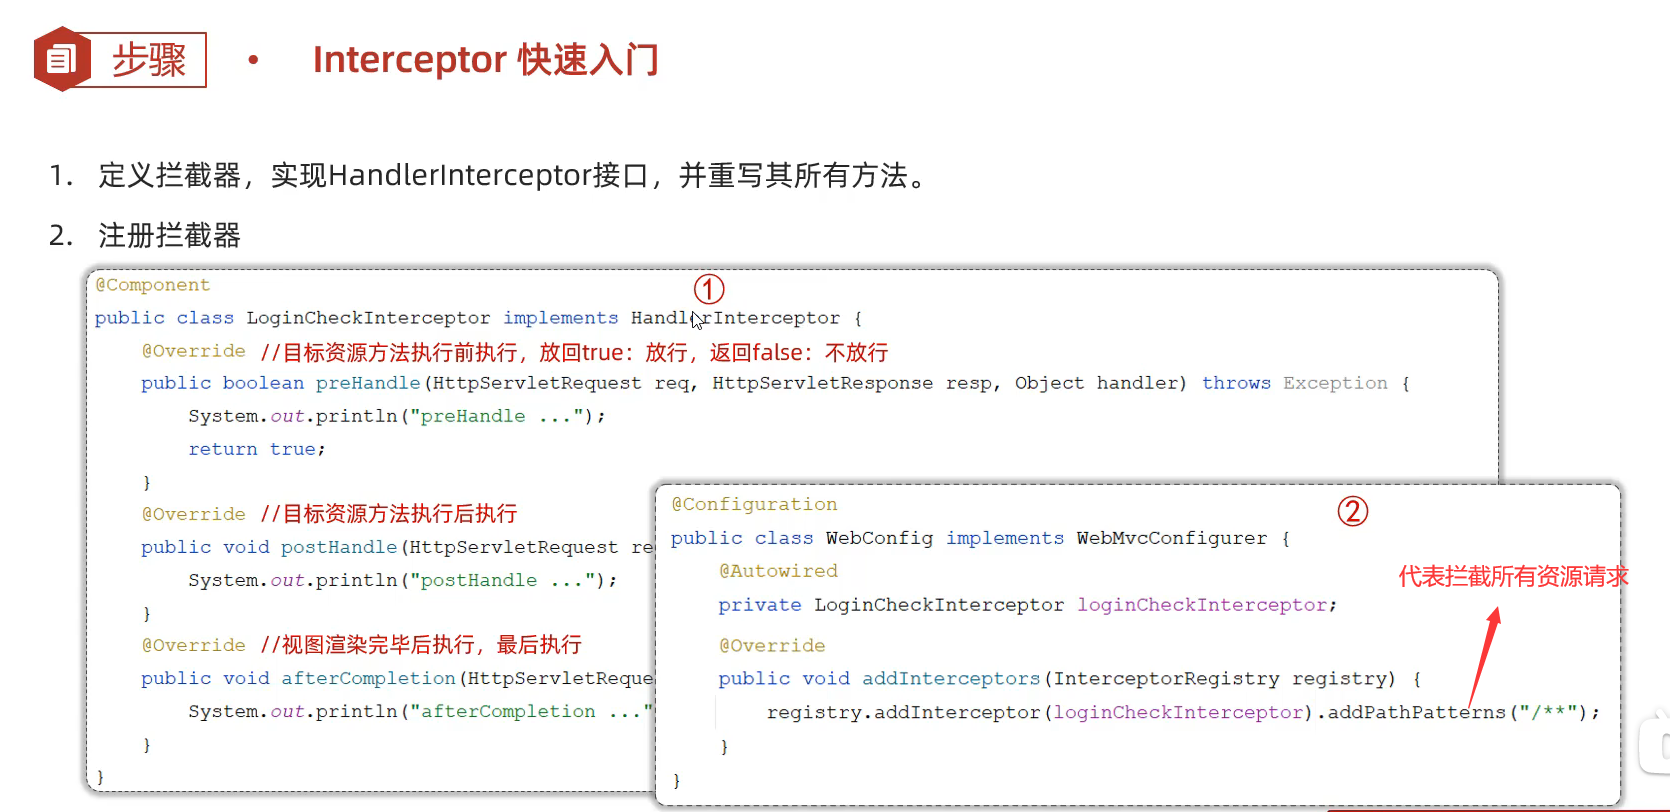
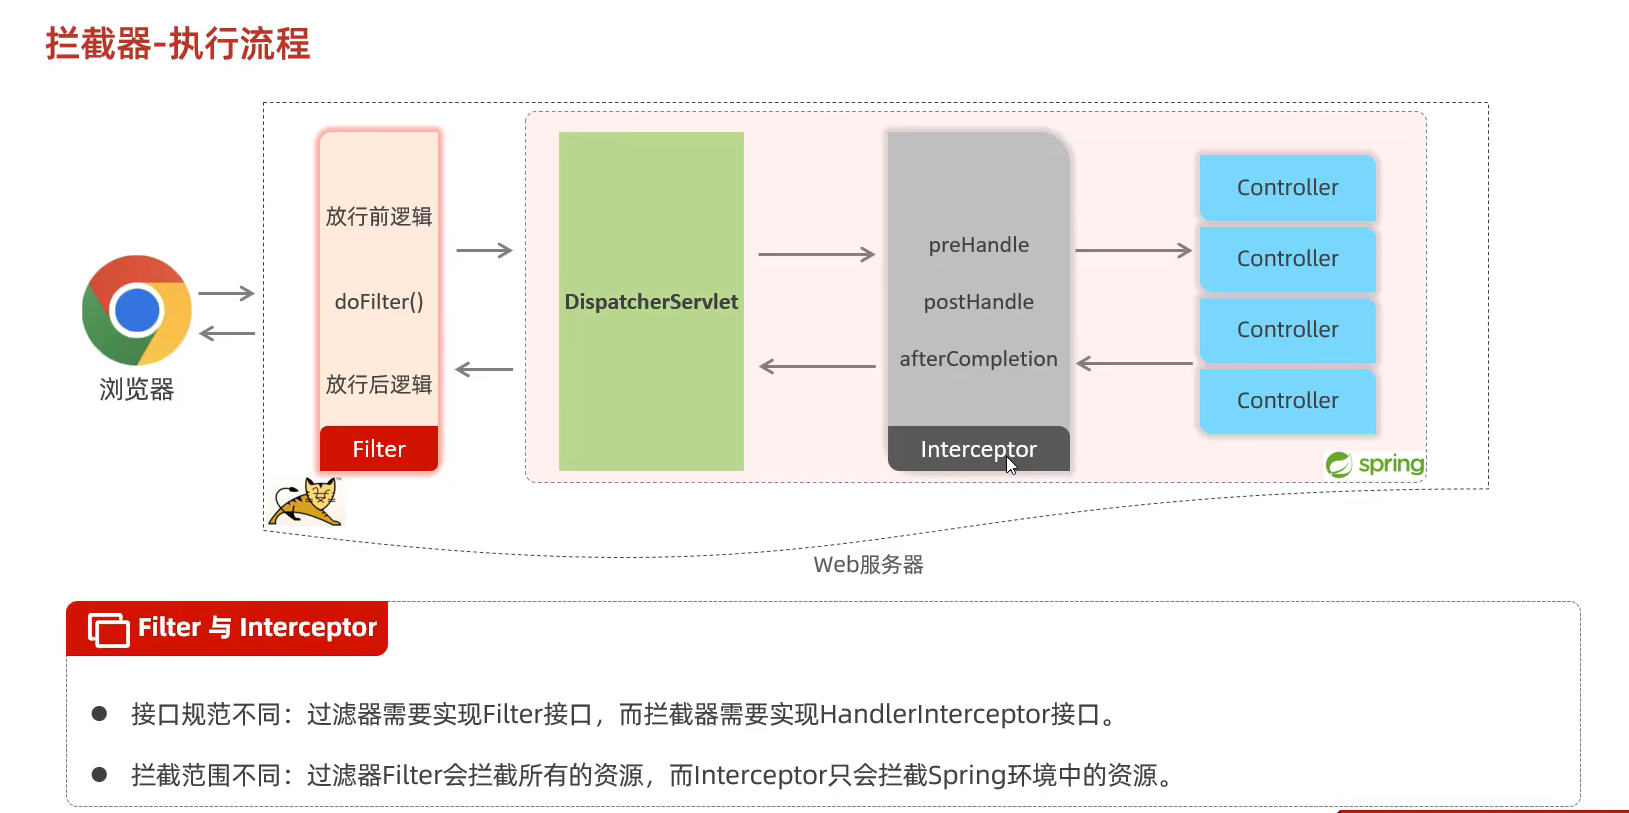
②拦截器Interceptor
拦截器的实现代码 1 2 3 4 5 6 7 8 9 10 11 12 13 14 15 16 17 18 19 20 21 22 23 24 25 26 27 28 29 30 31 package com.itheima.interceptor;import org.springframework.stereotype.Component;import org.springframework.web.servlet.HandlerInterceptor;import org.springframework.web.servlet.ModelAndView;import javax.servlet.http.HttpServletRequest;import javax.servlet.http.HttpServletResponse;@Component public class LoginCheckInterceptor implements HandlerInterceptor { @Override public boolean preHandle (HttpServletRequest request, HttpServletResponse response, Object handler) throws Exception { System.out.println("preHandle运行" ); return true ; } @Override public void postHandle (HttpServletRequest request, HttpServletResponse response, Object handler, ModelAndView modelAndView) throws Exception { System.out.println("postHandle运行" ); } @Override public void afterCompletion (HttpServletRequest request, HttpServletResponse response, Object handler, Exception ex) throws Exception { System.out.println("afterCompletion运行" ); } }
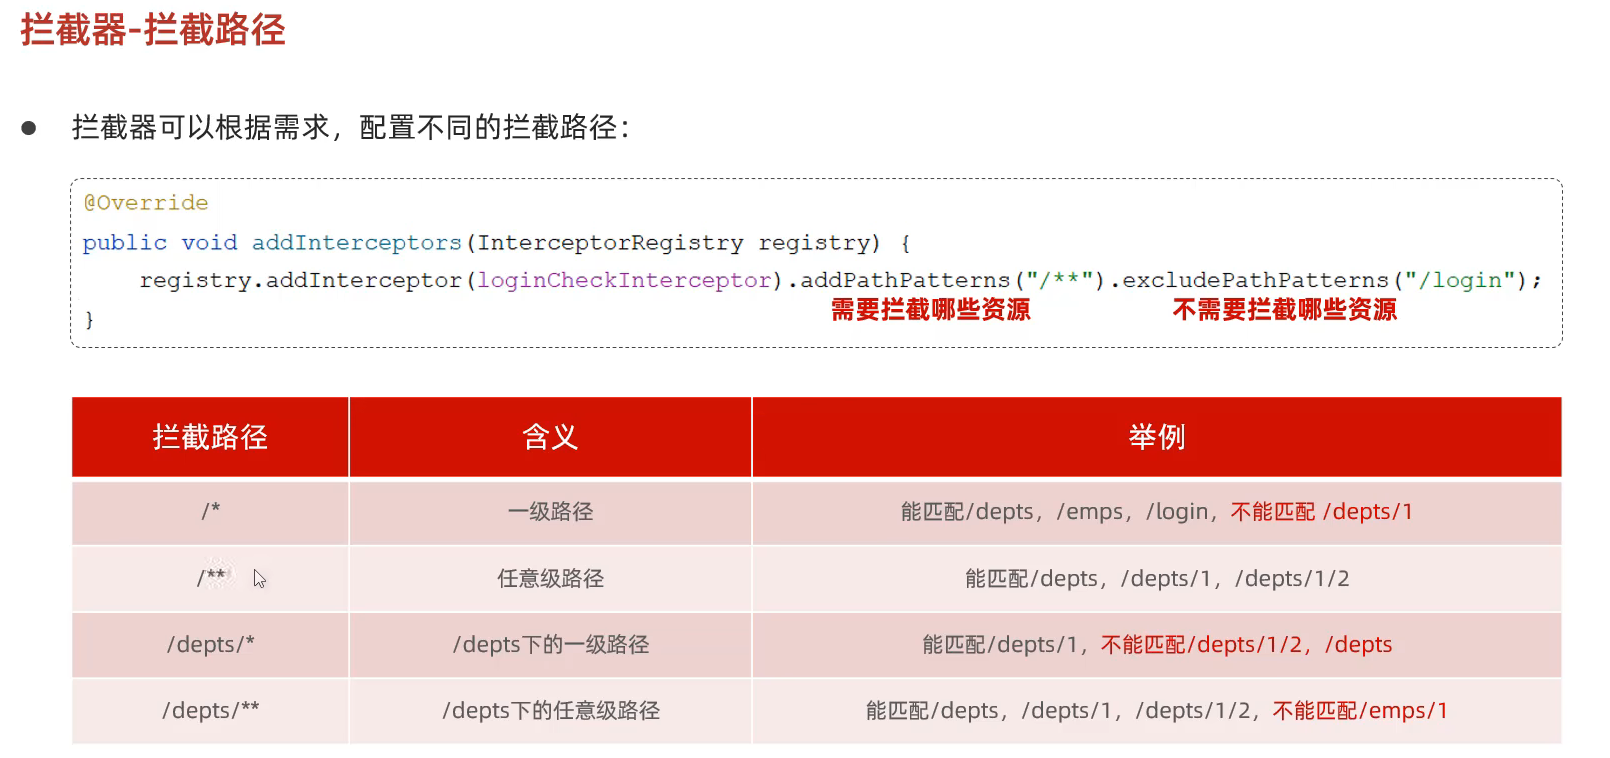
拦截器的注册代码 1 2 3 4 5 6 7 8 9 10 11 12 13 14 15 16 17 18 19 20 21 22 23 package com.itheima.config;import com.itheima.interceptor.LoginCheckInterceptor;import org.springframework.beans.factory.annotation.Autowired;import org.springframework.context.annotation.Configuration;import org.springframework.web.servlet.config.annotation.InterceptorRegistry;import org.springframework.web.servlet.config.annotation.WebMvcConfigurer;@Configuration public class WebConfig implements WebMvcConfigurer { @Autowired private LoginCheckInterceptor loginCheckInterceptor; @Override public void addInterceptors (InterceptorRegistry registry) { registry.addInterceptor(loginCheckInterceptor).addPathPatterns("/**" ); } }
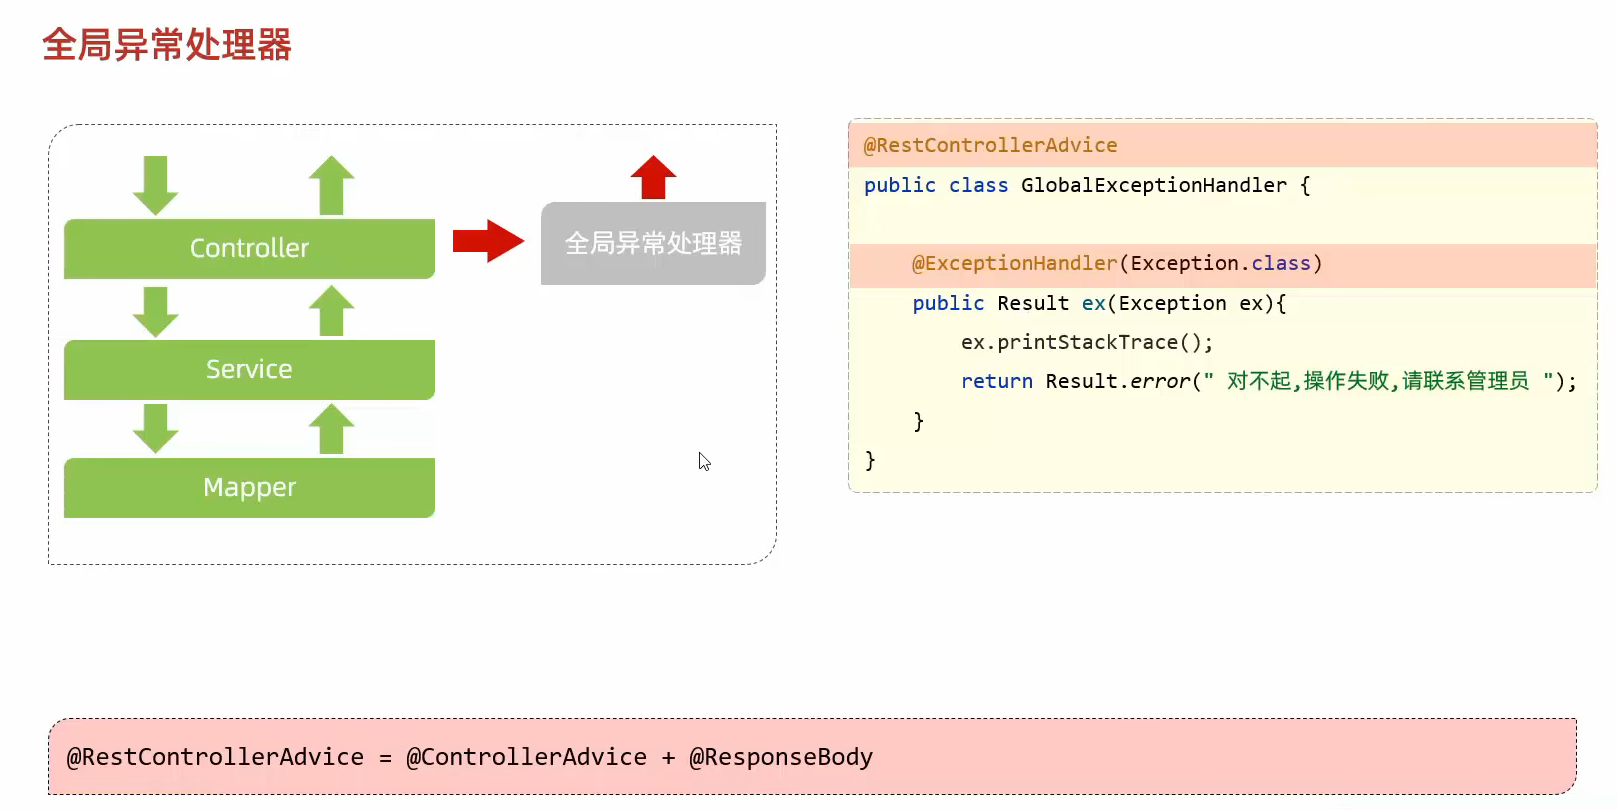
86.异常处理
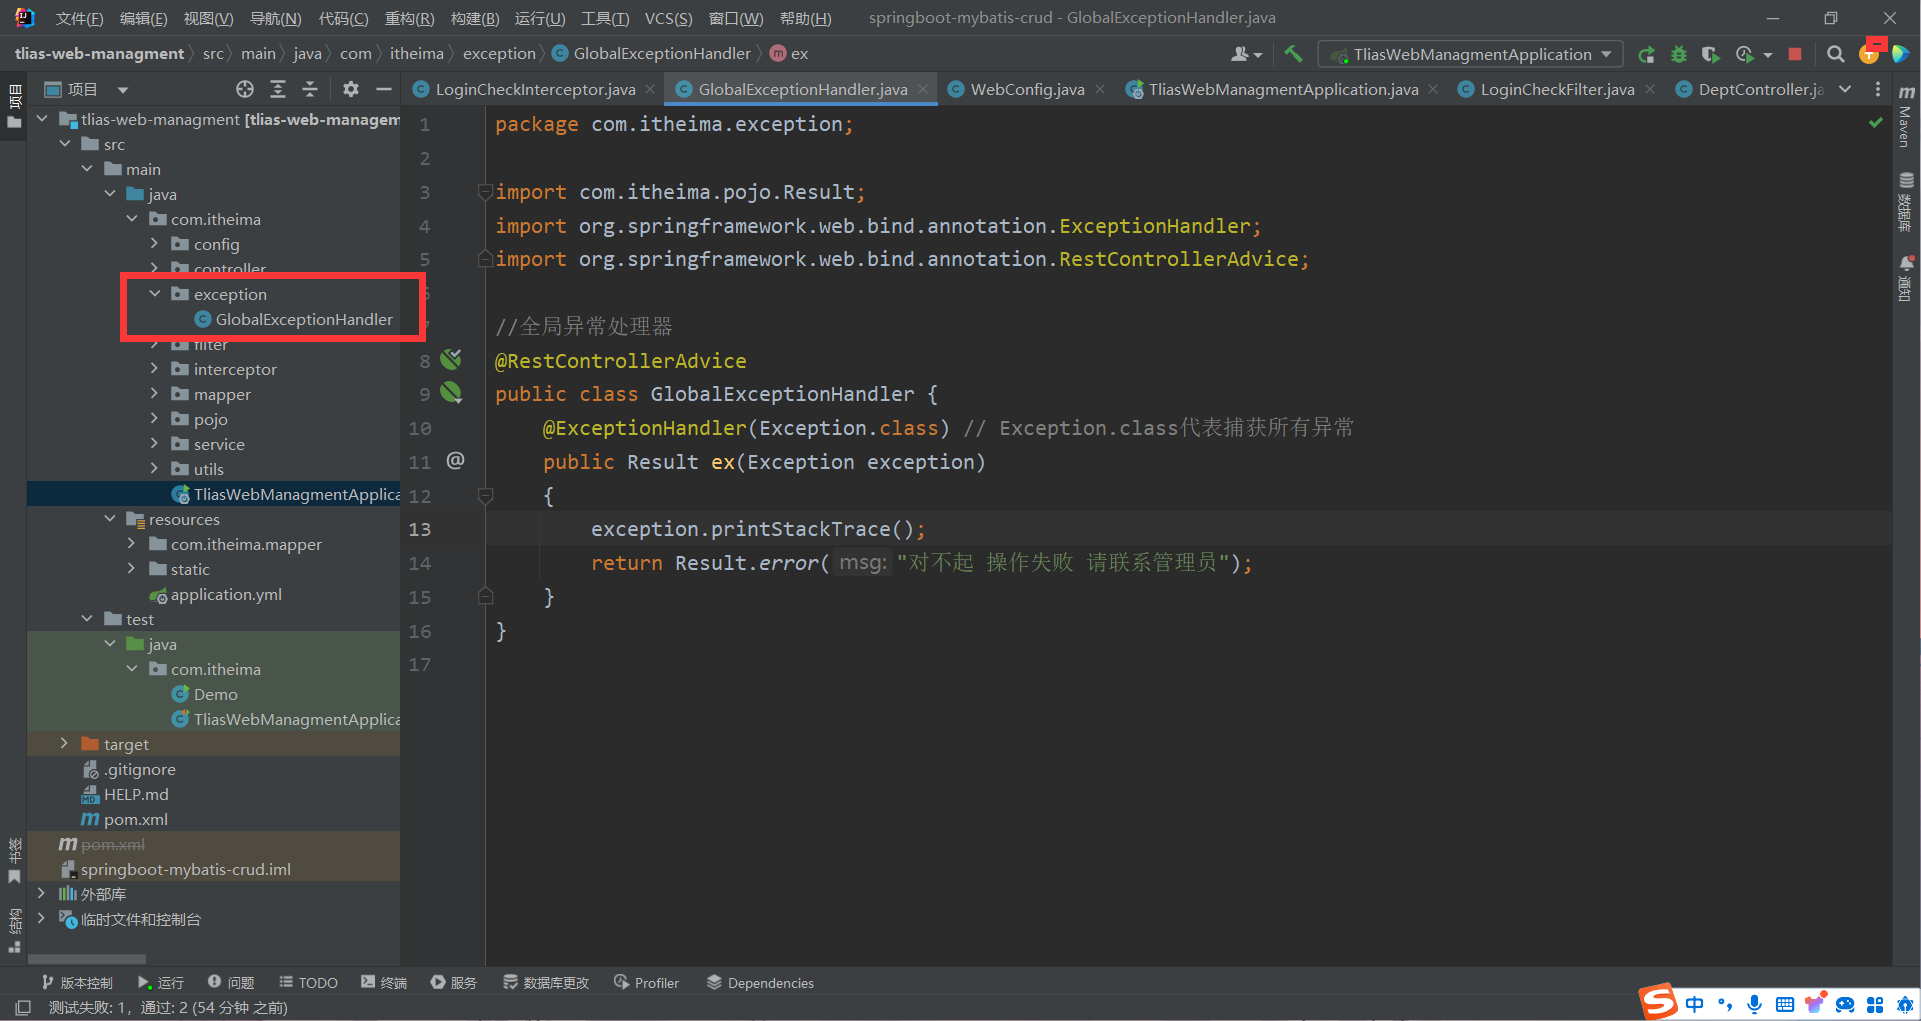
代码实现 1 2 3 4 5 6 7 8 9 10 11 12 13 14 15 16 17 package com.itheima.exception;import com.itheima.pojo.Result;import org.springframework.web.bind.annotation.ExceptionHandler;import org.springframework.web.bind.annotation.RestControllerAdvice;@RestControllerAdvice public class GlobalExceptionHandler { @ExceptionHandler(Exception.class) public Result ex (Exception exception) { exception.printStackTrace(); return Result.error("对不起 操作失败 请联系管理员" ); } }